Einleitung
Benutze diese Anleitung, um die Kopfhörerbuchse/ die Mikro USB Platine in deinem HTC One M8 zu ersetzen.
'''Das Gerät verfügt unter Umständen über eine große Anzahl an Kupferabschirmungen / Klebeband, das die Rückseite der Displayeinheit bedeckt, wie
hier zu sehen ist.
In diesem Fall, muss es behutsam entfernt werden, um an die Hauptplatine zu gelangen.'''
Was du brauchst
-
-
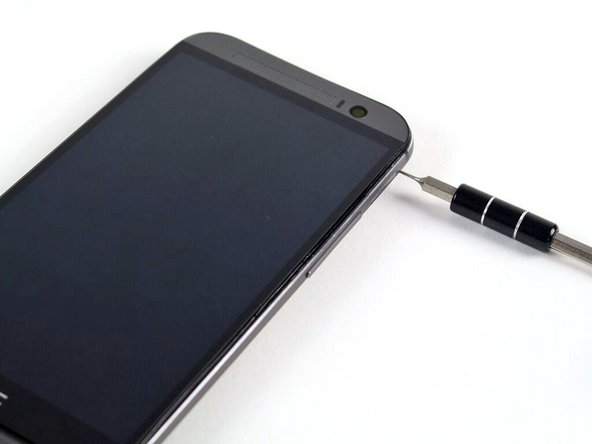
Stecke einen Auswurfstift für SIM-Karten oder eine aufgebogene Büroklammer in das kleine Loch an SIM-Karte Einschub, welches du links oben am Telefon findest.
-
Drücke damit hinein, damit der Einschub herauskommt.
-
-
-
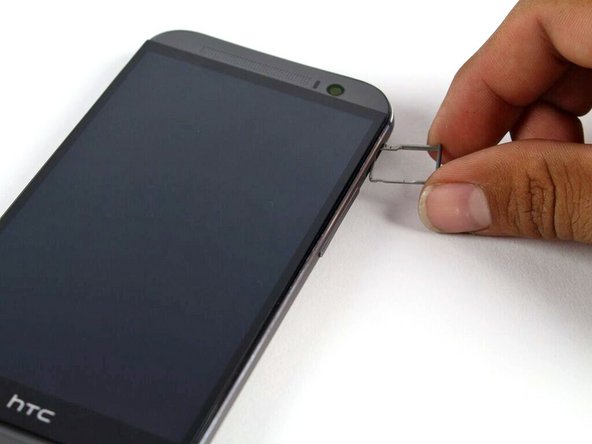
Entferne den Einschub aus dem HTC One M8.
Another easy step if you have the right tool
-
-
-
Stecke einen Auswurfstift für SIM-Karten oder eine aufgebogene Büroklammer in das kleine Loch am MicroSD-Karten Einschub, welches du rechts oben am Telefon findest.
-
Drücke damit hinein, damit der Einschub herauskommt.
-
-
-
Entferne den Einschub aus dem HTC One M8.
-
-
-
-
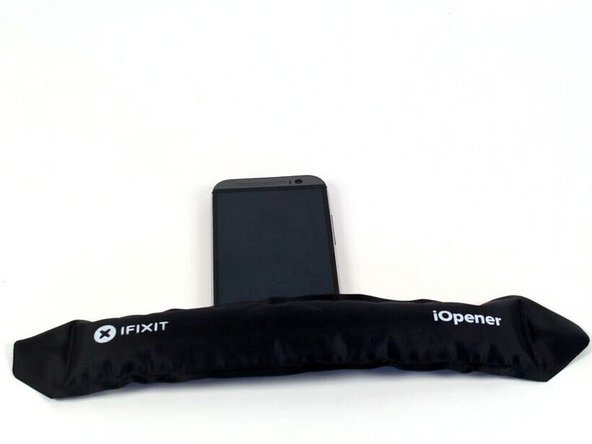
Benutze einen iOpener oder eine Heißluftpistole, um den Kleber an den oberen und unteren Lautsprecherabdeckungen aufzuweichen.
I used a heat gun settings 200 at 75, but I also found using a hair dryer works just as well. Heated up the bezels came right off and for putting back on I heated it back up and they have stayed put.
I used a hair dryer for this which worked fine but I didn't need to heat it for as long as I did. 10-20 seconds is enough to start. I didn't realise how hot it would get so after heating for 90 seconds on high heat the phone was absolutely roasting and I've got two spots of heat damage on my screen. Still all works though luckily.
Disassembly: I did NOT use any heating elements. I have a straight edge razor (like you use to scrape off window decals). Gently push in 1 point of the straight edge and work in the rest of it. Then use a spudger slowly to remove the grills.
Assembly: Enough adhesive should be left to reinstall the grill with no problem. Be careful align it perfectly then don’t be afraid to give a good push into place.
What are the speaker grilles?
-
-
-
Mit einem Plastiköffner kannst du vorsichtig die untere Lautsprecherabdeckung ablösen.
Disassembly: I did NOT use any heating elements. I have a straight edge razor (like you use to scrape off window decals). Gently push in 1 point of the straight edge and work in the rest of it. Then use a spudger slowly to remove the grills.
Assembly: Enough adhesive should be left to reinstall the grill with no problem. Be careful align it perfectly then don’t be afraid to give a good push into place.
-
-
-
Mit einem Plastiköffner kannst du vorsichtig die obere Lautsprecherabdeckung ablösen.
Be careful on these steps to not bend the grill while removing.
What is the strip of tape for under the grill? Mine has snapped off completely
-
-
-
Entferne die zwei oberen silbernen 3 mm PH00 Schrauben.
-
Entferne die vier unteren schwarzen 4 mm T5 Schrauben.
Nice good good
Do yourself a favor and get a proper set of small screwdrivers including smaller Torx bits T5-T10 (especially with magnetism)…you’ll thank me later. Getting the cheap kits from Amazon or included in the order will likely not work or strip easy.
Disassembly: be easy with the screws and don’t strip them. organize your workspace. i put the top screws next to my top speaker grill on the left of my workspace (and worked left to right…so that assembly was right to left) and bottom torx next to my bottom speaker grill.
Assembly: be easy with the screws and don’t strip them. you will definitely feel the stopping point and don’t add extra torque.
-
-
-
Um die Klammern zu lösen, die die Rückseite festhält musst du dich mit einem Spudger und einem Plastiköffner rings um das Telefon herum arbeiten.
Note: the pictures make it look like it's the glass the comes loose from the body. In fact, it's the metal shell the comes off, while all of the electronics are attached to the face. To get it started, you have to dig your spudger in between the metal shell and the little plastic rim that goes around the glass. I found it easiest to start in the middle, below the volume buttons.
I wish this was more clear in the picture. I ended up cracking my screen/digitiser trying to pry the glass open... the more you know!
NzUddin -
I tried starting by the volume buttons but was having no luck. I found starting just under the sim card worked best. Raising the whole side and the top up allowed the rest to come out. Be mindful of the charging port at the bottom and don't force the bottom out first but rather lift the top end out then the charger will clear. Same goes for putting back together. Charger port in first them push down on the sides and top.
Why do they design it to make it so difficult to replace the battery?
Disassembly: did not use any heating elements. used my straight edge razor near the top left side opposite the volume rocker (it should go in pretty far and worked until i heard the first clip pop. worked around the top and down the right side. as others mentioned, you’re getting the top loose then rocking out the unit to not screw up the charge port. DO NOT LOSE THE POWER BUTTON.
Assembly: hold the shell with charge port up and place the power button (this keeps it from falling out while assembling). put charge port in first then slowly work your way around the side little by little. I started hearing the clips pop into place maybe as I working around the perimeter on the 3rd try. after that, give it some good force as the unit should almost be flush with the shell.
After destroying the tip of three nylon spudgers, I would like to advocate using a METAL spudger, as shown in the picture. Just be careful to minimize scarring of the metal cover. But, the nylon spudger definitely is not strong enough to release the chassis, especially since these phones tend to be pretty old and set in their ways at this point in time. With a metal spudger, I was able to separate the back from the chassis in just a few minutes, after spending over 30 minutes failing with the nylon spudgers.
Not sure g enough for any of this work. Mine are nubs now. And left residue around the edges that I was trying to pry loose.
Please tell me, how to put in the Power Button. It’s not symetrical.
I would appreciate a picture of it in it’s housing or a discription.
I found that on my HTC M8 the power button needs to be a shade to the left. You can figure it out on your model by looking for the button by using a Sim Card eject tool and pressing on the power button which on my model was covered by black tape. You’ll feel the button click/press once you find it - you can then determine if the button is a shade to the left or right when you line it up with the housing with no power button. Place the phone temporarily into the shell and you’ll be able to determine the button placement, this is how I did it.
I too also used a metal spudger on the left side opposite the volume rocker, that seems like a good spot to start.
-
-
-
Entferne die zwei silbernen 2mm Kreuzschlitzschrauben #00, die den Akkuanschluss auf der Hauptplatine befestigen.
-
Mit einem Plastiköffnungswerkzeug kannst du nun behutsam den Akkuanschluss von der Hauptplatine lösen.
-
-
-
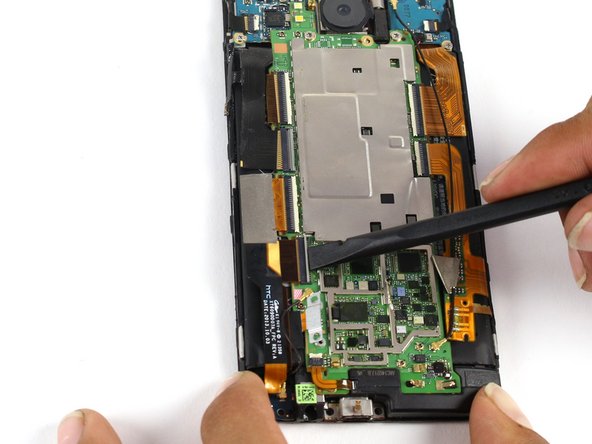
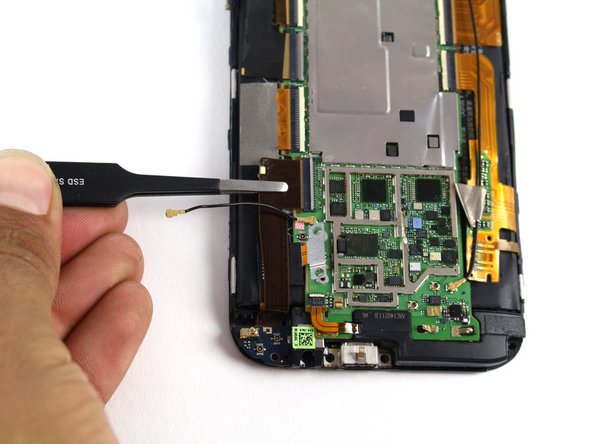
Nutze den Spudger, um die beiden ZIF Anschlüsse zu öffnen.
-
Mit der flachen Seite des Spudgers kannst du nun das schwarze Antennenkabel lösen.
-
Mit einer Pinzette kannst du jetzt die zwei Flachbandkabel aus den ZIF Anschlüssen entfernen.
Note that there are two hardware versions of the replacement part. One has one antenna connector, the other has two antenna connectors. The iFixit part labeled "Sprint" is the one-connector version. It is the most common. It may be labeled "16GB" on ebay and from other sellers. My 32GB T-Mo device required the "16GB" version of the hardware, so use caution when ordering. The iFixit part labeled "Verizon" is the two-connector version. You may see this one labaled "32GB" on ebay. My understanding is that the 2-connector part is for Verizon & AT&T Windows M8s, but I could be mistaken.
If you don't know which hardware you need, and you are ordering parts before cracking open your device, I would suggest (at least at 2017 ebay prices) ordering one of each and returning the one you don't need.
Be mindful of the small ZIF connector, as when you remove it, it will stick out from the back of the phone and can be easily damaged if you put the phone with its back on the table. Better put it flat again after you loosen the cable
As happened to me; the white part came loose, but I managed to put it back. However, it doesnt have as much r'resistance' as initially. Nevertheless my phone is still working, so probably the small ZIF is only to keep the cable in place. This kept me sweating for quite some time...
-
-
-
Entfernen die einzelne silberne 4mm T5 Torx Schraube, welche die Kopfhörer / Mikro USB Platine fixiert.
-
Mit einer Pinzette oder dem Plastiköffnungswerkzeug kannst du jetzt vorsichtig die Kopfhörerbuchse/ Mikro USB Platine aus den Smartphone entfernen.
There is a small rubber pad stuck to the inside end of the headphone jack. You can see it in the 3d picture that goes with this step, slightly offset to the right. Your new part will almost certainly not include this rubber pad. Stick it on the new headphone jack. This helps keep your M8 a little more water-resistant, as the pad is covering a small hole.
There is some adhesive sticking the board to the phone, you will need to reapply the heating pad to easily lift of the part.
There are also small surface mount components on the bottom side (opposite the USB connector) that can be broken if the board is pulled out without first lifting it up and away from the adhesive. I just successfully repaired the USB connector (solder joints on all pins were broken) and replaced a couple of the 0402 size resistors that broke off the USB board when removing it from the phone, and the phone is now charging again. Thanks for the step by step tear down - it helped save me from not destroying the M8 while opening it up!
-


Um dein Gerät wieder zusammenzubauen, folge den Schritten in umgekehrter Reihenfolge.
Um dein Gerät wieder zusammenzubauen, folge den Schritten in umgekehrter Reihenfolge.
Rückgängig: Ich habe diese Anleitung nicht absolviert.
71 weitere Nutzer:innen haben diese Anleitung absolviert.
Besonderer Dank geht an diese Übersetzer:innen:
100%


Diese Übersetzer:innen helfen uns, die Welt zu reparieren! Wie kann ich mithelfen?
Hier starten ›

Team

Cal Poly, Team 5-9, Maness Spring 2015 Mitglied von Cal Poly, Team 5-9, Maness Spring 2015
CPSU-MANESS-S15S5G9
4 Mitglieder
18 Anleitungen geschrieben
23 Kommentare
Worked for me - though looks like I will need to reopen as there is a problem with the wifi antenna & bluetooth connection is weak
where can i buy
i dont have one from sprint or horizon.. Which one do i buy?
Anybody want a new battery and charging port? Ok, only slightly used as the repair failed. When I got everything back together the LCD/backlight won't come on. I could charge the battery fine and you can feel the device responding to touch so the sensors in the display are working, but the screen will not light up what so ever. Now after a 3rd attempt to disassemble and reassemble searching in vane to find a lose connection there's a new problem, when I connect the battery lead to the terminals the phone vibrates. The only way to make the phone stop vibrating is to disconnect the battery. I can only assume this phone is now toast so it would be a shame to toss the 2 new parts...
How much? I'm having issues with the charging port not connecting to the micro used well
PM at spepperdine@hotmail.com and we'll work it out Jeremy
Hi,
I am having an issue where my phone will only charge if the cable is laying a certain direction. I have tried about 5 different chargers and the issue is the same. I had a phone repair shop replace the USB port and it did not help the issue. They tested 3 different USB assemblies to no avail. Can anyone think of another failure that would cause this issue?
I have the same issue however have noticed the micro usb charging port in the image has a small shield and earthing clip/spring on top.
I think this is what's broken on my phone, but I am having problems trying to get a replacement.
Does anyone know where I could get one or the whole assembly like the one in the picture.
Jeremy Richard did either of you ever find a solution to this
Alex -
Jeremy Richard did either of you find the solution to only charge when cable is at a particular angle
Alex -
Does any one know what the little cables that snap to the port and the mother board are called?
Excellent guide. My repair went perfectly. The only thing I can think to add is that when you're looking for a replacement, check your device to see if it's dual antenna or single. I wasn't sure but it turned out to be the dual model. It wasn't a big deal just a detail needed when buying replacement parts.
Very useful guide, I was able to take one USB board out of a junk phone and put it into my current phone with no problems.
The Ifixit fix paid for itself after this walk through and a play station repair. Saved me a lot of time and worry!
Can I ask how you stick the speaker grills back in place. Thanks
awesome step by step, I was able to fix my phone! Thank you so much!!
@sharon newick, probably you have already figured ito out, but in case your are not....
I did heat the glue again for about 90 seconds, then put the speaker grills again without using any extra glue, and just in case I did heat it again for 90 seconds and put some pressure on the grills again.
They have set pretty well, so I guess that it has worked fine.
Cheers,
Fede
I am trying to follow this guide to repair my HTC One M8 headphone jack, but I can't figure out which version of the phone I have.
CID is HTC_102 which, according to the sources I found is "HTC_GER" (OK so far, I have bought the phone directly from HTC Germany).
But which of the pictured replacement parts do I need?
Thanks for this guide, replacement went fine, though flashlight and gyroscope not working anymore. I guess haven't connected properly all the circuits. Do you know how to figure how this? In which area of phone the related components? Thanks
Thank you for this guide. I only have one wire connection on the new headphone Jack and charging port tho. Is there a work round or a different part number I should look for? The phone shows an orange indicator light when plugged in but will not power on.
Thanks,
C Nelson
Cnelson777@aol.com
Thanks! Saved myself having to buy another phone! These guides are indispensable!!
I just successfully completed the battery replacement on m8 using this guide…thought I would add a comment at each step to follow my story. This step of course should be easy if you’ve put the phone back together.
Ashley Keith (sc0rch3d) - Antwort
My HTC m8 doesn’t have a SIM card, and it might not have a micro SD card, since i can’t back anything up on it. Does not having the SIM card or the micro SD card matter in disassembly and reassembly?
Lewwy Ignovoir - Antwort