Zum Hauptinhalt wechseln

HTC Vive Camera Replacement

Archivierte Anleitung
Diese Anleitung wurde ausschließlich für historische Zwecke erhalten. Verwende die aktualisierte Version dieser Anleitung, um deine Reparatur durchzuführen.

Was du brauchst

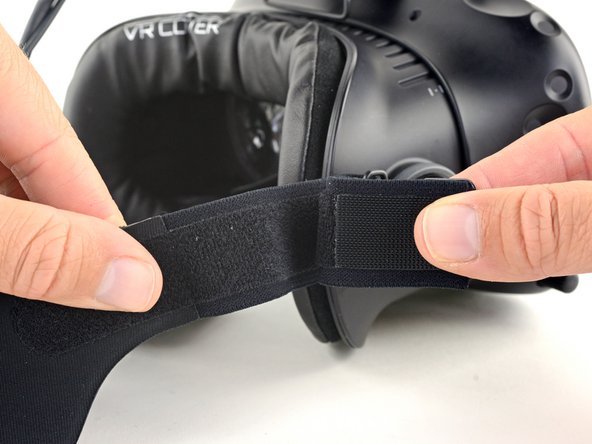
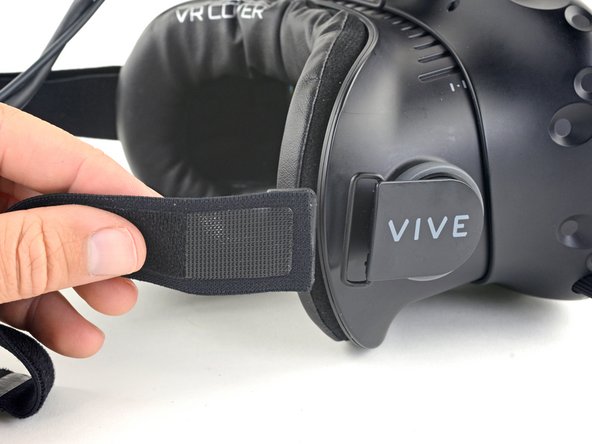
  1. HTC Vive Camera Replacement, Release the upper head strap: Schritt 1, Bild 1 von 2 HTC Vive Camera Replacement, Release the upper head strap: Schritt 1, Bild 2 von 2
    • Be sure to power down and disconnect your Vive before beginning.

    • Pull the hook-and-loop (Velcro) closure at the top of the head strap apart to release the top of the head strap.

  2. HTC Vive Camera Replacement, Remove the upper head strap: Schritt 2, Bild 1 von 2 HTC Vive Camera Replacement, Remove the upper head strap: Schritt 2, Bild 2 von 2
    • Slide the top part of the head strap through its metal loop on the headset to remove it.

  3. HTC Vive Camera Replacement, Remove the right side of the head strap: Schritt 3, Bild 1 von 3 HTC Vive Camera Replacement, Remove the right side of the head strap: Schritt 3, Bild 2 von 3 HTC Vive Camera Replacement, Remove the right side of the head strap: Schritt 3, Bild 3 von 3
    • Pull the hook-and-loop closure at the right side of the head strap apart to release the right side of the head strap.

    • Slide the right side of the head strap through its metal loop to remove it.

  4. HTC Vive Camera Replacement, Remove the left side of the head strap: Schritt 4, Bild 1 von 3 HTC Vive Camera Replacement, Remove the left side of the head strap: Schritt 4, Bild 2 von 3 HTC Vive Camera Replacement, Remove the left side of the head strap: Schritt 4, Bild 3 von 3
    • Pull the hook-and-loop closure at the left side of the head strap apart to release the left side of the head strap.

    • Slide the left side of the head strap through its metal loop to remove it.

  5. HTC Vive Camera Replacement, Remove the head strap: Schritt 5, Bild 1 von 3 HTC Vive Camera Replacement, Remove the head strap: Schritt 5, Bild 2 von 3 HTC Vive Camera Replacement, Remove the head strap: Schritt 5, Bild 3 von 3
    • Slide the head strap along the cable, away from the Vive.

    • When the head strap comes to the end of the cable, gently slide it over the plugs and remove it.

  6. HTC Vive Camera Replacement, Unscrew the head strap mounts: Schritt 6, Bild 1 von 2 HTC Vive Camera Replacement, Unscrew the head strap mounts: Schritt 6, Bild 2 von 2
    • Be sure to power down and disconnect your Vive before beginning.

    • Use a T5 Torx driver to remove the two 12 mm-long screws securing the head strap mounts on either side of the headset.

    • For some devices, a T6 Torx driver may work better.

    • The mounts may fall off when the screws are removed, so be careful not to lose any parts.

    Helaas blijkt de T5 Torx schroevendraaier aan de schroeven van de bevestigingsbeugels geen grip te krijgen. Wat dan gedaan?

    Immanuel Van Meirhaeghe - Antwort

    It was a T6 that fit perfectly in mine, T5 didn't cut it. Maybe it's a revision thing? Mine was an early model from 2016.
    Edit: Edited guide to say T6.

    Tim T - Antwort

  7. HTC Vive Camera Replacement, Remove the head strap mounts: Schritt 7, Bild 1 von 3 HTC Vive Camera Replacement, Remove the head strap mounts: Schritt 7, Bild 2 von 3 HTC Vive Camera Replacement, Remove the head strap mounts: Schritt 7, Bild 3 von 3
    • Remove both head strap mounts.

  8. HTC Vive Camera Replacement, Remove the facerest: Schritt 8, Bild 1 von 2 HTC Vive Camera Replacement, Remove the facerest: Schritt 8, Bild 2 von 2
    • Slide the facerest straight away from the headset to remove it.

  9. HTC Vive Camera Replacement, Unscrew the outer shell: Schritt 9, Bild 1 von 3 HTC Vive Camera Replacement, Unscrew the outer shell: Schritt 9, Bild 2 von 3 HTC Vive Camera Replacement, Unscrew the outer shell: Schritt 9, Bild 3 von 3
    • Use tweezers to remove the small stickers over the four screws securing the outer shell.

    • Use a T5 Torx driver to remove the four 3.4 mm-long screws securing the outer shell.

    PSA: There are four screws you need to remove that are covered with small black stickers (two on top, two on bottom)

    Oscar Kosar-Kosarewicz - Antwort

    Holy cow. Thank you for adding this comment Oscar. I was just about to break it.

    PC McGee -

    These screws are T6.

    Eric Tong - Antwort

  10. HTC Vive Camera Replacement, Remove the outer shell: Schritt 10, Bild 1 von 2 HTC Vive Camera Replacement, Remove the outer shell: Schritt 10, Bild 2 von 2
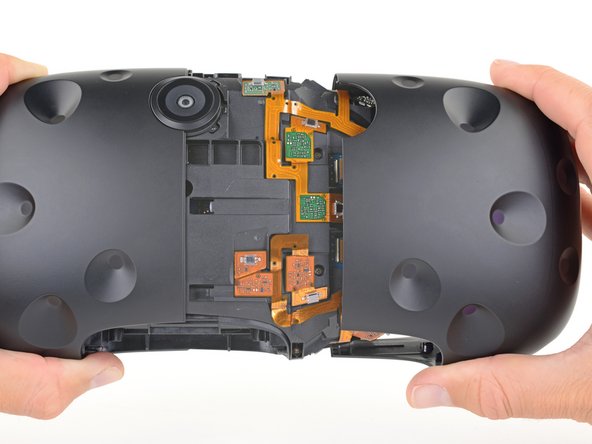
    • Use the flat end of a spudger to pry up the top edge of the right half of the outer shell, behind the component cover and near the seam in the center, until it is unclipped from the headset.

  11. HTC Vive Camera Replacement: Schritt 11, Bild 1 von 2 HTC Vive Camera Replacement: Schritt 11, Bild 2 von 2
    • Grasp the right half the outer shell and pull it to the right and toward the front of the headset until you feel the clips on the front of the cover release.

    • If the shell is difficult to remove, try prying along the seam with the flat end of a spudger to release the clips.

  12. HTC Vive Camera Replacement: Schritt 12, Bild 1 von 2 HTC Vive Camera Replacement: Schritt 12, Bild 2 von 2
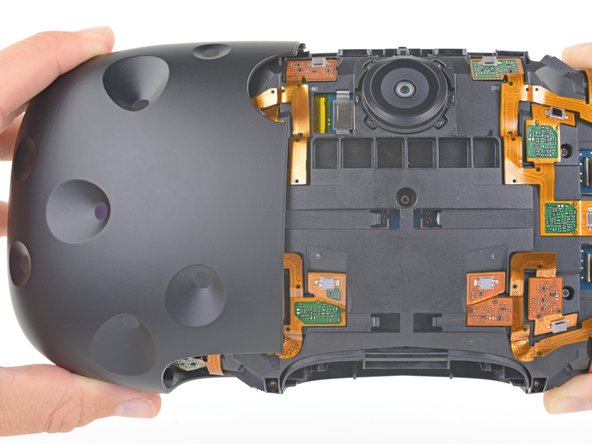
    • Slide the right side of the outer shell to the right and off of the headset.

  13. HTC Vive Camera Replacement: Schritt 13, Bild 1 von 2 HTC Vive Camera Replacement: Schritt 13, Bild 2 von 2
    • Repeat the last three steps for the left side of the outer shell and remove it.

  14. HTC Vive Camera Replacement, Disconnect the sensor array cables: Schritt 14, Bild 1 von 3 HTC Vive Camera Replacement, Disconnect the sensor array cables: Schritt 14, Bild 2 von 3 HTC Vive Camera Replacement, Disconnect the sensor array cables: Schritt 14, Bild 3 von 3
    • Use tweezers to remove the clear tape over all four of the sensor array cable connectors.

    During this step, there should be a picture of the flip side showing 4 more Philips screws hidden deep inside the headset. Removing those additional 4 screws is critical to getting the headset opened and continuing to the next step.

    Jeff - Antwort

  15. HTC Vive Camera Replacement: Schritt 15, Bild 1 von 3 HTC Vive Camera Replacement: Schritt 15, Bild 2 von 3 HTC Vive Camera Replacement: Schritt 15, Bild 3 von 3
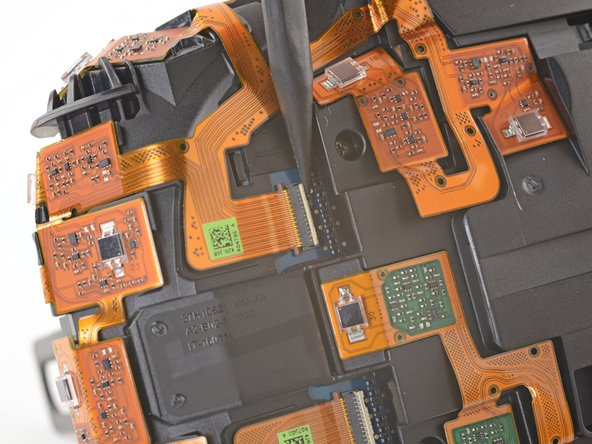
    • Use the pointed end of a spudger to flip up the small locking flap on one of the sensor array ZIF connectors.

    • Slide the cable straight out of its socket on the motherboard.

    This guide is grossly incomplete. Do NOT try to pull up the sensor array after taking these five screws off. There are 8 more screws that have to be removed, as well as 2 tabs that need to be pushed before the sensor array comes off.

    -Two screws on the bottom (by the camera) to each side. There are four screws here, but only the outermost two need to be taken off. See the two sensors on the bottom? The screws under the outside corner of each sensor are the ones you remove.

    -Two screws on the top, to the right and left of the cable opening.

    -Four screws on the back, to the left and right of the lenses. Turn the Vive around, the screws are deep inside four holes.

    -Finally, two tabs on the bottom by the camera. If you look closely you will see them!

    Dan OST - Antwort

  16. HTC Vive Camera Replacement: Schritt 16, Bild 1 von 3 HTC Vive Camera Replacement: Schritt 16, Bild 2 von 3 HTC Vive Camera Replacement: Schritt 16, Bild 3 von 3
    • Repeat the previous step for the remaining three sensor array cables to disconnect the remaining cables.

    Sure, but how do you get a replacement array?

    TheGreatYogurt - Antwort

    It starts with “lift the sensor array" but how am I supposed to do that? Its not just lifting off after unscrewing & disconnecting. What am I missing here?

    Daniel Connelly - Antwort

  17. HTC Vive Camera Replacement: Schritt 17, Bild 1 von 2 HTC Vive Camera Replacement: Schritt 17, Bild 2 von 2
    • Use tweezers or a spudger to pry up the camera cable cover and remove it.

  18. HTC Vive Camera Replacement: Schritt 18, Bild 1 von 2 HTC Vive Camera Replacement: Schritt 18, Bild 2 von 2
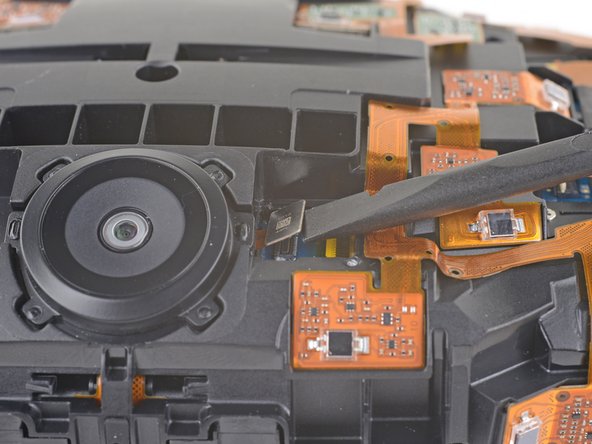
    • Use the flat end of a spudger to pry the camera cable connector straight up from its socket on the motherboard.

  19. HTC Vive Camera Replacement, Unscrew the sensor array: Schritt 19, Bild 1 von 1
    • Use a PH000 driver to remove the five 3.9 mm screws securing the sensor array.

  20. HTC Vive Camera Replacement: Schritt 20, Bild 1 von 1
    • Use a PH000 driver to remove the four 3.9 mm screws securing the sensor array.

    On my 2016 headset, I had to remove two additional Phillips screws at the top (appear in picture) and two more at the bottom (which are not present in the headset pictured here, must be a different revision) before the sensor array comes off.

    Tim T - Antwort

  21. HTC Vive Camera Replacement: Schritt 21, Bild 1 von 2 HTC Vive Camera Replacement: Schritt 21, Bild 2 von 2
    In diesem Schritt verwendetes Werkzeug:
    Phillips #000 Screwdriver
    $5.49
    Kaufen
    • Use a PH000 driver to remove the four 3.9 mm screws securing the sensor array.

    • You'll need a narrow, long-shaft driver to reach these screws.

  22. HTC Vive Camera Replacement, Remove the sensor array: Schritt 22, Bild 1 von 2 HTC Vive Camera Replacement, Remove the sensor array: Schritt 22, Bild 2 von 2
    • Lift the sensor array away from the headset to remove it.

  23. HTC Vive Camera Replacement, Camera: Schritt 23, Bild 1 von 2 HTC Vive Camera Replacement, Camera: Schritt 23, Bild 2 von 2
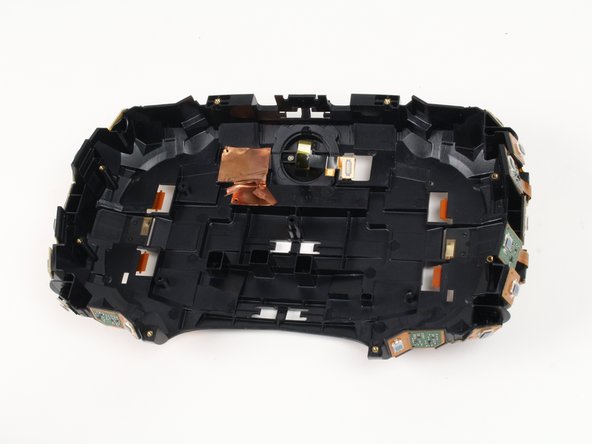
    • Flip the sensor array over 180 degrees.

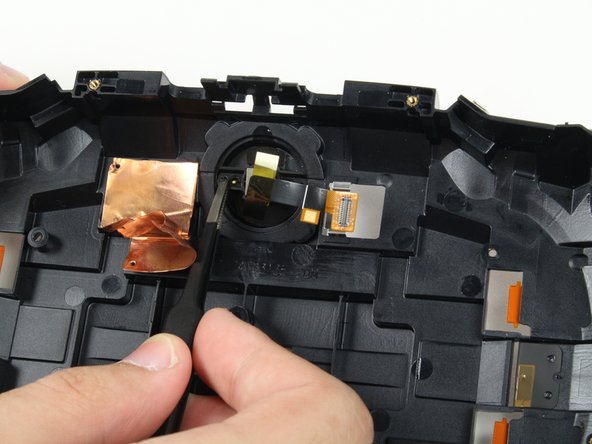
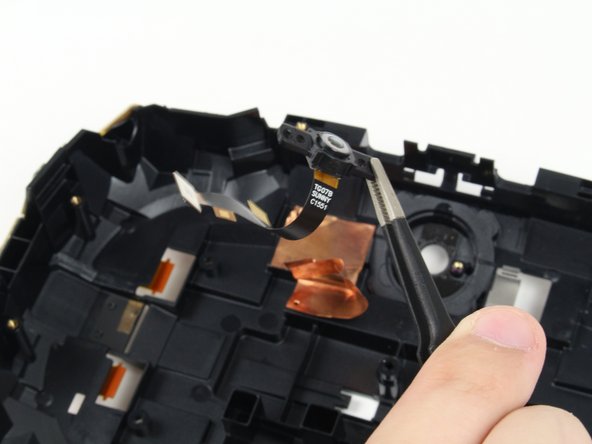
    • Using tweezers, move the copper tape covering the camera to the side so you can see the screws holding the camera.

  24. HTC Vive Camera Replacement: Schritt 24, Bild 1 von 3 HTC Vive Camera Replacement: Schritt 24, Bild 2 von 3 HTC Vive Camera Replacement: Schritt 24, Bild 3 von 3
    • Remove the two 2mm #00 Philips screws securing the camera.

    • Use tweezers to pull the now freed camera from its slot.

Abschluss

To reassemble your device, follow these instructions in reverse order.

Caleb Watts

Mitglied seit: 09/25/17

2.427 Reputation

11 Anleitungen geschrieben

Team

Cal Poly, Team S18-G1, Forte Fall 2017 Mitglied von Cal Poly, Team S18-G1, Forte Fall 2017

CPSU-FORTE-F17S18G1

5 Mitglieder

11 Anleitungen geschrieben

Ein Kommentar

Do you know where I can buy a replacement camera? Mine seems to be dead.

Andrew Goetz - Antwort

Kommentar hinzufügen

Seitenaufrufe:

Letzte 24 Stunden: 0

Letzte 7 Tage: 0

Letzte 30 Tage: 0

Insgesamt: 688