Zum Hauptinhalt wechseln

Honda CR-V Touring 2016 Cabin Air Filter Replacement

Was du brauchst

  1. Honda CR-V Touring 2016 Cabin Air Filter Replacement, Cabin Air Filter: Schritt 1, Bild 1 von 3 Honda CR-V Touring 2016 Cabin Air Filter Replacement, Cabin Air Filter: Schritt 1, Bild 2 von 3 Honda CR-V Touring 2016 Cabin Air Filter Replacement, Cabin Air Filter: Schritt 1, Bild 3 von 3
    • Ensure that your 2016 Honda CR-V Touring Edition is off.

    • Open the glovebox and remove all of its contents.

  2. Honda CR-V Touring 2016 Cabin Air Filter Replacement: Schritt 2, Bild 1 von 3 Honda CR-V Touring 2016 Cabin Air Filter Replacement: Schritt 2, Bild 2 von 3 Honda CR-V Touring 2016 Cabin Air Filter Replacement: Schritt 2, Bild 3 von 3
    • Unfasten the hinge on the right side of your glovebox so the hook-part of the hinge is free and clear.

    • You may have to close the glovebox slightly, then open it fully while holding the hook to clear it.

  3. Honda CR-V Touring 2016 Cabin Air Filter Replacement: Schritt 3, Bild 1 von 2 Honda CR-V Touring 2016 Cabin Air Filter Replacement: Schritt 3, Bild 2 von 2
    • Push both sides of the glovebox together while lowering until the glovebox hangs at its lowest point.

    • This should allow access to the interior and give a clear line of sight to the cabin air filter holder.

  4. Honda CR-V Touring 2016 Cabin Air Filter Replacement: Schritt 4, Bild 1 von 3 Honda CR-V Touring 2016 Cabin Air Filter Replacement: Schritt 4, Bild 2 von 3 Honda CR-V Touring 2016 Cabin Air Filter Replacement: Schritt 4, Bild 3 von 3
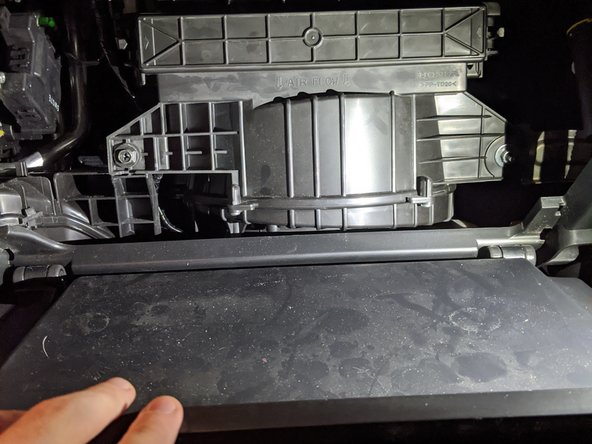
    • Grasp both clasps on either side of the rectangular cabin air filter protective cover and pull to release the cover.

    • You should see a white filter.

  5. Honda CR-V Touring 2016 Cabin Air Filter Replacement: Schritt 5, Bild 1 von 2 Honda CR-V Touring 2016 Cabin Air Filter Replacement: Schritt 5, Bild 2 von 2
    • Pull the filter straight out until it is free and clear.

    • Be sure not to shake it to prevent any excess dust from falling.

  6. Honda CR-V Touring 2016 Cabin Air Filter Replacement: Schritt 6, Bild 1 von 3 Honda CR-V Touring 2016 Cabin Air Filter Replacement: Schritt 6, Bild 2 von 3 Honda CR-V Touring 2016 Cabin Air Filter Replacement: Schritt 6, Bild 3 von 3
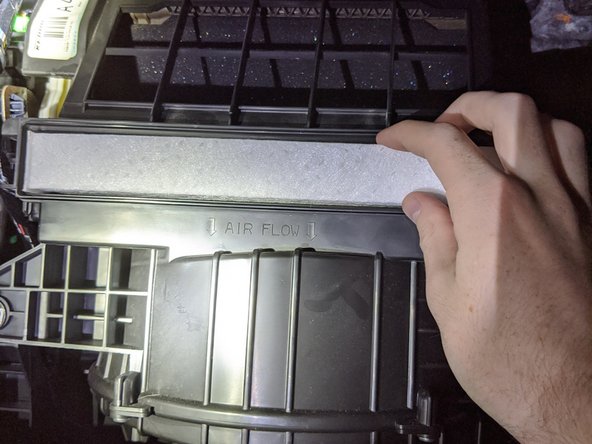
    • Insert the new filter, taking care to orient the filter in the correct direction for airflow.

    • It will be marked with arrows both on the filter and below the location for the filter.

  7. Honda CR-V Touring 2016 Cabin Air Filter Replacement: Schritt 7, Bild 1 von 2 Honda CR-V Touring 2016 Cabin Air Filter Replacement: Schritt 7, Bild 2 von 2
    • Place the cabin air filter protective cover over top of the filter until you hear audible clicks from the clasps engaging.

  8. Honda CR-V Touring 2016 Cabin Air Filter Replacement: Schritt 8, Bild 1 von 2 Honda CR-V Touring 2016 Cabin Air Filter Replacement: Schritt 8, Bild 2 von 2
    • Push the glovebox up until you feel a detent where it is self supported but is not fully in the up-position.

  9. Honda CR-V Touring 2016 Cabin Air Filter Replacement: Schritt 9, Bild 1 von 2 Honda CR-V Touring 2016 Cabin Air Filter Replacement: Schritt 9, Bild 2 von 2
    • Re-clip the hook on the right side of the glovebox until it is fully engaged.

  10. Honda CR-V Touring 2016 Cabin Air Filter Replacement: Schritt 10, Bild 1 von 2 Honda CR-V Touring 2016 Cabin Air Filter Replacement: Schritt 10, Bild 2 von 2
    • Close the glovebox and you're all set!

Abschluss

To reassemble your device, follow these instructions in reverse order.

2 weitere Nutzer:innen haben diese Anleitung absolviert.

0 Kommentare

Kommentar hinzufügen

Seitenaufrufe:

Letzte 24 Stunden: 1

Letzte 7 Tage: 10

Letzte 30 Tage: 38

Insgesamt: 1,587