Zum Hauptinhalt wechseln

Honda Light Duty Tiller F220K1AT715492 Clutch Cable Replacement

Was du brauchst

  1. Honda Light Duty Tiller F220K1AT715492 Clutch Cable Replacement, Disconnect the spark plug: Schritt 1, Bild 1 von 2 Honda Light Duty Tiller F220K1AT715492 Clutch Cable Replacement, Disconnect the spark plug: Schritt 1, Bild 2 von 2
    • Before you begin, make sure the engine is switched off and cool to the touch.

    • Pull the spark plug connector straight off of the spark plug.

  2. Honda Light Duty Tiller F220K1AT715492 Clutch Cable Replacement, Remove the air filter: Schritt 2, Bild 1 von 2 Honda Light Duty Tiller F220K1AT715492 Clutch Cable Replacement, Remove the air filter: Schritt 2, Bild 2 von 2
    • Push down on the two tabs at the top of the air filter cover.

    • With the two tabs depressed, swing the top of the cover down.

    • Remove the cover.

  3. Honda Light Duty Tiller F220K1AT715492 Clutch Cable Replacement: Schritt 3, Bild 1 von 1
    • Pull the air filter out of the housing and remove it.

  4. Honda Light Duty Tiller F220K1AT715492 Clutch Cable Replacement, Unscrew the air cleaner housing: Schritt 4, Bild 1 von 1
    • Use an 8 mm socket to remove the following fasteners securing the air cleaner housing:

    • Two silver nuts

    • One black bolt

  5. Honda Light Duty Tiller F220K1AT715492 Clutch Cable Replacement, Disconnect the breather tubes: Schritt 5, Bild 1 von 2 Honda Light Duty Tiller F220K1AT715492 Clutch Cable Replacement, Disconnect the breather tubes: Schritt 5, Bild 2 von 2
    • Slide the pink breather tube out of its clip on the back of the air cleaner housing.

  6. Honda Light Duty Tiller F220K1AT715492 Clutch Cable Replacement: Schritt 6, Bild 1 von 3 Honda Light Duty Tiller F220K1AT715492 Clutch Cable Replacement: Schritt 6, Bild 2 von 3 Honda Light Duty Tiller F220K1AT715492 Clutch Cable Replacement: Schritt 6, Bild 3 von 3
    • Use a flathead screwdriver to gently pry the black breather tube off of its connector on the back of the air cleaner housing.

  7. Honda Light Duty Tiller F220K1AT715492 Clutch Cable Replacement, Remove the air cleaner housing: Schritt 7, Bild 1 von 3 Honda Light Duty Tiller F220K1AT715492 Clutch Cable Replacement, Remove the air cleaner housing: Schritt 7, Bild 2 von 3 Honda Light Duty Tiller F220K1AT715492 Clutch Cable Replacement, Remove the air cleaner housing: Schritt 7, Bild 3 von 3
    • Hold the black carburetor hose in place and rotate the air cleaner housing clockwise until you can slide the hose out of its slot on the air cleaner housing.

    • Remove the air cleaner housing.

  8. Honda Light Duty Tiller F220K1AT715492 Clutch Cable Replacement, Loosen the clutch cable barrel adjuster: Schritt 8, Bild 1 von 1
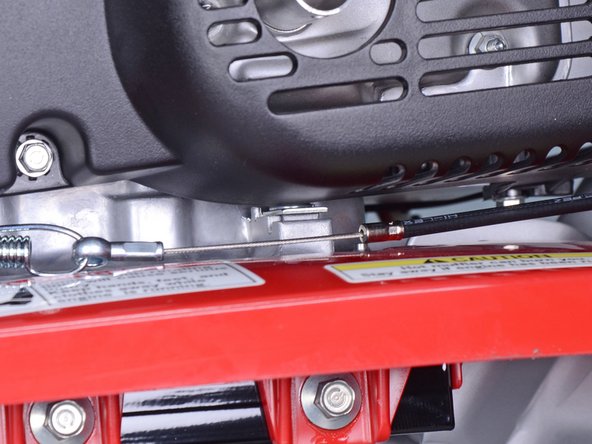
    • Use an 8 mm wrench to hold the clutch cable barrel adjuster in place while you use a 10 mm wrench to loosen the lock nut.

    • Continue to loosen the lock nut until it is against the end of the threads.

    • With the lock nut against the end of the threads, tighten the barrel until it is against the lock nut to add as much slack as possible to the cable.

  9. Honda Light Duty Tiller F220K1AT715492 Clutch Cable Replacement, Remove the clutch cable: Schritt 9, Bild 1 von 3 Honda Light Duty Tiller F220K1AT715492 Clutch Cable Replacement, Remove the clutch cable: Schritt 9, Bild 2 von 3 Honda Light Duty Tiller F220K1AT715492 Clutch Cable Replacement, Remove the clutch cable: Schritt 9, Bild 3 von 3
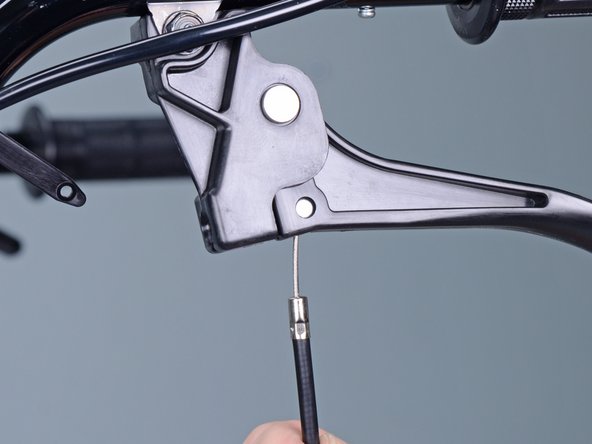
    • Slide the clutch cable housing straight out of its hole in the clutch lever.

    • Rotate the cable and housing through the slot in the lever until the cable is perpendicular to the lever.

  10. Honda Light Duty Tiller F220K1AT715492 Clutch Cable Replacement: Schritt 10, Bild 1 von 2 Honda Light Duty Tiller F220K1AT715492 Clutch Cable Replacement: Schritt 10, Bild 2 von 2
    • Slide the clutch cable through the slot in the clutch lever and remove it from the lever.

  11. Honda Light Duty Tiller F220K1AT715492 Clutch Cable Replacement: Schritt 11, Bild 1 von 1
    • Remove any zip-ties securing the clutch cable.

  12. Honda Light Duty Tiller F220K1AT715492 Clutch Cable Replacement: Schritt 12, Bild 1 von 3 Honda Light Duty Tiller F220K1AT715492 Clutch Cable Replacement: Schritt 12, Bild 2 von 3 Honda Light Duty Tiller F220K1AT715492 Clutch Cable Replacement: Schritt 12, Bild 3 von 3
    • Slide the clutch cable housing out of its bracket on the tiller.

    • Slide the clutch cable through the slot in the bracket to free it.

  13. Honda Light Duty Tiller F220K1AT715492 Clutch Cable Replacement: Schritt 13, Bild 1 von 3 Honda Light Duty Tiller F220K1AT715492 Clutch Cable Replacement: Schritt 13, Bild 2 von 3 Honda Light Duty Tiller F220K1AT715492 Clutch Cable Replacement: Schritt 13, Bild 3 von 3
    • Slide the clutch cable off of its hook on the clutch spring.

    • Remove the clutch cable.

Abschluss

To reassemble your device, follow these instructions in reverse order.

Adam O'Camb

Mitglied seit: 04/11/15

196.251 Reputation

416 Anleitungen geschrieben

0 Kommentare

Kommentar hinzufügen

Seitenaufrufe:

Letzte 24 Stunden: 1

Letzte 7 Tage: 7

Letzte 30 Tage: 44

Insgesamt: 1,008