Zum Hauptinhalt wechseln

Hoover Power Path Deluxe FH50951 Water Dispenser Replacement

Was du brauchst

  1. Hoover Power Path Deluxe FH50951 Water Dispenser Replacement, Brush Roll: Schritt 1, Bild 1 von 3 Hoover Power Path Deluxe FH50951 Water Dispenser Replacement, Brush Roll: Schritt 1, Bild 2 von 3 Hoover Power Path Deluxe FH50951 Water Dispenser Replacement, Brush Roll: Schritt 1, Bild 3 von 3
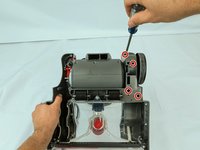
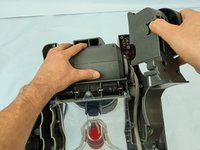
    • Remove the four 18.6 mm screws labeled 1-4 using a Phillips #1 screwdriver.

    • Remove the piece that was being held down by those screws.

  2. Hoover Power Path Deluxe FH50951 Water Dispenser Replacement: Schritt 2, Bild 1 von 3 Hoover Power Path Deluxe FH50951 Water Dispenser Replacement: Schritt 2, Bild 2 von 3 Hoover Power Path Deluxe FH50951 Water Dispenser Replacement: Schritt 2, Bild 3 von 3
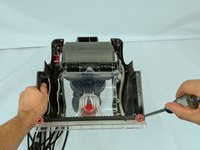
    • Remove the four 18.6 mm screws with arrows listing 5-8 using a Phillips #1 screwdriver.

    • Remove the wheel assembly on the left side of the vacuum.

    • You may need a longer Phillips #1 screwdriver for screw #7.

  3. Hoover Power Path Deluxe FH50951 Water Dispenser Replacement: Schritt 3, Bild 1 von 1
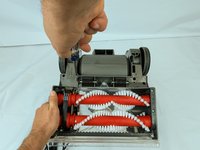
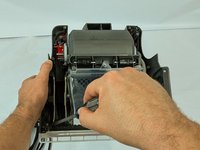
    • Lift up the belt to give enough slack to allow the brush roll to come out.

    • While lifting the belt, pull/push upward away from the cleaner to pop it out.

    • It may seem like the brush rolls wont come out but just put more force into it.

  4. Hoover Power Path Deluxe FH50951 Water Dispenser Replacement, Belt: Schritt 4, Bild 1 von 2 Hoover Power Path Deluxe FH50951 Water Dispenser Replacement, Belt: Schritt 4, Bild 2 von 2
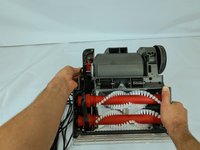
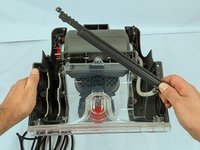
    • Gently slide the belt off of the motor shaft and lift it out of the vacuum.

    • Loop one end of the new belt around the motor shaft, making sure it sits securely in the groove.

    • Ensure the belt is securely placed in the correct slot on both the motor shaft and the brush roll. A loosely installed or improperly positioned belt can slip, break, or prevent the brush roll from spinning correctly, potentially damaging your vacuum. Double-check that the belt is aligned and tensioned properly before reassembling the vacuum.

  5. Hoover Power Path Deluxe FH50951 Water Dispenser Replacement, Water Dispenser: Schritt 5, Bild 1 von 2 Hoover Power Path Deluxe FH50951 Water Dispenser Replacement, Water Dispenser: Schritt 5, Bild 2 von 2
    • Remove the four 18.6 mm screws using a Phillips #1 screwdriver.

    • Remove the wheel assembly on the right side of the vacuum.

  6. Hoover Power Path Deluxe FH50951 Water Dispenser Replacement: Schritt 6, Bild 1 von 3 Hoover Power Path Deluxe FH50951 Water Dispenser Replacement: Schritt 6, Bild 2 von 3 Hoover Power Path Deluxe FH50951 Water Dispenser Replacement: Schritt 6, Bild 3 von 3
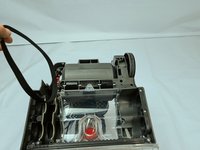
    • Remove the two 12.6 mm screws using a Phillips #1 screwdriver.

    • Remove the piece.

  7. Hoover Power Path Deluxe FH50951 Water Dispenser Replacement: Schritt 7, Bild 1 von 1
    • Hold the dispenser in one hand and the tube that is attached to the bottom in the other hand and pull.

    • It should just pull straight off, no twisting.

Abschluss

To reassemble your device, follow these instructions in reverse order.

Kiersten Liebig

Mitglied seit: 10/31/24

197 Reputation

1 Anleitung geschrieben

Team

Cuesta, Team 60-1, Krynen Fall 2024 Mitglied von Cuesta, Team 60-1, Krynen Fall 2024

CUESTA-KRYNEN-F24S60G1

4 Mitglieder

5 Anleitungen geschrieben

0 Kommentare

Kommentar hinzufügen

Seitenaufrufe:

Letzte 24 Stunden: 0

Letzte 7 Tage: 0

Letzte 30 Tage: 1

Insgesamt: 31