Zum Hauptinhalt wechseln

Diese Version enthält möglicherweise inkorrekte Änderungen. Wechsle zur letzten geprüften Version.

Grundständige Anleitung
Dies ist eine grundständige Anleitung, die nur als Teil einer anderen Anleitung verwendet werden sollte.

Was du brauchst

  1. Dieser Schritt ist noch nicht übersetzt. Hilf mit, ihn zu übersetzen!

    : Schritt 1, Bild 1 von 2 : Schritt 1, Bild 2 von 2
    • Flip the hoverboard so the bottom is facing up.

    • The right side is the side that has the power button. There is also an "R" on the metal plate underneath the battery.

  2. Dieser Schritt ist noch nicht übersetzt. Hilf mit, ihn zu übersetzen!

    : Schritt 2, Bild 1 von 2 : Schritt 2, Bild 2 von 2
    • Using a Phillips #1 screwdriver, remove the two 14 mm screws closest to the center of the hoverboard.

    • Using a Phillips #1 screwdriver, remove the four 12 mm screws located in the middle of the panel.

    • Using a Phillips #1 screwdriver, remove the two 15 mm screws located closest to the wheel.

  3. Dieser Schritt ist noch nicht übersetzt. Hilf mit, ihn zu übersetzen!

    : Schritt 3, Bild 1 von 3 : Schritt 3, Bild 2 von 3 : Schritt 3, Bild 3 von 3
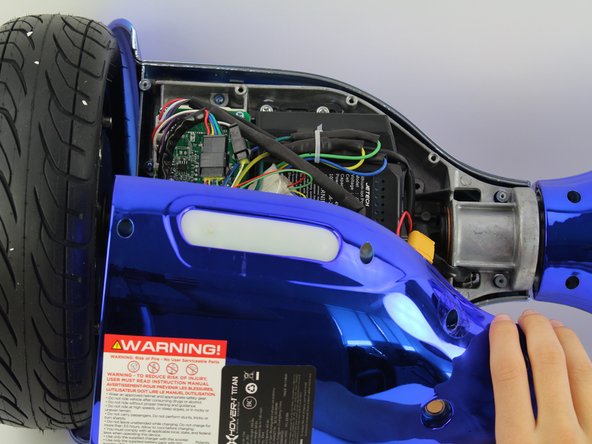
    • Grip the bottom right panel and lift to remove it.

Ziellinie

Dana Ebe

Mitglied seit: 10/08/18

238 Reputation

2 Anleitungen geschrieben

Team

Cal Poly, Team S15-G4, White Fall 2018 Mitglied von Cal Poly, Team S15-G4, White Fall 2018

CPSU-WHITE-F18S15G4

4 Mitglieder

10 Anleitungen geschrieben

0 Kommentare

Kommentar hinzufügen

Seitenaufrufe:

Letzte 24 Stunden: 1

Letzte 7 Tage: 6

Letzte 30 Tage: 6

Insgesamt: 51