Einleitung
Diese Anleitung zeigt, wie der Akku eines iPads mit einer Spielkarte abgetrennt werden kann.
Wenn es dir nicht gelingt, den Akku eines iPads unter dem Logic Board mit einem Akkublocker abzutrennen, kannst du dies mit einer entsprechend zurechtgeschnittenen Spielkarte versuchen.
Was du brauchst
-
-
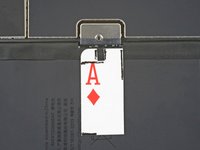
Richte die linke Kante der Spielkarte und die linke Kante des Steckers aneinander aus.
-
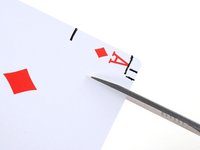
Markiere wie gezeigt beide Seiten des Schraubenlochs und die Enden des Steckers.
-
-
-
Richte die Oberkanten des Steckers und des Schraubenlochs miteinander aus.
-
Markiere die Unterkante des Steckers.
-
-
-
-
Nimm eine Schere und schneide den Akkublocker wie gezeigt aus.
-
-
-
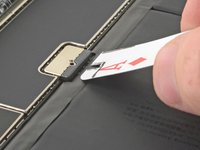
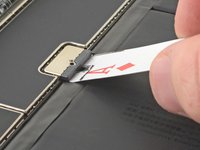
Schiebe den Akkublocker unter einem Winkel von 35° ein, um den Akku abzutrennen.
-
Lasse den Akkublocker während der Reparatur stecken.
-


Um dein Gerät wieder zusammenzubauen, folge den Schritten in umgekehrter Reihenfolge.
Rückgängig: Ich habe diese Anleitung nicht absolviert.
16 weitere Personen haben diese Anleitung absolviert.
Besonderer Dank geht an diese Übersetzer:innen:
100%

Diese Übersetzer:innen helfen uns, die Welt zu reparieren! Wie kann ich mithelfen?
Hier starten ›

3 Kommentare zur Anleitung
Thanks Robert. Great easy to create tool and excellent explanation.
Hello Robert,
thank you for this useful tip.
Let me ask you this question:
I need to rectify a bent 9th gen iPad but after dismantling both the digitizer and the screen, I don't want to go further. The bent is located exactly aside the logic board screen connector.
All I want to do is try to fix the bent, therefore I need the iPad be free of movements. Since this article says the card needs to be kept in place, my question is is really mandatory that the card stays at 15 degrees or may I tape the card to the battery to avoid the card being accidentally removed?
I hope you can reply to my question.
Thank you