Einleitung
If you've stumbled upon this guide, odds are that your Nintendo Switch Pro controller is acting a bit strange. Maybe it's causing your character to move in a completely different direction from what you wanted. Maybe your character is moving on its own without you even touching the controller! If so, you are experiencing something video game enthusiasts refer to as "joystick drift," which is usually a result of dirt and debris that gets trapped within the joystick.
It's difficult to enjoy a video game when your controller is working against you. You may be tempted to throw away the controller and buy a new one, but a Nintendo Switch Pro Controller has an MSRP of nearly $70.00!
Fortunately, there is a relatively easy fix for joystick drift. The solution involves taking apart the controller to clean the inside of the joysticks. This guide will show you how to do this safely and quickly.
Was du brauchst
-
-
Remove the two black screws at the bottom ends of the controller using a Phillips #00 screwdriver.
-
Pull the hand grips off the bottom edges of the controller.
-
-
-
Remove the four silver screws from the back of the controller using a Phillips #00 screwdriver.
-
Hold the controller as depicted in the third picture with your thumbs placed on the top of the controller. Use your thumbs to pry apart the backplate from the rest of the controller.
When reassembling, don't forget to put the battery back in. I know it seems stupid, but I have taken apart many pro controllers and constantly set the battery to the side, just to forget about and scratch my head and wonder why the controller isn't working.
-
-
-
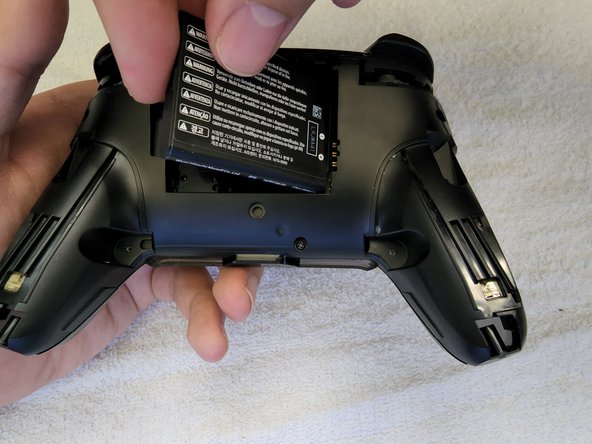
Place a finger in the gap to the left of the battery.
-
Use the small tab on the side of the battery to remove the battery from the controller.
-
-
-
Remove the five black screws from the back of the controller using a Phillips #00 screwdriver.
-
Place a finger between the faceplate and the rest of the controller and pull each half of the controller apart to separate them.
-
-
-
-
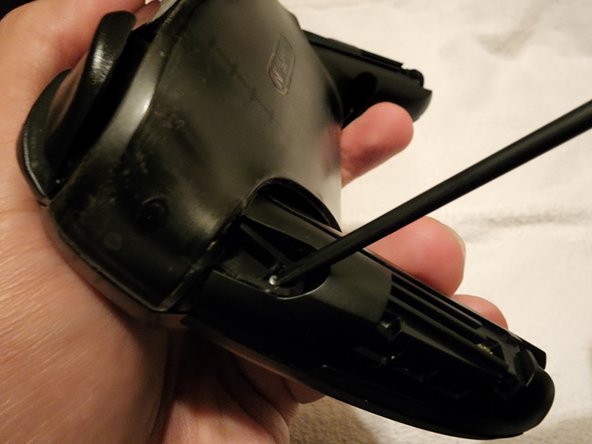
Use one hand to grip the back of the controller piece with the joysticks. With the other hand, grip the rubber cap of the joystick and carefully pull it off of the joystick.
-
-
-
Spray the can of compressed air inside and around the joysticks to remove any debris.
You may also want to use contact cleaner on the sticks.
In my case just using compressed air did not fix the drift, I also had to use contact cleaner, after which the drift was completely fixed.
-
-
-
Place the rubber caps back on the joysticks by applying a bit of pressure.
-
-
-
Align both halves of the controller and push them together. They should reattach easily.
-
Screw in the five black screws on the back of the controller using a Phillips #00 screwdriver.
-
-
-
Place the battery into the socket by aligning the connectors on the battery with the connectors on the right of the battery socket.
-
-
-
Align the backplate of the controller as shown in the picture and snap it on.
-
Screw in the four silver screws in the back of the controller using a Phillips #00 screwdriver.
-
-
-
Reattach the handgrips by sliding them onto the ends of the controller.
-
Screw in the two black screws on the bottom of the handgrips using a Phillips #00 screwdriver.
-


After following these steps, your controller will be much cleaner now than it was before. Your controller should now be drift-free and function as well as any other $70.00 controller!
If you are still experiencing drift, then there is a physical defect with the joystick. In this case, you can opt to replace the joystick itself. You can find replacement parts online, but you will probably need to learn how to solder in order to install the replacement joystick.
Rückgängig: Ich habe diese Anleitung nicht absolviert.
42 weitere Nutzer:innen haben diese Anleitung absolviert.
Team

CSU Los Angeles, Team 4-67, Briggs Spring 2022 Mitglied von CSU Los Angeles, Team 4-67, Briggs Spring 2022
CSULA-BRIGGS-S22S4G67
1 Mitglied
8 Anleitungen geschrieben
10 Kommentare
Excellent. Really clear guide. Thank you so much
Worked like a charm! Thank you!
My controller has been having this issue, I've been opening it up and dusting the stick, but that only temporarily fixes this issue. I am considering replacing the stick module, although I am a bit worried that something else is causing drift. Its possible that the shell or upper stick part has worn out or has some sort of opening which is allowing dust and other particles to get into the stick. Any advice?
This is the first thing I have used my iFixit kit to try and fix and it worked perfectly. Thanks for a very helpful and clear to follow guide.
I was lucky and had a very long ph00 lying around that came with a toy from the dollar store I bought over 15 years ago. My usual repair kit couldn’t reach the deep screws next to the battery, but that screwdriver saved the day. Excellent guide regardless.
This was the first time I used Ifixit. It worked perfectly, thanks a lot, saved my money, better repair than buy something new!
Merci beaucoup, j'ai pu régler le problème :)
My controller has gone from 'almost unusable' to 'most accurate controller I've ever seen'. It's absolutely brand-new again.
兄弟, 十分感谢。这个攻略干货十足。
Phillips #0 screwdriver did not fit into the screw and stripped it. #00 worked on the other screw, but now I'm unable to continue the teardown.
Mitchell Harding - Antwort
The screws are screwed in too tight by the factory that put it together, it can't be undone by hand, because all it did was strip the screw entirely. Need a powered tool to undo the screws.
Alkaris - Antwort
These are JIS #00 screws! DO NOT USE PHILIPS else you get stripped heads. Like me. Get a JIS screwdriver set for this breakdown.
Christian Manahan - Antwort
@christianma5187, thanks for the tip! I wish I'd read your comment and understood the difference between phillips and jis before I tried using the ph #00 and completely stripped one of the screws. I couldn't find a screw extractor small enough, and in the end I had to cut off the entire hand grip sleeve and get a new one. I hope nobody else makes the same mistake!
Mike - Antwort