Zum Hauptinhalt wechseln
Gemeinsam reparieren - Jetzt registrieren

How to Fix a Thrustmaster Eswap X Pro Controller Trigger

Was du brauchst

  1. How to Fix a Thrustmaster Eswap X Pro Controller Trigger, How to Fix a Thrustmaster Eswap X Pro Controller Trigger: Schritt 1, Bild 1 von 2 How to Fix a Thrustmaster Eswap X Pro Controller Trigger, How to Fix a Thrustmaster Eswap X Pro Controller Trigger: Schritt 1, Bild 2 von 2
    • Flip the controller so the backside is facing up.

    • Flip both of the switches away from the center.

    Frag FixBot

    Kommentar hinzufügen

  2. How to Fix a Thrustmaster Eswap X Pro Controller Trigger: Schritt 2, Bild 1 von 3 How to Fix a Thrustmaster Eswap X Pro Controller Trigger: Schritt 2, Bild 2 von 3 How to Fix a Thrustmaster Eswap X Pro Controller Trigger: Schritt 2, Bild 3 von 3
    • Flip the controller over so the top is facing up.

    • Pull out both the joystick and the directional pad modules.

    Frag FixBot

    Kommentar hinzufügen

  3. How to Fix a Thrustmaster Eswap X Pro Controller Trigger: Schritt 3, Bild 1 von 3 How to Fix a Thrustmaster Eswap X Pro Controller Trigger: Schritt 3, Bild 2 von 3 How to Fix a Thrustmaster Eswap X Pro Controller Trigger: Schritt 3, Bild 3 von 3
    • Flip the controller over again so the backside is facing up.

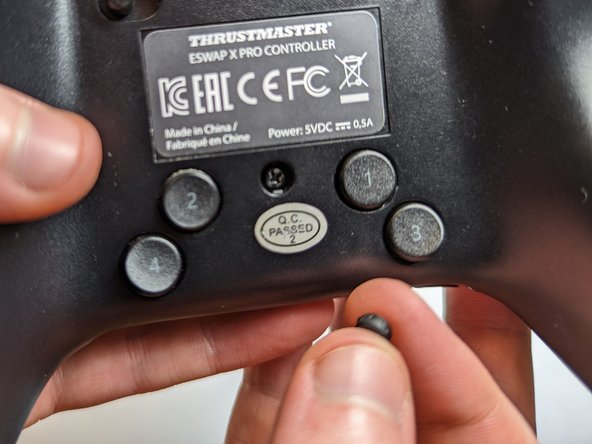
    • Use a spudger to remove five rubber screw covers.

    Frag FixBot

    Kommentar hinzufügen

  4. How to Fix a Thrustmaster Eswap X Pro Controller Trigger: Schritt 4, Bild 1 von 3 How to Fix a Thrustmaster Eswap X Pro Controller Trigger: Schritt 4, Bild 2 von 3 How to Fix a Thrustmaster Eswap X Pro Controller Trigger: Schritt 4, Bild 3 von 3
    • Use a Phillips #1 screwdriver to remove each of the 4.0 mm exposed screws.

    Frag FixBot

    Kommentar hinzufügen

  5. How to Fix a Thrustmaster Eswap X Pro Controller Trigger: Schritt 5, Bild 1 von 2 How to Fix a Thrustmaster Eswap X Pro Controller Trigger: Schritt 5, Bild 2 von 2
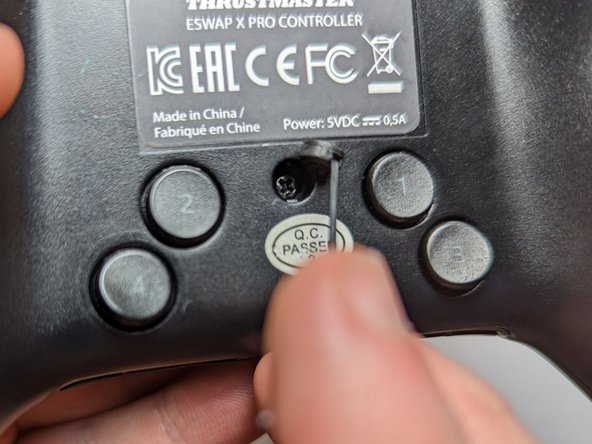
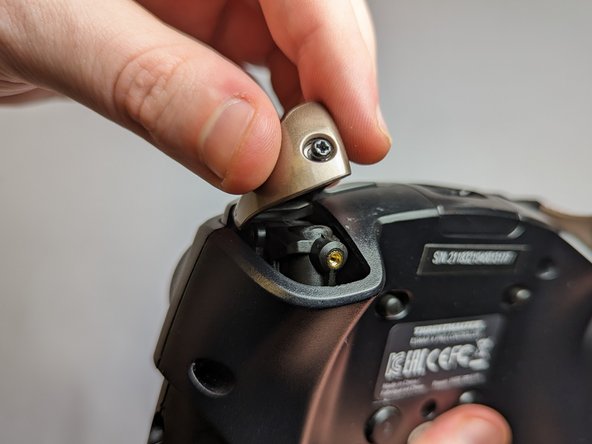
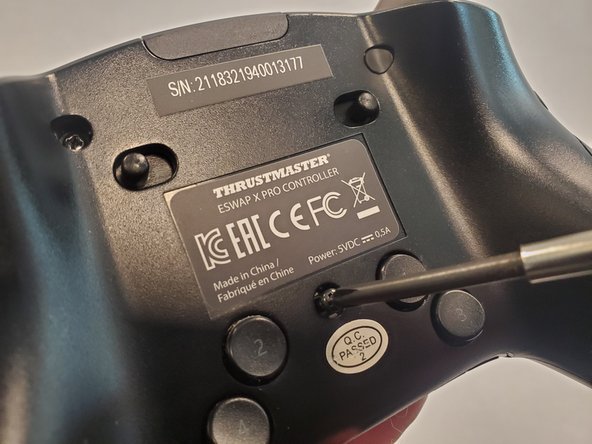
    • Use a Phillips #1 screwdriver to loosen the captive screw and remove the trigger button.

    Frag FixBot

    Kommentar hinzufügen

  6. How to Fix a Thrustmaster Eswap X Pro Controller Trigger: Schritt 6, Bild 1 von 3 How to Fix a Thrustmaster Eswap X Pro Controller Trigger: Schritt 6, Bild 2 von 3 How to Fix a Thrustmaster Eswap X Pro Controller Trigger: Schritt 6, Bild 3 von 3
    • Rotate the controller 90 degrees.

    • Pull off the magnetic side cover.

    Frag FixBot

    Kommentar hinzufügen

  7. How to Fix a Thrustmaster Eswap X Pro Controller Trigger: Schritt 7, Bild 1 von 3 How to Fix a Thrustmaster Eswap X Pro Controller Trigger: Schritt 7, Bild 2 von 3 How to Fix a Thrustmaster Eswap X Pro Controller Trigger: Schritt 7, Bild 3 von 3
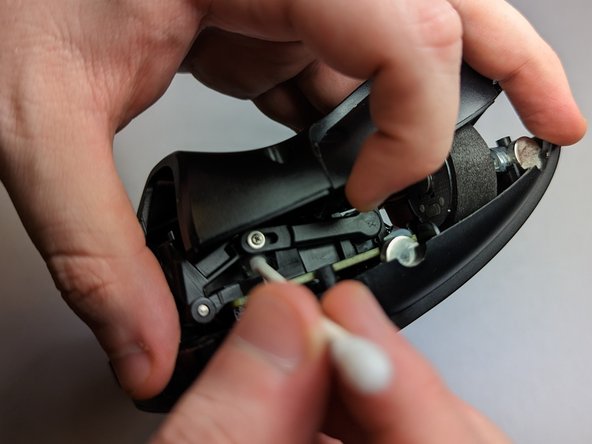
    • Lift the back cover slightly from where you removed the trigger button.

    • Use a Q-tip dipped with isopropyl alcohol to clean the surrounding area.

    • Additionally, wipe down the top face of the trigger with a Q-tip.

    Frag FixBot

    Kommentar hinzufügen

  8. How to Fix a Thrustmaster Eswap X Pro Controller Trigger: Schritt 8, Bild 1 von 3 How to Fix a Thrustmaster Eswap X Pro Controller Trigger: Schritt 8, Bild 2 von 3 How to Fix a Thrustmaster Eswap X Pro Controller Trigger: Schritt 8, Bild 3 von 3
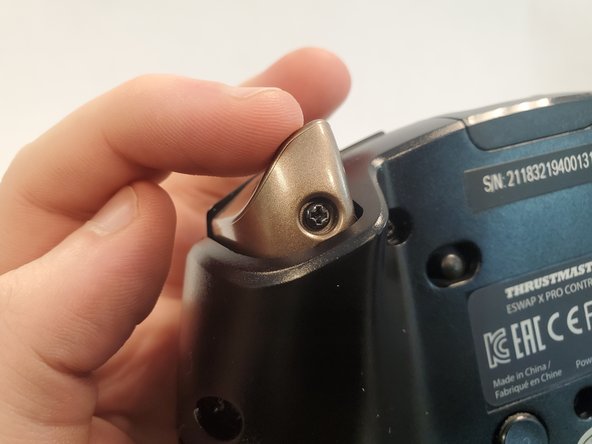
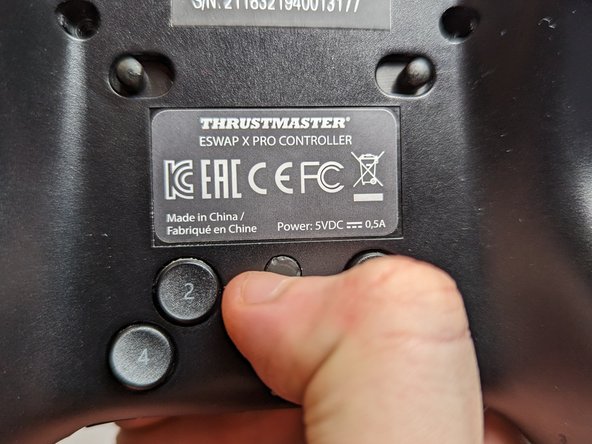
    • Reattach the trigger button onto the controller.

    • Use a Phillips #1 screwdriver to tighten the screw securing trigger button.

    Frag FixBot

    Kommentar hinzufügen

  9. How to Fix a Thrustmaster Eswap X Pro Controller Trigger: Schritt 9, Bild 1 von 3 How to Fix a Thrustmaster Eswap X Pro Controller Trigger: Schritt 9, Bild 2 von 3 How to Fix a Thrustmaster Eswap X Pro Controller Trigger: Schritt 9, Bild 3 von 3
    • Use a Phillips #1 screwdriver to reattach the 4.0 mm screws to the back of the controller.

    Frag FixBot

    Kommentar hinzufügen

  10. How to Fix a Thrustmaster Eswap X Pro Controller Trigger: Schritt 10, Bild 1 von 3 How to Fix a Thrustmaster Eswap X Pro Controller Trigger: Schritt 10, Bild 2 von 3 How to Fix a Thrustmaster Eswap X Pro Controller Trigger: Schritt 10, Bild 3 von 3
    • Notice that the notches on the rubber covers correspond with the notches on the screw hole.

    • Reattach the rubber covers above the screws.

    Frag FixBot

    Kommentar hinzufügen

  11. How to Fix a Thrustmaster Eswap X Pro Controller Trigger: Schritt 11, Bild 1 von 1
    • Place the joystick and the directional pad modules back in their respective spots.

    Frag FixBot

    Kommentar hinzufügen

  12. How to Fix a Thrustmaster Eswap X Pro Controller Trigger: Schritt 12, Bild 1 von 3 How to Fix a Thrustmaster Eswap X Pro Controller Trigger: Schritt 12, Bild 2 von 3 How to Fix a Thrustmaster Eswap X Pro Controller Trigger: Schritt 12, Bild 3 von 3
    • Reattach the magnetic side cover.

    • The controller is fixed!

    Frag FixBot

    Kommentar hinzufügen

Abschluss

To reassemble your device, follow these instructions in reverse order.

Rückgängig: Ich habe diese Anleitung nicht absolviert.

4 weitere Personen haben diese Anleitung absolviert.

Team

UC Davis, Team 2-3, Morris Winter 2023 Mitglied von UC Davis, Team 2-3, Morris Winter 2023

UCD-MORRIS-W23S2G3

2 Mitglieder

1 Anleitung geschrieben

4 Kommentare zur Anleitung

The problem is it keeps happening after doing all these steps. is there any way or parts to replace the trigger sensor completely? Possibly with a nice hall effect sensor?

John Addington - Antwort Teilen

You can remove the lever bar that goes from the screw to the sensor (the one you see on Step 7)

Spray a small amount of WD40 on the sensor and use a prong to rotate the part on its full range of motion several times, that will clean up the contact inside and it completely fixed the jitter on mine.

Alex L - Antwort Teilen

hi, i made an account here just to say this worked for me but on the thrustmaster eswap S pro controller, it's almost identical aside from the cover panels

Anna Fiore - Antwort Teilen

so to repair mine, I did a couple additional things :
- step 3 & 4 : I unscrewed all 7 screws (careful though some stuff can tumble it seems)
- on the image of step 7b you can see a small screw above the Q-tip, I unscrewed this ( Phillips #0 )
- removed the lever
- carefully pushed the trigger mechanism to the side to "fully open it"
- at this point I had full access to the sensor & to the spring on the rotating part of the trigger
- cleaned both
- reassembled everything ( be gentle with the screwing of the Phillips #0 screw )
DONE.

Thanks for the guide.

Whismerhill - Antwort Teilen

Kommentar hinzufügen

Seitenaufrufe:

Letzte 24 Stunden: 5

Letzte 7 Tage: 26

Letzte 30 Tage: 124

Insgesamt: 5,027