Diese Version enthält möglicherweise inkorrekte Änderungen. Wechsle zur letzten geprüften Version.
Was du brauchst
-
-
Löse die beiden Kreuzschlitzschrauben, mit denen die Zugangsklappe an deinem iMac befestigt ist.
-
Entferne die Zugangsklappe.
-
-
Dieser Schritt ist noch nicht übersetzt. Hilf mit, ihn zu übersetzen!
-
Remove the following screws along the lower edge of your iMac:
-
Three 6 mm T8 Torx screws
-
One 8 mm T8 Torx screw (Right side of the RAM slot on 2105)
-
-
Dieser Schritt ist noch nicht übersetzt. Hilf mit, ihn zu übersetzen!
-
Insert a plastic card up into the corner of the air vent slot near the top of the rear case.
-
Push the card toward the top of the iMac to release the front bezel latch.
-
Pull the front bezel away from the rear case.
-
Repeat this process for the other side of the front bezel.
-
If the bezel refuses to release, try lifting the lower edge of the front bezel slightly away from the rear case (detailed in the next few steps) and repeat the latch release process.
-
-
Dieser Schritt ist noch nicht übersetzt. Hilf mit, ihn zu übersetzen!
-
Lay your iMac stand-side down on a flat surface.
-
To lift the front bezel off the iMac, simultaneously:
-
Use your thumbs to press in the RAM arms and hold the iMac down.
-
Use your index fingers to pull the small bridge of material on the front bezel toward yourself.
-
Pull the front bezel up with your index fingers.
-
Once the small bridge of material has cleared the RAM arms, lift the front bezel by its lower edge just enough to clear the bottom edge of the rear case.
-
-
Dieser Schritt ist noch nicht übersetzt. Hilf mit, ihn zu übersetzen!
-
Lift the front bezel off the rear case and rotate it away from the bottom edge of the iMac, minding the camera and microphone cables still attached to its upper edge.
-
-
-
Dieser Schritt ist noch nicht übersetzt. Hilf mit, ihn zu übersetzen!
-
Disconnect the microphone cable.
-
Disconnect the camera cable by pulling its connector away from the socket on the camera board.
-
-
Dieser Schritt ist noch nicht übersetzt. Hilf mit, ihn zu übersetzen!
-
Remove the two 5 mm T6 Torx screws securing the display data cable connector to the logic board.
-
Pull the display data cable connector up off the logic board by its black pull tab.
-
-
Dieser Schritt ist noch nicht übersetzt. Hilf mit, ihn zu übersetzen!
-
Peel back the EMI tape from the two vertical edges of the display.
-
-
Dieser Schritt ist noch nicht übersetzt. Hilf mit, ihn zu übersetzen!
-
Allow the lower EMI shield to hang down from the display.
-
Remove the four 7.5 mm T10 Torx screws securing the display to the rear case.
-
-
Dieser Schritt ist noch nicht übersetzt. Hilf mit, ihn zu übersetzen!
-
Lift the lower edge of the display and rotate it toward the top edge of your iMac.
-
-
Dieser Schritt ist noch nicht übersetzt. Hilf mit, ihn zu übersetzen!
-
Disconnect both inverter cables from the inverter board.
-
-
Dieser Schritt ist noch nicht übersetzt. Hilf mit, ihn zu übersetzen!
-
Disconnect the two inverter cables at the top edge of the inverter using the method explained in the previous step.
-
-
Dieser Schritt ist noch nicht übersetzt. Hilf mit, ihn zu übersetzen!
-
Rotate the display until it is nearly perpendicular to the rear case and lift it up to peel it off the EMI shield stuck to its top edge.
-
-
Dieser Schritt ist noch nicht übersetzt. Hilf mit, ihn zu übersetzen!
-
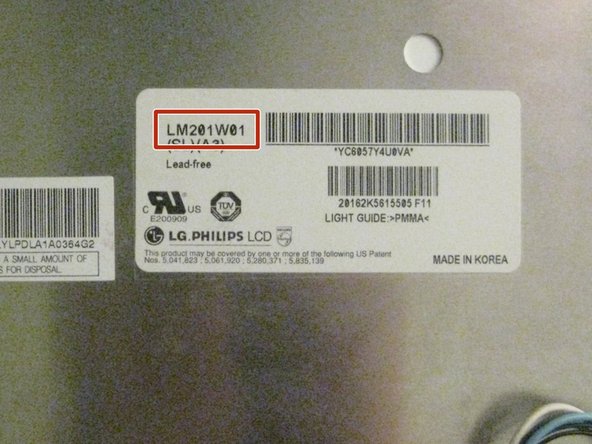
Lay screen on it's face. Locate the sticker on the back, which lists the Make, Model, and Model Number.
-
This screen, from a 2006 iMac A1207, is an LG model LM201W01. Yours Will Most Likely Be Different
-
The example searches shown in the next step use the model number LM201W01. Again, Yours May Be Different, so adjust accordingly.
-
-
Dieser Schritt ist noch nicht übersetzt. Hilf mit, ihn zu übersetzen!
-
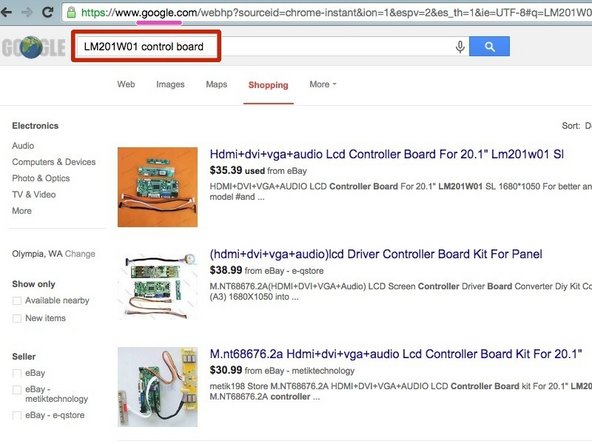
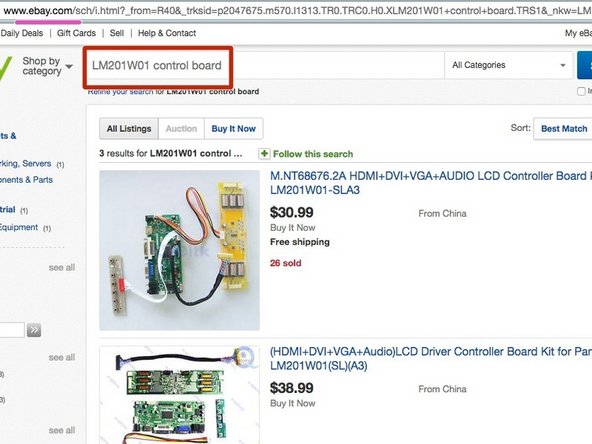
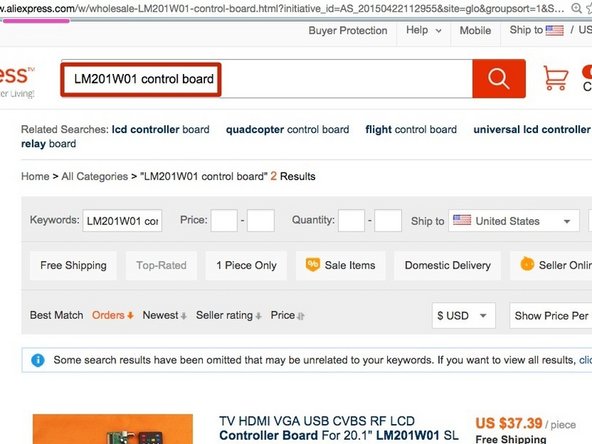
Using a search engine of your choice, search for the following phrase: "your-screen-model control board".
-
Other good places to find such parts are ebay.com and aliexpress.com.
-
Be sure that the control board which you purchase, comes with an inverter board for your screen's backlight.
-
Purchase the control board. Expect shipping times of 2+ weeks if ordering parts from Asia.
-
-
Dieser Schritt ist noch nicht übersetzt. Hilf mit, ihn zu übersetzen!
-
The vast majority of control boards do not come with a power supply. Check the specifications listed by the vendor to get the power supply requirements for your board.
-
You'll need to get both the Voltage (typically 12v for 12-21" screens, or 19v for 24+" screens) and the Amperage. The control board's voltage specification must be followed exactly, while the amperage specification is a 'minimum required': In general, using a power supply with a higher amperage than the requirement is a good thing.
-
Shown here: A generic 12V 5A power supply purchased online for $8.
-
You may not need to purchase a power supply because you may already have one: check around your home or office for the unused power supplies of old electronics such as old modems, routers, coffee makers, etc. You may have one sitting in your box of spare/used electronics. Check before buying!
-


Rückgängig: Ich habe diese Anleitung nicht absolviert.
5 weitere Nutzer:innen haben diese Anleitung absolviert.

Team
