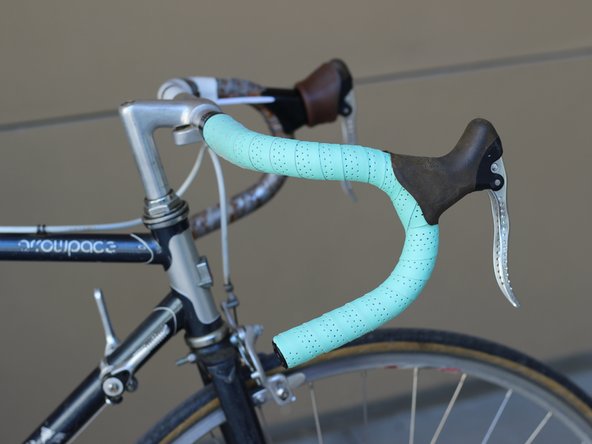
Zum Hauptinhalt wechseln

How to Install Handlebar Tape

Was du brauchst

  1. How to Install Handlebar Tape, How to Install Handlebar Tape: Schritt 1, Bild 1 von 2 How to Install Handlebar Tape, How to Install Handlebar Tape: Schritt 1, Bild 2 von 2
    • Flip the hood of the brake lever upwards.

  2. How to Install Handlebar Tape: Schritt 2, Bild 1 von 3 How to Install Handlebar Tape: Schritt 2, Bild 2 von 3 How to Install Handlebar Tape: Schritt 2, Bild 3 von 3
    • Peel off the adhesive covering from the back of the bar tape.

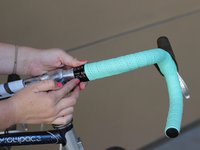
    • Place one end of the bar tape around the handlebar, making sure to leave a half inch extended past the end of the handlebar.

    • Begin tightly wrapping the bar tape clockwise around the handlebar so that the bar tape overlaps itself slightly.

  3. How to Install Handlebar Tape: Schritt 3, Bild 1 von 2 How to Install Handlebar Tape: Schritt 3, Bild 2 von 2
    • After a few wraps, tuck the extra bar tape into the end of the handlebar and firmly push in the bar end plug.

  4. How to Install Handlebar Tape: Schritt 4, Bild 1 von 2 How to Install Handlebar Tape: Schritt 4, Bild 2 von 2
    • Continue to tightly wrap the bar tape around the bar as evenly as possible.

    • Make sure the adhesive on the back of the bar tape is making contact with the metal handlebar.

  5. How to Install Handlebar Tape: Schritt 5, Bild 1 von 3 How to Install Handlebar Tape: Schritt 5, Bild 2 von 3 How to Install Handlebar Tape: Schritt 5, Bild 3 von 3
    • Take the extra piece of bar tape provided and cut it to fit the back of the brake lever.

  6. How to Install Handlebar Tape: Schritt 6, Bild 1 von 3 How to Install Handlebar Tape: Schritt 6, Bild 2 von 3 How to Install Handlebar Tape: Schritt 6, Bild 3 von 3
    • Continue wrapping over lever.

    • Keep in mind the tightness and evenness of space between each wrap as you continue.

  7. How to Install Handlebar Tape: Schritt 7, Bild 1 von 2 How to Install Handlebar Tape: Schritt 7, Bild 2 von 2
    • Flip the break lever hood back down and continue.

  8. How to Install Handlebar Tape: Schritt 8, Bild 1 von 2 How to Install Handlebar Tape: Schritt 8, Bild 2 von 2
    • Stop wrapping about 2 inches from stem.

  9. How to Install Handlebar Tape: Schritt 9, Bild 1 von 3 How to Install Handlebar Tape: Schritt 9, Bild 2 von 3 How to Install Handlebar Tape: Schritt 9, Bild 3 von 3
    • Cut the bar tape diagonally at an approximately 60 degree angle.

  10. How to Install Handlebar Tape: Schritt 10, Bild 1 von 1
    • Finish the wrap.

    • The cut should make the end of the bar tape a straight line.

  11. How to Install Handlebar Tape: Schritt 11, Bild 1 von 3 How to Install Handlebar Tape: Schritt 11, Bild 2 von 3 How to Install Handlebar Tape: Schritt 11, Bild 3 von 3
    • Use the electrical tape provided to tightly secure the end of the wrap.

  12. How to Install Handlebar Tape: Schritt 12, Bild 1 von 3 How to Install Handlebar Tape: Schritt 12, Bild 2 von 3 How to Install Handlebar Tape: Schritt 12, Bild 3 von 3
    • Press down on electrical tape to secure it.

  13. How to Install Handlebar Tape: Schritt 13, Bild 1 von 3 How to Install Handlebar Tape: Schritt 13, Bild 2 von 3 How to Install Handlebar Tape: Schritt 13, Bild 3 von 3
    • Repeat steps 1-12 on the other side, now wrapping counterclockwise.

Ziellinie

Ein:e weitere:r Nutzer:in hat diese Anleitung absolviert.

Elizabeth Hall

Mitglied seit: 04/28/17

131 Reputation

1 Anleitung geschrieben

Team

UC Davis, Team S2-G7, Cole Spring 2017 Mitglied von UC Davis, Team S2-G7, Cole Spring 2017

UCD-COLE-S17S2G7

3 Mitglieder

1 Anleitung geschrieben

0 Kommentare

Kommentar hinzufügen

Seitenaufrufe:

Letzte 24 Stunden: 0

Letzte 7 Tage: 4

Letzte 30 Tage: 16

Insgesamt: 3,948