Diese Version enthält möglicherweise inkorrekte Änderungen. Wechsle zur letzten geprüften Version.
Was du brauchst
-
Dieser Schritt ist noch nicht übersetzt. Hilf mit, ihn zu übersetzen!
-
Clean the damaged area with rubbing alcohol, using a rag, paper towel, or Q-tip.
-
-
Dieser Schritt ist noch nicht übersetzt. Hilf mit, ihn zu übersetzen!
-
Cut the backing fabric large enough to cover the tear, approximately half an inch larger around the tear.
-
-
-
Dieser Schritt ist noch nicht übersetzt. Hilf mit, ihn zu übersetzen!
-
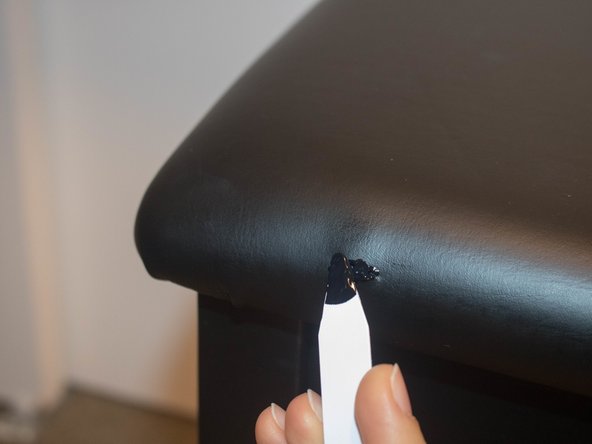
Use the spatula tool to insert the backing fabric underneath the tear.
-
-
Dieser Schritt ist noch nicht übersetzt. Hilf mit, ihn zu übersetzen!
-
Use the spatula to apply the adhesive to the damaged area.
-
-
Dieser Schritt ist noch nicht übersetzt. Hilf mit, ihn zu übersetzen!
-
Let the adhesive dry for approximately four hours.
-
You may use a hair dryer to speed up the drying process.
-
-
Dieser Schritt ist noch nicht übersetzt. Hilf mit, ihn zu übersetzen!
-
Use a Q-tip dipped in rubbing alcohol to buff and blend the area.
-
Apply light pressure to even out the edges.
-


Rückgängig: Ich habe diese Anleitung nicht absolviert.
4 weitere Nutzer:innen haben diese Anleitung absolviert.
Team

University of Minnesota, Team S1-G4, Card Fall 2018 Mitglied von University of Minnesota, Team S1-G4, Card Fall 2018
UMN-CARD-F18S1G4
3 Mitglieder
1 Anleitung geschrieben