Zum Hauptinhalt wechseln

IBM ThinkPad 600E RAM Replacement

Was du brauchst

  1. IBM ThinkPad 600E RAM Replacement, Battery: Schritt 1, Bild 1 von 3 IBM ThinkPad 600E RAM Replacement, Battery: Schritt 1, Bild 2 von 3 IBM ThinkPad 600E RAM Replacement, Battery: Schritt 1, Bild 3 von 3
    • Flip the laptop over and find the battery latch.

  2. IBM ThinkPad 600E RAM Replacement: Schritt 2, Bild 1 von 1
    • Move the latch to the side with the unlocked symbol.

  3. IBM ThinkPad 600E RAM Replacement: Schritt 3, Bild 1 von 3 IBM ThinkPad 600E RAM Replacement: Schritt 3, Bild 2 von 3 IBM ThinkPad 600E RAM Replacement: Schritt 3, Bild 3 von 3
    • Pry the battery out using your fingers.

  4. IBM ThinkPad 600E RAM Replacement, RAM: Schritt 4, Bild 1 von 1
    • Put on the anti-static wrist trap and clip it to a large metal object.

    • If you do not have an anti-static wristband, make sure to touch a large metal object to ground yourself before beginning to work on your replacement. Occasionally touch the metal object.

  5. IBM ThinkPad 600E RAM Replacement: Schritt 5, Bild 1 von 3 IBM ThinkPad 600E RAM Replacement: Schritt 5, Bild 2 von 3 IBM ThinkPad 600E RAM Replacement: Schritt 5, Bild 3 von 3
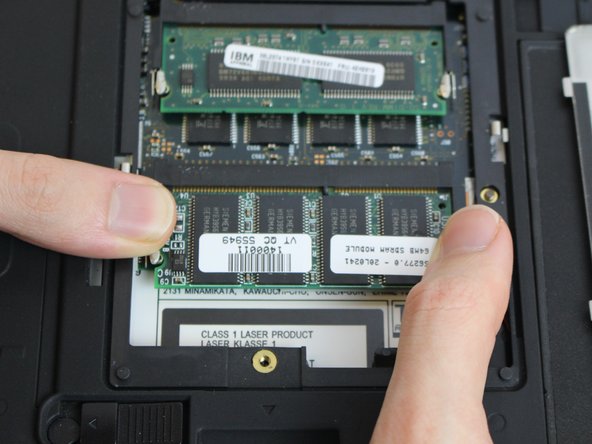
    • Using a screwdriver, loosen but do not remove the captive screw by turning counterclockwise.

    • One 3mm PH0 screw

  6. IBM ThinkPad 600E RAM Replacement: Schritt 6, Bild 1 von 3 IBM ThinkPad 600E RAM Replacement: Schritt 6, Bild 2 von 3 IBM ThinkPad 600E RAM Replacement: Schritt 6, Bild 3 von 3
    • Using your fingers, pry the small retention clips apart until the ram pops up.

  7. IBM ThinkPad 600E RAM Replacement: Schritt 7, Bild 1 von 2 IBM ThinkPad 600E RAM Replacement: Schritt 7, Bild 2 von 2
    • Using your fingers, pull straight in line with the ram to remove it.

  8. IBM ThinkPad 600E RAM Replacement: Schritt 8, Bild 1 von 3 IBM ThinkPad 600E RAM Replacement: Schritt 8, Bild 2 von 3 IBM ThinkPad 600E RAM Replacement: Schritt 8, Bild 3 von 3
    • Repeat steps 3 and 4 if you want to remove the second ram stick.

Abschluss

To reassemble your device, follow these instructions in reverse order.

2 weitere Nutzer:innen haben diese Anleitung absolviert.

Team

USF Tampa, Team 1-4, Nance Fall 2016 Mitglied von USF Tampa, Team 1-4, Nance Fall 2016

USFT-NANCE-F16S1G4

4 Mitglieder

12 Anleitungen geschrieben

0 Kommentare

Kommentar hinzufügen

Seitenaufrufe:

Letzte 24 Stunden: 0

Letzte 7 Tage: 5

Letzte 30 Tage: 17

Insgesamt: 1,003