Zum Hauptinhalt wechseln

IBM ThinkPad T43 CD Drive Replacement

Was du brauchst

  1. IBM ThinkPad T43 CD Drive Replacement, CD Drive: Schritt 1, Bild 1 von 1
    • Start by having the right side of the laptop facing you.

    • The laptop can be open if you would like, but it can be done easier if it is closed.

  2. IBM ThinkPad T43 CD Drive Replacement: Schritt 2, Bild 1 von 1
    • Remove the screw to be able to use the CD drive unlock switch

  3. IBM ThinkPad T43 CD Drive Replacement: Schritt 3, Bild 1 von 1
    • Locate the switch on the right side of the CD Drive.

  4. IBM ThinkPad T43 CD Drive Replacement: Schritt 4, Bild 1 von 3 IBM ThinkPad T43 CD Drive Replacement: Schritt 4, Bild 2 von 3 IBM ThinkPad T43 CD Drive Replacement: Schritt 4, Bild 3 von 3
    • Place finger in between the switch and the bumper

    • Slide the switch to the right until the plastic tab ejects.

  5. IBM ThinkPad T43 CD Drive Replacement: Schritt 5, Bild 1 von 3 IBM ThinkPad T43 CD Drive Replacement: Schritt 5, Bild 2 von 3 IBM ThinkPad T43 CD Drive Replacement: Schritt 5, Bild 3 von 3
    • Place fingers on the plastic tab.

    • Pull on the tab until the CD Drive ejects.

    • The tab only comes out about an inch to inch and a half.

    • Do not try to pull the tab all the way out.

    • If after you have removed the CD Drive and the tab goes back in, it is alright. It does not affect the later process.

  6. IBM ThinkPad T43 CD Drive Replacement: Schritt 6, Bild 1 von 2 IBM ThinkPad T43 CD Drive Replacement: Schritt 6, Bild 2 von 2
    • Grab the end of the CD Drive and pulls straight out towards your body.

    • Be careful not to pull it out at an angle to not risk damage.

  7. IBM ThinkPad T43 CD Drive Replacement: Schritt 7, Bild 1 von 1
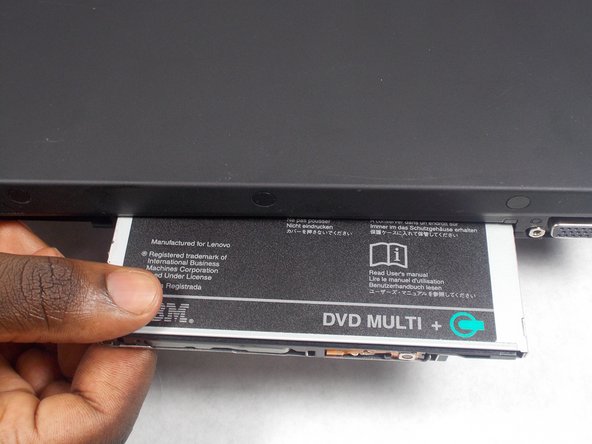
    • Now that you have successfully removed the CD Drive you can put in the new one.

    • Place the end of the new CD Drive in and slide in until it clicks.

    • If you are using slight force and it doesn't go in, it could be jammed. Just take it out and try again.

    • If you had not already, you can push back in the tab.

Abschluss

To reassemble your device, follow these instructions in reverse order.

Ein:e weitere:r Nutzer:in hat diese Anleitung absolviert.

aLiX pIeRRe

Mitglied seit: 03/19/18

855 Reputation

5 Anleitungen geschrieben

Team

UMass Dartmouth, Team S6-G4, Bernier Spring 2018 Mitglied von UMass Dartmouth, Team S6-G4, Bernier Spring 2018

UMASSD-BERNIER-S18S6G4

4 Mitglieder

10 Anleitungen geschrieben

0 Kommentare

Kommentar hinzufügen

Seitenaufrufe:

Letzte 24 Stunden: 0

Letzte 7 Tage: 7

Letzte 30 Tage: 24

Insgesamt: 839