Einleitung
If the monitor of the Infant Optics DXR-8 is not functioning properly, the motherboard may be faulty. Follow these instructions to replace the motherboard in the monitor.
Was du brauchst
-
-
Using the plastic opening tool, remove screen protector from front of monitor.
-
-
-
Remove the six 4mm screws using a Phillips #00 screwdriver.
-
Remove the screen, exposing the circuit board.
-
Turn device over to expose rear circuit board.
-
-
-
-
Using a plastic opening tool, disconnect the ribbon cable connector.
-
Gently separate the ribbon cable from the motherboard.
-
-
-
Using a Phillips #000 screwdriver, remove the four 4mm screws around the edge of the motherboard.
-
Flip the motherboard away from the front case to reveal the screen on the other side.
-
-
-
Using a plastic opening tool, carefully pry the top retaining frame off of the screen. Start in one corner and work around the bottom of the frame.
-
-
-
Using a plastic opening pick, carefully pry a corner of the screen away from the motherboard.
-
Lift the screen off of the motherboard.
-
-
-
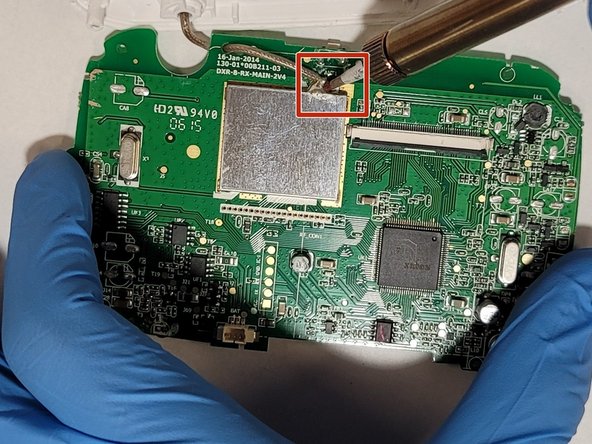
Flip the motherboard away from the case.
-
Using a soldering iron and desoldering braid, desolder the antenna from the motherboard.
-


To reassemble your device, follow these instructions in reverse order.
To reassemble your device, follow these instructions in reverse order.
Rückgängig: Ich habe diese Anleitung nicht absolviert.
Ein:e weitere:r Nutzer:in hat diese Anleitung absolviert.
Team

The Citadel Military College of South Carolina, Team S3-G1, Eggleston Spring 2021 Mitglied von The Citadel Military College of South Carolina, Team S3-G1, Eggleston Spring 2021
CMCSC-EGGLESTON-S21S3G1
3 Mitglieder
3 Anleitungen geschrieben
2 Kommentare
Can you please tell me where to buy a replacement motherboard??