Zum Hauptinhalt wechseln

Insignia NS-HTMC01-B Power Indicator Light Replacement

Was du brauchst

  1. Insignia NS-HTMC01-B Power Indicator Light Replacement, Front Case: Schritt 1, Bild 1 von 3 Insignia NS-HTMC01-B Power Indicator Light Replacement, Front Case: Schritt 1, Bild 2 von 3 Insignia NS-HTMC01-B Power Indicator Light Replacement, Front Case: Schritt 1, Bild 3 von 3
    • Flip the device over so the back panel faces up.

    • Unscrew the four screws counter-clockwise from the back panel using a 4mm Phillips screwdriver.

    • You may want to use a flashlight during this step, as the screws are hard to see.

    • Make sure to firmly connect your screwdriver with the head of the screw. A loose connection can strip the screw head, making the screws nearly impossible to remove.

  2. Insignia NS-HTMC01-B Power Indicator Light Replacement: Schritt 2, Bild 1 von 1
    • Take the screws out and set them aside.

    • Be sure to set them somewhere flat, so they don't roll away.

    • Gently pull the front panel and back panel apart to open the device.

  3. Insignia NS-HTMC01-B Power Indicator Light Replacement, Power Indicator Light: Schritt 3, Bild 1 von 3 Insignia NS-HTMC01-B Power Indicator Light Replacement, Power Indicator Light: Schritt 3, Bild 2 von 3 Insignia NS-HTMC01-B Power Indicator Light Replacement, Power Indicator Light: Schritt 3, Bild 3 von 3
    • Locate the bottom left corner below the fan inside of the heater.

    • There is a small black rectangular box with two cables coming out of it.

    • Using a Phillips #4 screwdriver, unscrew the two screws at the base counterclockwise, and set the screws to the side.

    • Be sure to set the screws on a flat surface to ensure they don't roll away.

  4. Insignia NS-HTMC01-B Power Indicator Light Replacement: Schritt 4, Bild 1 von 3 Insignia NS-HTMC01-B Power Indicator Light Replacement: Schritt 4, Bild 2 von 3 Insignia NS-HTMC01-B Power Indicator Light Replacement: Schritt 4, Bild 3 von 3
    • After unscrewing the black rectangular box up from the base of the grey frame, locate the small green rectangular light fixture.

    • Unscrew the one screw from the green rectangle counter clockwise, and set the screw to the side.

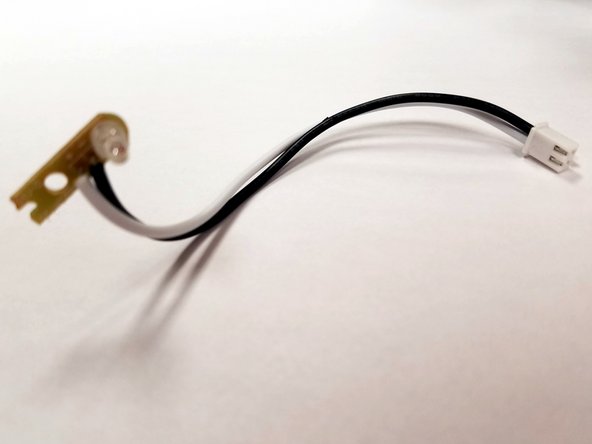
    • Gently lift the green circuit board out of the socket by pulling on the black and white cables.

    • At the end of the green rectangle is a light-emitting diode (LED). This is what lights up the power button.

  5. Insignia NS-HTMC01-B Power Indicator Light Replacement: Schritt 5, Bild 1 von 2 Insignia NS-HTMC01-B Power Indicator Light Replacement: Schritt 5, Bild 2 von 2
    • To replace the LED, unplug the white jack with the black and white cords from the bigger tan circuit board.

    • Remove the LED cord.

Abschluss

To reassemble your device, follow these instructions in reverse order.

Emma Walters

Mitglied seit: 01/31/17

201 Reputation

2 Anleitungen geschrieben

Team

0 Kommentare

Kommentar hinzufügen

Seitenaufrufe:

Letzte 24 Stunden: 0

Letzte 7 Tage: 0

Letzte 30 Tage: 0

Insgesamt: 108