Einleitung
Zum Betrieb des Lautsprechers ist ein Akku unverzichtbar, außerdem wird er benötigt, um dein Smartphone an der externen Ladebuchse zu laden. Wenn die Akkulaufzeit nachlässt, solltest du den Akku tauschen. Diese Anleitung zeigt dir, wie das geht.
Was du brauchst
-
-
Drehe den Lautsprecher herum und setze das Öffnungswerkzeug in den Spalt an der Lautsprecherabdeckung ein.
-
Heble von dir weg hin zur Rückseite des Lautsprechers, bis sich die Raste löst.
-
Wiederhole das Ganze für die Raste an der anderen Seite.
-
-
-
Entferne die beiden 8 mm Kreuzschlitzschrauben #0 von der anderen Kante der Lautsprecherabdeckung.
You have to remove the 8 mm screws before you try and Prius the other side. They are attached, and will break
-
-
-
Ziehe die beiden Seiten der Lautsprecherabdeckung auseinander.
-
Hebe die Abdeckung vom Lautsprecher ab.
-
-
-
Hebe mit einem Öffnungswerkzeug die Lasche oben am Lautsprecher an, so dass sich der Strahler von den Rasten löst.
-
Wiederhole das Ganze für die anderen Laschen um den Strahler herum, um ihn vom Rahmen abzulösen.
There is absolutely no reason to remove the passive radiators if you want to replace the speaker only!
Just cut to step 6.
Also the difficulty level is way too high. I found it very easy to disassemble the unit.
-
-
-
-
Drücke den Strahler vom Rahmen des Gerätes weg.
-
Wiederhole das Ganze auf der anderen Seite.
-
-
-
Entferne die beiden Kreuzschlitzschrauben #0 von der Vorderseite der Anschlussabdeckung.
-
-
-
Schiebe die Abdeckung behutsam zurück aus den Rasten heraus.
-
Entferne die Anschlussabdeckung.
-
-
-
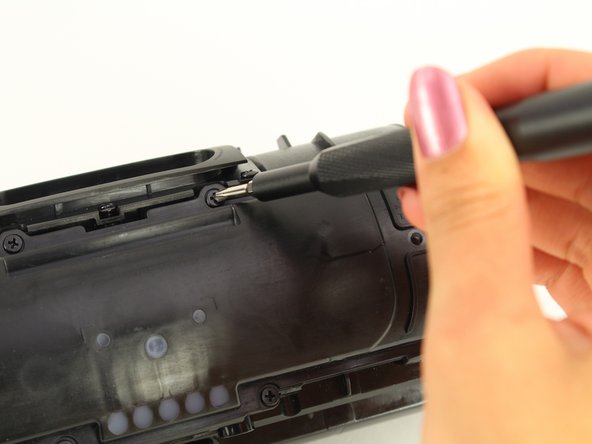
Entferne die beiden 6 mm Kreuzschlitzschrauben #0.
-
Entferne die vier 8 mm Kreuzschlitzschrauben #0.
-
-
-
Entferne das Stück Klebeband um an den ZIF-Verbinder des weißen Flachbandkabels zu gelangen.
-
Klappe mit der Spudgerspitze oder dem Fingernagel den schwarzen Sicherungsbügel des ZIF-Verbinders hoch und löse das Kabel ab.
-
Entferne das weiße Flachbandkabel von der Akkuabdeckung und lege die Abdeckung zur Seite.
Don't remove this white ribbon cable from the circuit board, it's almost impossible to plug it back. Instead of removing the cable, just remove the circuit board which is glued loosely to the plate. If you can get to the battery itself, you don't have to remove the circuit board neither.
-
-
-
Ziehe den Akku weit genug heraus um an den Akkuanschluss zu gelangen.
-
Drücke die weiße Lasche nach unten und ziehe behutsam den Akkustecker ab.
-


Um dein Gerät wieder zusammenbauen, folge den Schritten in umgekehrter Reihenfolge.
Um dein Gerät wieder zusammenbauen, folge den Schritten in umgekehrter Reihenfolge.
Rückgängig: Ich habe diese Anleitung nicht absolviert.
20 weitere Nutzer:innen haben diese Anleitung absolviert.
Besonderer Dank geht an diese Übersetzer:innen:
100%
VauWeh hilft uns, die Welt in Ordnung zu bringen! Wie kann ich mithelfen?
Hier starten ›
Team

Cal Poly, Team S1-G1, White Winter 2019 Mitglied von Cal Poly, Team S1-G1, White Winter 2019
CPSU-WHITE-W19S1G1
4 Mitglieder
26 Anleitungen geschrieben
15 Kommentare
Where do you buy a battery for a jbl Charge 4 ??
Probably just cut open the blue foil around the batteries and replace them by re-soldering the electronics onto new 18650 batteries.
correct me if I’m wrong here.
If you know how to handle them and have experience with soldering them that's a yes if not those batteries are really dangerous if you don't know how to do it correctly.
Hart80 -
Where in the !&&* do i get a battery for a bluetooth speaker. What happened to the jbl charge 4 that it even goes out???
My JBL charge 4 battery dead too. 9nly uses it for three months
How is the battery 6 pins? Any idea what the middle 2 wires do? The outer ones seems +and - 3.7v if the cells are in parallel. Can anyone shine a light on the configuration/wiring of the cells?
Middle connections are scl sda serial connections. For communication from battery board to main board.
Matt C -
Does the battery come charged already?
After replacement mine turns on and right off again any ideas
Did you ever solve this? Thinking of replacing a battery in my 4, but saw a few Reddit posts saying they had similar issues- new battery didn’t allow power up. One person put their original battery back in, and speaker worked, but old battery only.
I’m in the same boat. Replaced battery and speaker turns on then off. Doesn’t seem to be taking a charge.
You have to be an expert electronics technician to replace a battery! My JBL Charge 4 lasted one (1) battery charge cycle! Now I gotta go back to vocational school for a year to be able to listen to it for what, one more charge cycle???? Besides that Walmart won't exchange it because it was the 92nd day from the purchase date. WHAT A FREAKING JOKE!
I think there are just 3 18350 2600mah cells in parallel, I would just keep the genuine BMS and only raplace the cells. Good soldering iron and some serious skills are required.
My jbl charge 4 has heat problems and doesn't charge. The port and plug in the usb c get very hot and no charge what so ever. Will replacing the battery solve this issue. Plz help.
ich schaffe es nur auf der einen seite. Auf der anderen ist die abdeckung viel zu fest dran ? was kann ich machen ?
George Ziakos - Antwort