Einleitung
The speaker is responsible for creating the sound coming out of the device. If the sound quality is low or your speaker is not making sound at all but powering on it may be the result of a damaged or broken speaker. This guide will show you how to replace the speaker in your JBL Charge 4. This guide requires knowledge of desoldering. Find a guide on soldering and desoldering here.
Was du brauchst
-
-
Flip your speaker over and insert the plastic opening tool into the slit on the grille.
-
Pry away from yourself towards the back of the speaker to release the clip.
-
Repeat this process for the clip on the other side.
-
-
-
Remove the two 8mm Phillips #0 screws from the other edge of the grille.
You have to remove the 8 mm screws before you try and Prius the other side. They are attached, and will break
-
-
-
-
Using the plastic opening tool, lift the tab on top of the speaker to release the radiator from the clips.
-
Repeat this process on the other clips around the radiator to release it from the frame.
There is absolutely no reason to remove the passive radiators if you want to replace the speaker only!
Just cut to step 6.
Also the difficulty level is way too high. I found it very easy to disassemble the unit.
-
-
-
Flip the device so that the speaker faces you.
-
Remove the four 8mm Phillips #1 screws.
-
-
-
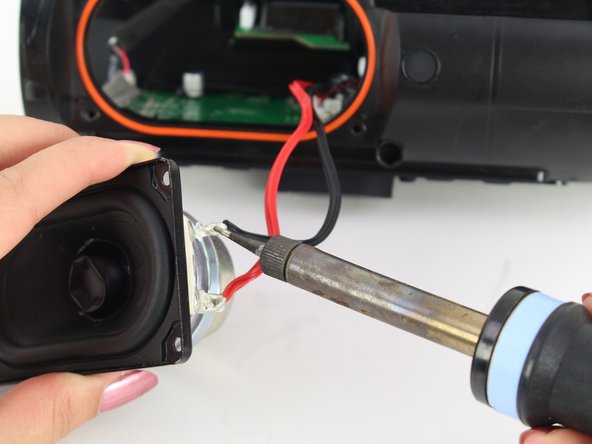
Gently pull out the speaker.
-


To reassemble your device, follow these instructions in reverse order.
To reassemble your device, follow these instructions in reverse order.
Rückgängig: Ich habe diese Anleitung nicht absolviert.
10 weitere Nutzer:innen haben diese Anleitung absolviert.
Team

Cal Poly, Team S1-G1, White Winter 2019 Mitglied von Cal Poly, Team S1-G1, White Winter 2019
CPSU-WHITE-W19S1G1
4 Mitglieder
26 Anleitungen geschrieben
11 Kommentare
Perfect - But where to get the replacement speaker ??? I’ve searched whole web. Please give me the info about replacement speaker diaphragm. Regards, T
Jbl charge 4
Jbl charge 4 Led indicator board G ribbon cable authentic
$$$$$$$$$$$$
Where can I order a replacement speaker for the charge for I really appreciate this article thank you
Nice tutorial but you don’t have to remove the passive radiators because its not that it gets more difficult, but it is that after the passive radiators are removed, the sealing glue will break, resulting in a non waterproof speaker. so, the only thing to do, is after you remove the grill, remove the 4 screws, take out the driver and de-solder the red and black wires and after you get the new driver, solder the red wire to positive and the black to negative. Now do these steps backward. Then you’ll be resulted with a brand-new looking JBL charge 4. Trust me, I removed passive radiators of the charge 4 and it resulted me with an air leak. So do everything except for removing passive radiators.
I need JBL charge 4 speakers black colour grill
ich schaffe es nur auf der einen seite. Auf der anderen ist die abdeckung viel zu fest dran ? was kann ich machen ?
George Ziakos - Antwort