Einleitung
Removing the motherboard will allow access to most of the internal components.
Was du brauchst
-
-
Make sure the device is powered off before you begin to disassemble the speaker.
-
Remove the trim from the speaker using a jimmy or metal spudger.
-
-
-
Use the PH1 screwdriver to remove all five of the 6 mm screws from the battery cover.
-
Remove the battery cover and set the cover aside.
-
-
-
Use a spudger to carefully remove the liquid electrical tape that holds the battery inside the battery compartment.
This is NOT liquid Electrical tape! I recommend using 3M adhesive silicone. If you are doing this repair then you can find the 3m adhesive silicone at automotive stores. Liquid tape hardens and 3M adhesive remains mailable vs the rock hardening effect of liquid tape.
-
-
-
Use a spudger to lift the battery out of the device.
-
Lift the end of the battery that does not have the wire connection and remove the 16 mm PH2 screw underneath the battery.
-
-
-
-
Remove the four 16 mm screws from the white plastic casing using the PH2 screwdriver.
The two screws on the right side (side with the USB port) are too long to extract with the iFixit screwdriver in the basic kit. I needed to use a regular thin PH2 screwdriver to get them out.
I had this problem also, whenever putting the screws back in there were still air pockets in the side with smaller screws
-
-
-
Starting in a corner of the device where the casing and the side meet, use a pointed metal spudger to pry the back casing off the speaker and the glue holding the seam together.
-
Slide the metal spudger along the seam to separate the back casing from the rest of the speaker.
-
-
-
Once the back casing is open, disconnect the three white connectors from the motherboard.
-
Remove the upper casing.
Hi , Thanks a lot in my speacker i had broken plastic part which affect clear sound with your guide i open mine seasily and take it out now i have beand new sound which i had before. thanks again.
-
-
-
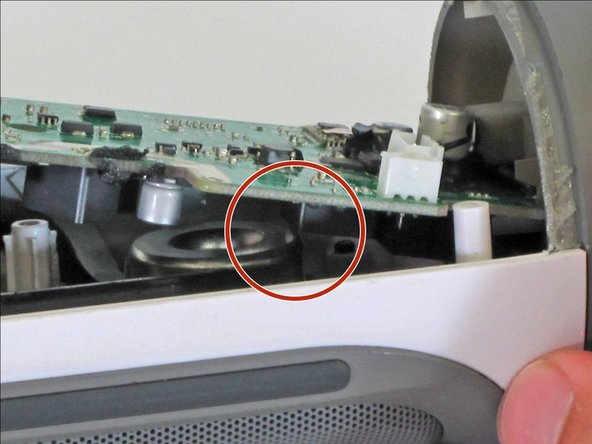
Remove the 9 mm Phillips screw in the corner of the motherboard.
There are 2 screws to remove, the other is under the barcode sticker
-
-
-
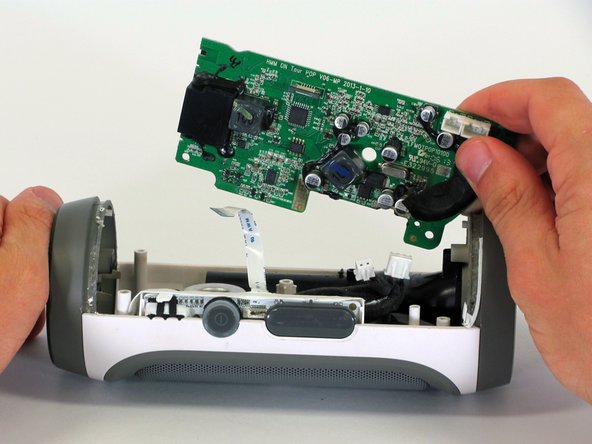
Remove the motherboard from the casing by lifting the corner of the board out of the device.
-
If the motherboard won't budge, be sure that the square component on the bottom of the motherboard clears the edge of the speaker.
-
-
-
Pull down on the black clip holding the ribbon cable in place.
-
Pull the ribbon cable from the connector using the blue tab.
-
Remove the motherboard from the device.
-


To reassemble your device, follow these instructions in reverse order.
To reassemble your device, follow these instructions in reverse order.
Rückgängig: Ich habe diese Anleitung nicht absolviert.
7 weitere Nutzer:innen haben diese Anleitung absolviert.
Team

Cal Poly, Team 12-1, Lancaster Spring 2015 Mitglied von Cal Poly, Team 12-1, Lancaster Spring 2015
CPSU-LANCASTER-S15S12G1
5 Mitglieder
11 Anleitungen geschrieben
14 Kommentare
Hello I have 3 jbl speakers I bought that work only if plugged to the wall and aux cable... other than that it doesn't work at all .. Bluetooth or even the buttons don't function
had same issue. fixed it by reconnecting the cable that conncts LEDs/ buttons
i have the same problem
hello can i ask if how many pins in the flex for power button i accidentally damage when i fixed it
How much does the motherboard cost.
i have a pulse 2. Please tell me
I have two jbl charger 3 but doesnt Connect it for wifi, could be the problem.
Where can I get the ribbon cable …mine is broken
I think I may have gotten the buttons on top, volume & power, wet from my wet hand. After that it wouldn’t power on & off properly and would not connect to bluetooth. The power button will flash blue, and then red, and any combination of the 2, but doesn’t function properly. Won’t stay blue and doesn’t stay solid blue.
Do you think I damaged the mother board? I did remove the mother board as instructed, but I really don’t want to buy one unless I am reasonably sure that is what is up with it.
i want new mother board
i want new mother board can u plz give me your number
I can play music but all the buttons of my JBL Flip6 aren’t working I can just turn on and turn off my speaker I even cannot pair to another device how can I fix it?🙏🙏