Zum Hauptinhalt wechseln

Jumper Angelsounds JPD-100S The Transducer Replacement

Was du brauchst

  1. Jumper Angelsounds JPD-100S The Transducer  Replacement, Motherboard: Schritt 1, Bild 1 von 1
    • Access the battery compartment

    • Remove the battery compartment lid and set it aside.

    • Disconnect the battery and set it aside.

  2. Jumper Angelsounds JPD-100S The Transducer  Replacement: Schritt 2, Bild 1 von 2 Jumper Angelsounds JPD-100S The Transducer  Replacement: Schritt 2, Bild 2 von 2
    • Puncture the sticker in the battery compartment with a spudger to access the screw beneath it.

  3. Jumper Angelsounds JPD-100S The Transducer  Replacement: Schritt 3, Bild 1 von 1
    • Remove the 7mm Phillips #1 screw from the battery compartment.

    • Place the screw in a secure place.

  4. Jumper Angelsounds JPD-100S The Transducer  Replacement: Schritt 4, Bild 1 von 2 Jumper Angelsounds JPD-100S The Transducer  Replacement: Schritt 4, Bild 2 von 2
    • Begin prying open the device.

    • Insert a plastic opening tool into the side groove about 2cm from the pink plastic component and pry open one side of the device.

    • Once the side is separated, leave the opening tool inside to prevent the two sides from closing.

  5. Jumper Angelsounds JPD-100S The Transducer  Replacement: Schritt 5, Bild 1 von 2 Jumper Angelsounds JPD-100S The Transducer  Replacement: Schritt 5, Bild 2 von 2
    • Insert another plastic opening tool into the groove opposite to the side of the tool already inserted.

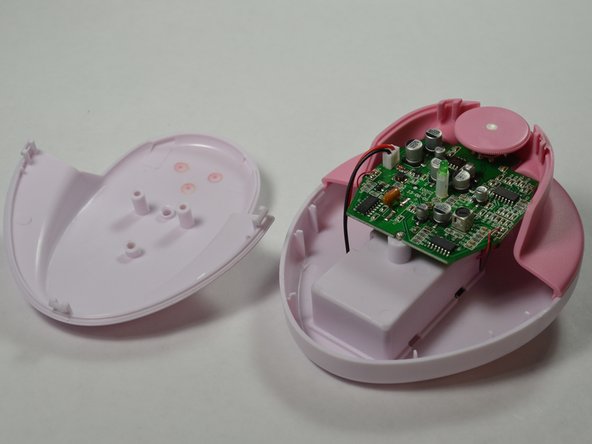
    • Create separation on that side until the white plastic component comes off entirely.

    • Place the white plastic component in a secure place.

  6. Jumper Angelsounds JPD-100S The Transducer  Replacement: Schritt 6, Bild 1 von 1
    • With your hand, remove the pink component.

  7. Jumper Angelsounds JPD-100S The Transducer  Replacement: Schritt 7, Bild 1 von 1
    • Remove the 7mm Phillips #1 screw in the middle of the motherboard.

  8. Jumper Angelsounds JPD-100S The Transducer  Replacement, The Transducer: Schritt 8, Bild 1 von 1
    • Unsolder the Black cable

  9. Jumper Angelsounds JPD-100S The Transducer  Replacement: Schritt 9, Bild 1 von 2 Jumper Angelsounds JPD-100S The Transducer  Replacement: Schritt 9, Bild 2 von 2
    • Unsolder the red cables from the metal plates.

Abschluss

To reassemble your device, follow these instructions in reverse order.

Muosa Almubarak

Mitglied seit: 09/29/15

101 Reputation

1 Anleitung geschrieben

Team

USF Tampa, Team 6-1, Remmell Fall 2015 Mitglied von USF Tampa, Team 6-1, Remmell Fall 2015

USFT-REMMELL-F15S6G1

6 Mitglieder

6 Anleitungen geschrieben

0 Kommentare

Kommentar hinzufügen

Seitenaufrufe:

Letzte 24 Stunden: 0

Letzte 7 Tage: 0

Letzte 30 Tage: 2

Insgesamt: 283