Zum Hauptinhalt wechseln

KYVOL CYBOVAC E20 Wheel Assembly Replacement

Was du brauchst

  1. KYVOL CYBOVAC E20 Wheel Assembly Replacement, Battery: Schritt 1, Bild 1 von 2 KYVOL CYBOVAC E20 Wheel Assembly Replacement, Battery: Schritt 1, Bild 2 von 2
    • Start by laying the device on a flat surface with the logo facing up.

    • Flip the device over.

  2. KYVOL CYBOVAC E20 Wheel Assembly Replacement: Schritt 2, Bild 1 von 2 KYVOL CYBOVAC E20 Wheel Assembly Replacement: Schritt 2, Bild 2 von 2
    • Remove two 1 mm screws using a Phillips #00 screwdriver.

  3. KYVOL CYBOVAC E20 Wheel Assembly Replacement: Schritt 3, Bild 1 von 2 KYVOL CYBOVAC E20 Wheel Assembly Replacement: Schritt 3, Bild 2 von 2
    • Remove the cover.

  4. KYVOL CYBOVAC E20 Wheel Assembly Replacement: Schritt 4, Bild 1 von 2 KYVOL CYBOVAC E20 Wheel Assembly Replacement: Schritt 4, Bild 2 von 2
    • Lift the battery.

    • Press down on the top of the white connector.

    • Remove the battery from the vacuum.

  5. KYVOL CYBOVAC E20 Wheel Assembly Replacement, Wheel: Schritt 5, Bild 1 von 1
    • Remove both sweepers by pinching near the base of the brushes and pulling up.

  6. KYVOL CYBOVAC E20 Wheel Assembly Replacement: Schritt 6, Bild 1 von 1
    • Remove four 10 mm screws using a Phillips #00 screwdriver.

  7. KYVOL CYBOVAC E20 Wheel Assembly Replacement: Schritt 7, Bild 1 von 3 KYVOL CYBOVAC E20 Wheel Assembly Replacement: Schritt 7, Bild 2 von 3 KYVOL CYBOVAC E20 Wheel Assembly Replacement: Schritt 7, Bild 3 von 3
    • Lift the wheel to detach the tensioning spring. This step requires you to first press down on the wheel, then detach.

    • Disconnect the wheel motor from the power supply.

    • Repeat the process for the other wheel.

  8. KYVOL CYBOVAC E20 Wheel Assembly Replacement, Wheel Assembly: Schritt 8, Bild 1 von 3 KYVOL CYBOVAC E20 Wheel Assembly Replacement, Wheel Assembly: Schritt 8, Bild 2 von 3 KYVOL CYBOVAC E20 Wheel Assembly Replacement, Wheel Assembly: Schritt 8, Bild 3 von 3
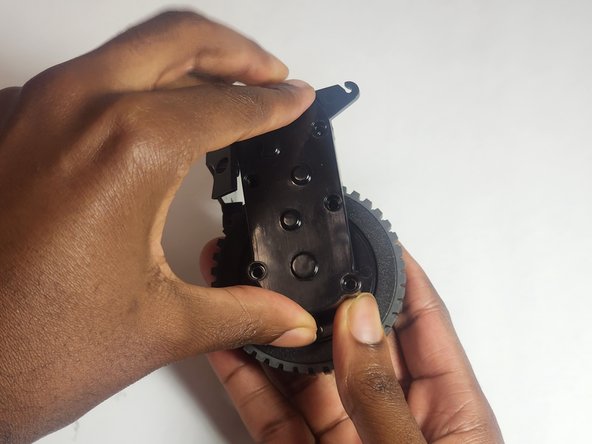
    • Remove six 10 mm screws from the housing using a Phillips #00 screwdriver.

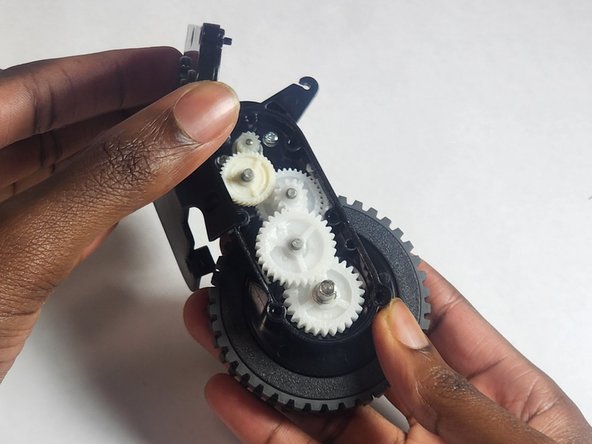
    • Open the gearbox.

  9. KYVOL CYBOVAC E20 Wheel Assembly Replacement: Schritt 9, Bild 1 von 1
    • Gently remove each gear.

  10. KYVOL CYBOVAC E20 Wheel Assembly Replacement: Schritt 10, Bild 1 von 2 KYVOL CYBOVAC E20 Wheel Assembly Replacement: Schritt 10, Bild 2 von 2
    • Use a J1 screw driver to remove two 6 mm screws from the gearbox.

Abschluss

To reassemble your device, follow these instructions in reverse order.

Randall Morgan

Mitglied seit: 07/13/23

359 Reputation

3 Anleitungen geschrieben

Team

IUPUI, Team 1-1, Harley Summer 2023 Mitglied von IUPUI, Team 1-1, Harley Summer 2023

IUPUI-HARLEY-SU23S1G1

4 Mitglieder

4 Anleitungen geschrieben

0 Kommentare

Kommentar hinzufügen

Seitenaufrufe:

Letzte 24 Stunden: 1

Letzte 7 Tage: 7

Letzte 30 Tage: 16

Insgesamt: 149