Zum Hauptinhalt wechseln

Kenwood DNX571HD Cooling Fan Replacement

Was du brauchst

  1. Kenwood DNX571HD Cooling Fan Replacement, CD/DVD Drive: Schritt 1, Bild 1 von 2 Kenwood DNX571HD Cooling Fan Replacement, CD/DVD Drive: Schritt 1, Bild 2 von 2
    • Unscrew the four 3.5mm side screws with a Phillips #1 screwdriver.

    • There are two screws per side.

  2. Kenwood DNX571HD Cooling Fan Replacement: Schritt 2, Bild 1 von 3 Kenwood DNX571HD Cooling Fan Replacement: Schritt 2, Bild 2 von 3 Kenwood DNX571HD Cooling Fan Replacement: Schritt 2, Bild 3 von 3
    • Use a spudger to unhook the plastic clips on the sides and top of the front panel. There are two clips on each side and one clip on the top.

    • Place the spudger between the plastic tab and the metal case and gently lift the spudger away from the case.

  3. Kenwood DNX571HD Cooling Fan Replacement: Schritt 3, Bild 1 von 1
    • Pull the top of the front panel out and down to remove front panel.

    • Remove the front panel gently so as not to damage the ribbon cables behind it.

  4. Kenwood DNX571HD Cooling Fan Replacement: Schritt 4, Bild 1 von 3 Kenwood DNX571HD Cooling Fan Replacement: Schritt 4, Bild 2 von 3 Kenwood DNX571HD Cooling Fan Replacement: Schritt 4, Bild 3 von 3
    • Unscrew the three 5mm screws from the top of the device using a Phillips #1 screwdriver.

    • Lift up to remove the top casing.

  5. Kenwood DNX571HD Cooling Fan Replacement: Schritt 5, Bild 1 von 1
    • Lift the CD drive carefully to expose the attached cable underneath.

  6. Kenwood DNX571HD Cooling Fan Replacement: Schritt 6, Bild 1 von 2 Kenwood DNX571HD Cooling Fan Replacement: Schritt 6, Bild 2 von 2
    • Flip up the black clasp with a spudger to disconnect the large white ribbon cable connecting the CD drive to the board underneath.

  7. Kenwood DNX571HD Cooling Fan Replacement, Cooling Fan: Schritt 7, Bild 1 von 1
    In diesem Schritt verwendetes Werkzeug:
    Tweezers
    $4.99
    Kaufen
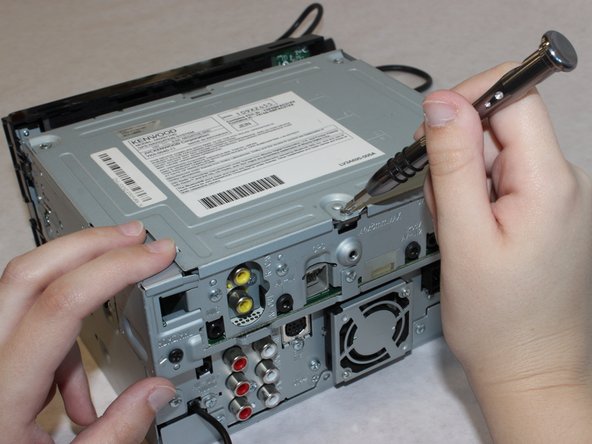
    • Carefully unplug the fan power cord with the tweezers.

  8. Kenwood DNX571HD Cooling Fan Replacement: Schritt 8, Bild 1 von 2 Kenwood DNX571HD Cooling Fan Replacement: Schritt 8, Bild 2 von 2
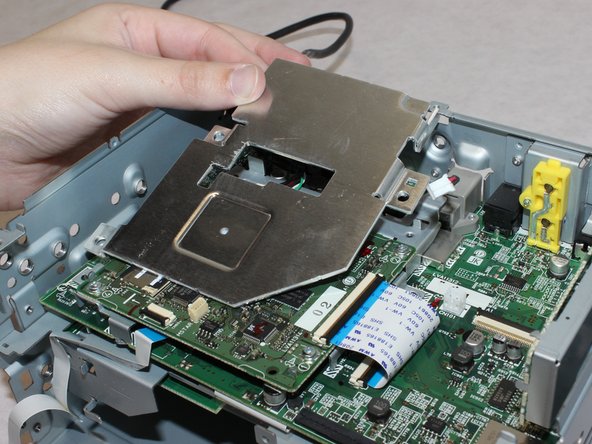
    • Unscrew the three 5mm length screws with the Phillips #1 screwdriver.

    • Remove the metal plate

    • Removing the plate will damage the heat sink compound. This will need to be replaced during reassembly.

  9. Kenwood DNX571HD Cooling Fan Replacement: Schritt 9, Bild 1 von 2 Kenwood DNX571HD Cooling Fan Replacement: Schritt 9, Bild 2 von 2
    • Unscrew the three 5.5mm long screws with a Phillips #1 screwdriver.

  10. Kenwood DNX571HD Cooling Fan Replacement: Schritt 10, Bild 1 von 3 Kenwood DNX571HD Cooling Fan Replacement: Schritt 10, Bild 2 von 3 Kenwood DNX571HD Cooling Fan Replacement: Schritt 10, Bild 3 von 3
    • Remove the four 5.5mm screws with the Phillips #1 screwdriver.

  11. Kenwood DNX571HD Cooling Fan Replacement: Schritt 11, Bild 1 von 1
    • Lift the top part of the unit up from the lower chassis.

  12. Kenwood DNX571HD Cooling Fan Replacement: Schritt 12, Bild 1 von 2 Kenwood DNX571HD Cooling Fan Replacement: Schritt 12, Bild 2 von 2
    • Remove the two 13mm long screws with a Phillips #1 screwdriver.

    • Gently thread the power cable through the circuit boards to separate the fan from the body of the stereo.

Abschluss

To reassemble your device, follow these instructions in reverse order.

Wendy Zaballos

Mitglied seit: 09/17/18

952 Reputation

6 Anleitungen geschrieben

Team

Washington State, Team S1-G1, Hope Fall 2018 Mitglied von Washington State, Team S1-G1, Hope Fall 2018

WSU-HOPE-F18S1G1

4 Mitglieder

6 Anleitungen geschrieben

0 Kommentare

Kommentar hinzufügen

Seitenaufrufe:

Letzte 24 Stunden: 0

Letzte 7 Tage: 2

Letzte 30 Tage: 12

Insgesamt: 931