Einleitung
Having battery issues that require replacement? Well you're in the right place. You're also in luck: the battery is the easiest internal component of the Kindle 7th generation to replace. Follow this guide and your Kindle should be working in no time.
Was du brauchst
-
-
At each corner, use the blue plastic opening tool to unhook and separate the front panel from the adhesive.
-
Run the tool along the seams to pry open the front panel.
-
-
-
Peel the front panel off to remove it from the Kindle.
-
To prevent damaging the front panel, peel the panel from the corners towards the middle of the Kindle.
What is the adhesive you are using resecure the screen? Would Tesa 61395 Tape work (4mm) or would this create protrusion?
Did that option work for you? I'm about to try and change my battery and don't have any idea on what backup adhesive to have
Lagroth -
-
-
-
Remove the ten 5.0 mm T5 Torx screws.
You will break the newer vision of kindle just like this. there is a peg that connect the top center of the screen to the back case. Remove the black double sided tape in the center and push this peg back .
If you see black double sided tape at the top of your Kindle, as the commenter above did, you are on the wrong model—have a look here to see if this is your model: Kindle Paperwhite 3 Bildschirm/Touch Panel austauschen
-
-
-
-
Working evenly along the corners and edges, separate the internal contents from the back panel.
-
-
-
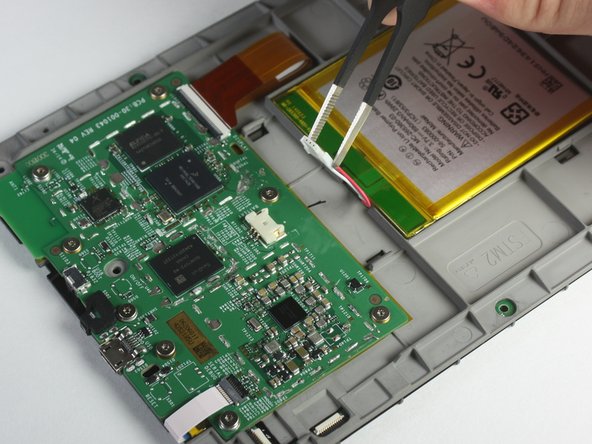
Use the blunted precision tweezers to pinch the ends of the clip securing the battery cord to the motherboard.
-
Gently slide the cord from the motherboard connection.
-
-
-
Use the plastic opening tool to pry the battery from the backside of the screen.
-
Set the battery aside.
-


To reassemble your device, follow these instructions in reverse order.
To reassemble your device, follow these instructions in reverse order.
Rückgängig: Ich habe diese Anleitung nicht absolviert.
23 weitere Nutzer:innen haben diese Anleitung absolviert.
Team

Cal Poly, Team 6-28, Amido Winter 2015 Mitglied von Cal Poly, Team 6-28, Amido Winter 2015
CPSU-AMIDO-W15S6G28
4 Mitglieder
18 Anleitungen geschrieben
16 Kommentare
Fairly easy to do. Saves a lot of money compared to buying a whole new Kindle :) Thank you for this! A note: I've never seen batteries as...soft as these. Take care when using the removal tool. I could be easy to puncture the battery which could cause a big mess and possibly injury.
Where do I get a new battery from please?
You can get the batteries on Ebay.
Does replacing the battery reset the Kindle 7 to factory defaults?
No. I just replaced my battery, and it booted with my settings and content.
I have a 7'th gen kindle paperwhite, and inside the screws look nothing like the pictures here! :(
1. There are way more screws, but none of them a torx.
2. The battery is screwed down, and is in a hard black plastic package
3. the main board is edge-to-egde, and with 3 ribbon connectors goring around the sides
4. main board has 4 metal housings hiding all the chips
Thanks for this! But as others have said, this doesn't look like my 7th generation Kindle Paperwhite (I'm in the UK – I guess it’s possible there might be regional differences?).
But the principle is just the same. Be prepared for 11 crosshead screws instead of ten Torx. The nice thing about the 7th gen is that the battery is in a rigid carrier held down by three screws instead of glue. I’m impressed with the repairability of this Kindle, and the build quality too.
Comment savoir si la batterie est à remplacer ? merci
You could have mentioned that this is not a Kindle Voyage 7th Generation! Your instructions have had me trying to prise the back off one of those when it just needs the top panel removing and 4 screws undoing. Thanks to ifu##it.com, I have ruined a Kindle. Thanks very much, I won't be ordering any more tools from you!
Hello @tonywinter47915
i understand that your situation is really unsettling. The Kindle and the Kindle Voyage are completely different devices, even if they are both Kindles and they are both black. It is absolutely unsatisfying, I understand that, but you cannot blame iFixit for buying the wrong sparepart or using a wrong guide.
If you still need to contact the support, feel free to contact them at support@ifixit.com
In case you need some more support fixing your Kindle Voyage, we have some guides to fix issues with it: Kindle Voyage
BenZ78 -
"i understand that your situation is really unsettling. The Kindle and the Kindle Voyage are completely different devices, even if they are both Kindles and they are both black. It is absolutely unsatisfying, I understand that, but you cannot blame iFixit for buying the wrong sparepart or using a wrong guide."
Don't you think that adding a clarification to the Kindle 7 guides that it is not the Kindle 7 Voyage would be more helpful than telling me they are both Kindles and both black?
i had a battery that wouldn't even last a full day in the end. by accident i let the battery fall below 10% charge and when turned on it only showed the battery icon. I fully charged it and now i am having no problems with it. what i think happened is it reset the batteries memory and that was the problem. worth trying anyway before buying a new battery.
soupamanx - Antwort