Einleitung
Hier wird gezeigt, wie du eine zerbrochene Frontglasscheibe oder den Digitizer am Amazon Kindle Fire austauschen kannst.
Was du brauchst
-
-
Zwänge ein Plastiköffnungswerkzeug in den Spalt an der unteren rechten Ecke des Kindle Fire.
-
Heble die Teile auseinander und lasse das Werkzeug rings um das Kindle Fire laufen. Löse so die Rasten, welche die beiden Gehäuseteile zusammenhalten.
-
Es kann helfen, wenn du die Unterseite des Kindle weg vom oberen Teil ziehst (und heraus aus der Seite). Wenn du zuviel Kraft zum Trennen aufbringst, ohne zu ziehen, können die Rasten brechen.
-
-
-
Wenn alle Kunststoffrasten gelöst sind, kannst du das Gehäuserückteil weg vom Kindle Fire ziehen.
Order placed
Mine has another plastic pc over the m.etal plate
-
-
-
Setze die Spitze eines Plastiköffnungswerkzeugs zwischen die rechte Akkuzelle und dem Rahmen des Kindle Fire.
-
Heble den Akku hoch und arbeite dich mit dem Werkzeug die Kante entlang, um die Klebeverbindung zum Rahmen zu trennen.
-
-
-
Wiederhole den vorherigen Schritt für die linke Akkuzelle.
The CPU got extremely hot and just now getting repaired 5 days or so
I can't get the battery to charge
-
-
-
Hebe die Rückseite des Akkus hoch, um jegliche Spannung vom Akkuanschluss zu nehmen, und benutze gleichzeitig einen Spudger, um den Akkuanschluss aus seinem Verbinder zu schieben.
-
Ziehe den Akku aus dem Kindle Fire heraus.
-
-
-
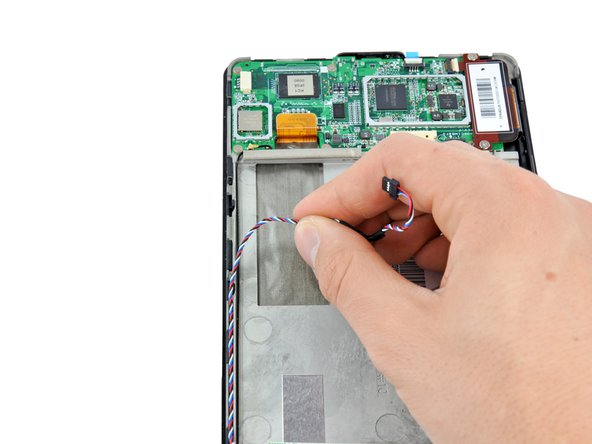
Ziehe das Stück Klebeband von der linken oberen IC ab, welches das Lautsprecherkabel befestigt.
-
Schiebe den Stecker am Lautsprecherkabel mit dem flachen Ende des Spudgers aus seinem Sockel.
-
Fädle das Lautsprecherkabel aus.
-
-
-
Entferne die beiden 3,3 mm Kreuzschlitzschrauben #00, welche die Lautsprecher am Kindle Fire befestigen.
-
Hebe die Lautsprecher aus dem Kindle Fire.
-
-
-
-
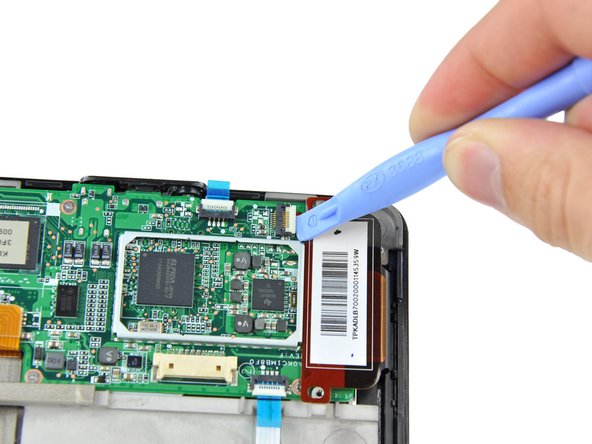
Entferne die beiden 2,3 mm Kreuzschlitzschrauben #00 vom Kontroller des Touchscreens.
-
Löse den Stecker am Kontroller des Touchscreens mit einem Plastiköffnungswerkzeug.
-
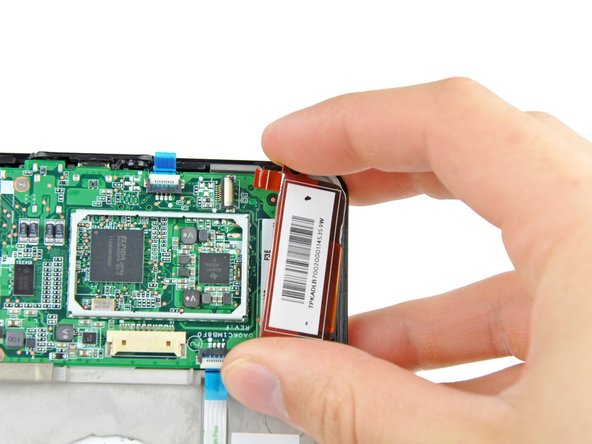
Hebe den Touchscreen Kontroller hoch und nach rechts. Entferne ihn vorsichtig.
-
-
-
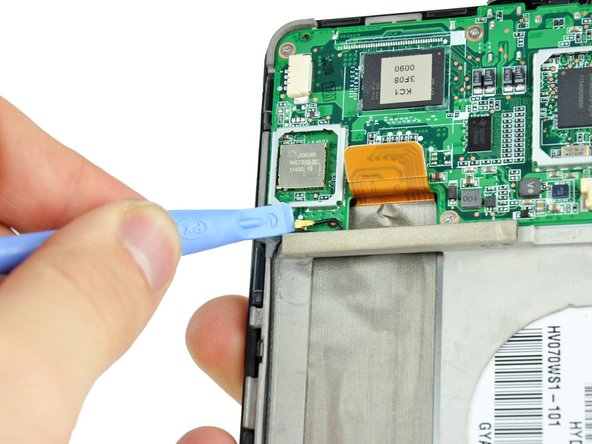
Klappe den Sicherungsbügel am ZIF Verbinder der Einschalttaste mit einem Plastiköffnungswerkzeug hoch.
-
Klappe den Sicherungsbügel am ZIF Verbinder des Helligkeitssensors mit einem Plastiköffnungswerkzeug hoch.
-
Ziehe mit einer Pinzette an der blauen Lasche am Kabel des Helligkeitssensors, um es aus seinem Sockel zu entfernen.
Make sure to mark what ZIF connector goes where, they are not interchangeable even though a first glance the appear to be the same size
It took about 2 hours, but that is, mainly, because reconnecting the ZIF connectors can be overly tedios.
I cannot get the zif connectors to go back in ..what can i do...been trying for hours to get them back in...im talking bout the white flip pieces that lock in film..some one please help me with this!!
Stand it up on its end, lining up the holes to the wires. Slide into holes and 'flip'/rotate white plastic piece down into a flat position.
-
-
-
Benutze ein Plastiköffnungswerkzeug um das Displaydatenkabel hochzuheben und abzulösen.
-
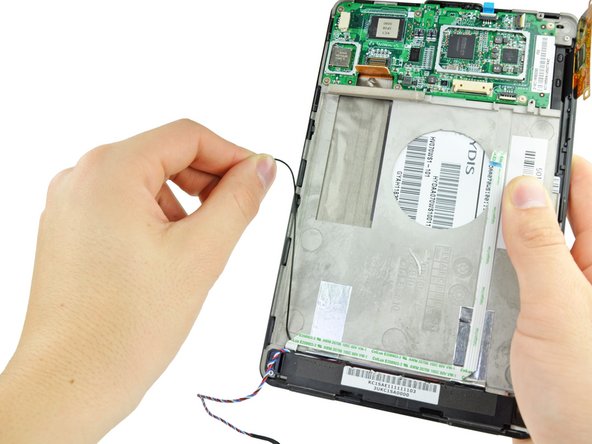
Hebe den Antennenstecker mit einem Plastiköffnungswerkzeug hoch und löse ihn.
-
Fädle das Antennenkabel aus.
Be very careful when disconnecting the antenna, and be sure to note how the cable is routed into the little socket on the motherboard. The reconnecting of the antenna cable into its motherboard port can be tricky and will require patience, persistence and perhaps a magnifier and tweezers.
Followed the steps but once reassembled the screen comes on but doesn't respond to touch. It was working fine even with broken glass screen. Any suggestions?
Mine is doing the same thing! What did you do to fix it?
Tara -
I order a replacement motherboard from ifixit and for some reason it had a plastic increasing around the outer edge of the "display data cable connection port" on the motherboard, which makes it impossible to connect the cable to the motherboard. I called ifixit and they said send a picture and a description. Hopefully the customer who owns the kindle fire will understand that after waiting on the part for a week. :\
-
-
-
Entferne die sechs 2,6 mm Kreuzschlitzschrauben #00, welche die Hauptplatine am Rahmen befestigen.
-
-
-
Hebele vorsichtig mit einem Plastiköffnungswerkzeug an der Unterseite der Hauptplatine, um sie von der Klebeverbindung darunter zu lösen.
-
Hebele die Hauptplatine oben mit einem Plastiköffnungswerkzeug hoch, bis sie frei kommt.
-
Hebe die Hauptplatine aus dem Kindle Fire. Achte dabei darauf, dass das Kabel zur Einschalttaste aus Schritt 8 aus seinem Anschluss herauskommt.
-
-
-
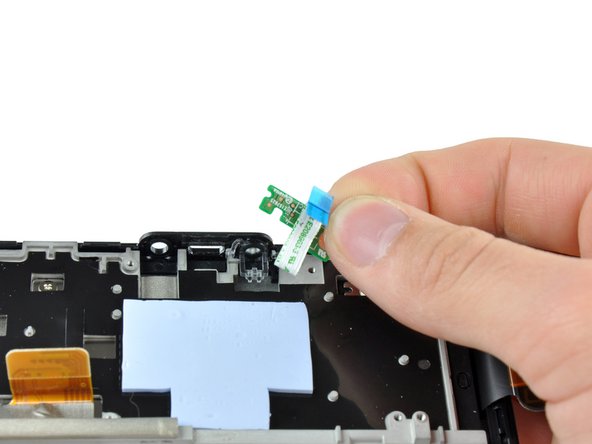
Entferne die 2,5 mm Kreuzschlitzschraube, welche die Platine der Einschalttaste am Kindle Fire befestigt.
-
Hebe die Platine der Einschalttaste aus dem Kindle Fire.
-
-
-
Löse das Kabel zum Helligkeitssensor mit dem flachen Ende des Spudgers vom Rahmen ab.
-
-
-
Ziehe mit dem flachen Ende des Spudgers das silberfarbene Klebeband ab, welches das Antennenkabel sichert.
-
-
-
Entferne die fünf 3,6 mm Kreuzschlitzschrauben #00, welche den Rahmen und den Helligkeitssensor befestigen.
-
-
-
Schiebe den Helligkeitssensor unter dem Rahmen hervor und entferne ihn vom Kindle Fire.
-
-
-
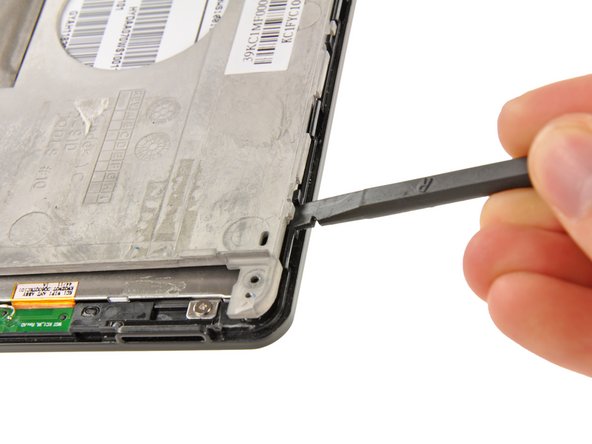
Hebele den Rahmen mit dem flachen Ende des Spudgers weg von der Displayeinheit, bis du ihn mit deiner Hand anfassen kannst.
-
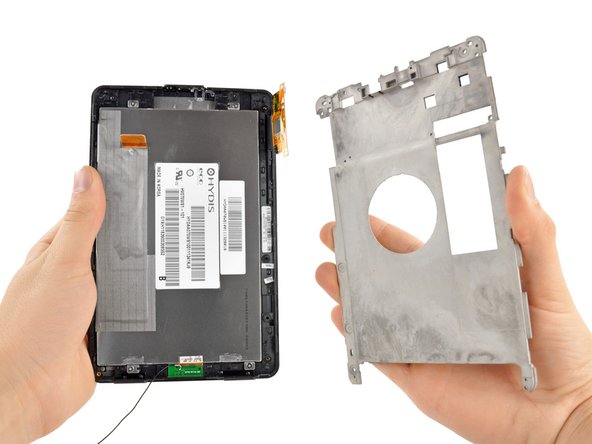
Entferne den Rahmen von der Displayeinheit.
-
-
-
Entferne die vier 2,4 mm Kreuzschlitzschrauben #00, welche das LCD am Frontglas befestigen.
-
Drehe die Oberkante des LCD um 90° weg von der Frontscheibe, so wie im zweiten Bild gezeigt.
-
Trenne LCD und Frontscheibe.
Separate the front glass panel can be tricky, it's glue to the frame. Mine was cracked pretty badly so I won't come out in one neat little piece. Just patiently peel off the screen slowly.
I attempted to separate the glass from the black screen/digitizer (LCD) and it was all glued. Kept heating the area probably 30 times. My glass has been cracked throughout and it was impossible to peel it off without damaging the screen/digitizer. Now the Kindle Fire HD is trash. I don't intend to spend nearly $100 for a replacement LCD, especially after I have already purchased a replacement front glass.
Go on ebay I ordered my LCD there and it was 22.00 I replaced the clear digitized (22.00 also). If you still do not want to mess with it, list it for parts and take pictures and post and it will sell trust me.
Cynthia -
-


Um dein Gerät wieder zusammenzusetzen, folge den Schritten in umgekehrter Reihenfolge.
Um dein Gerät wieder zusammenzusetzen, folge den Schritten in umgekehrter Reihenfolge.
Rückgängig: Ich habe diese Anleitung nicht absolviert.
85 weitere Nutzer:innen haben diese Anleitung absolviert.
Besonderer Dank geht an diese Übersetzer:innen:
100%

Diese Übersetzer:innen helfen uns, die Welt zu reparieren! Wie kann ich mithelfen?
Hier starten ›

25 Kommentare
How does that tell you how to fix the screen you are just putting the screen on so it sill cracked so how are you going to fix it now?
This took me about an hour from start to finish - taking my time to mark all the screws etc. but it may take longer if you don't have the correct tools. I agree that there should be a photo of separating the front glass digitizer from the front bezel as the true last step - it can be tricky, and the replacements I have seen don't include the front bezel. I used a razor/hobby knife to slowly peel and separate the digitizer working slowly and carefully from the inside bottom (around and behind the power button cutout) - some goo-gone or lighter fluid will be necessary to clean any old adhesive residue from the bezel as well. The front bezel has a rubberized gasket that should not be remover, so take care to see that you are not peeling that off. My last suggestion is to wear latex or nitrile gloves to prevent getting smudges on the LCD or digitizer during replacement; put them on for step 18, and until you have the frame back in place - care to keep dust out from in between during reassembly is a must!
How do I know which part I need?? Do I need the lcd screen and/or the digitizer?? What's the difference?? My kindle was dropped unfortunately and I am trying to find the part to replace it with. PLEASE HELP!! People are trying to charge me 100$ to replace the screen alone, excluding labor.
Took me two hours but worked great - my daughter will be very happy in the morning. The hardest part of replacing the broken front glass was separating the broken glass from the plastic front housing as there was no instruction for this. As another person noted, I, too, used an X-ACTO to separate the two. During dis-assembly, I kept track of the screws as I removed them which made it easy to put them back. Good Luck and thanks to the Original Poster and all the other help here. (I didn't need to search elsewhere - this was all inclusive for me). Again, Thanks!!!
Excellent guide! Works perfectly now. Get the correct tools and take your time.
Extra details were needed at Steps 3 & 4! The text implies it's lightly glued on the edges of the battery. NOT SO! It isn't 'tacked' down into the frame, it's held quite nastily by a piece of doubleback right in the center. I broke the large plastic lifter I had, and after 30 mins of working with the smaller one, and finally lifted the battery, I found I had damaged the "ambient light sensor cable". So I've now got a piece of junk. I figure the rest of this procedure is void of other key details, so I'm done. Until they figure out how to make Lexan screens (virtually an indestructible material as opposed to glass which shatters if you look at it wrong), I'm pretty much out of this tablet game, which should come with a orange "Chance" card reading: "You bumped your kindle against something more firm than a pillow. Do Not Pass GO, Do not Collect $200, instead donate $100 to the tablet repair geeks, or simply thrown that marvel in the trash and pay for another one. You just made Jeff Bezos richer."
The Capacitive Sense only works with glass. The resistive screens wear out after some use.
Keith -
Well I am a 53 year old retired Sailor that has big fat fingers... I gotta say I did the whole thing in about 1 1/2 hours and have no experience with electronics. I did have a couple problems with the little flip up white plug thingies... but even after the fight with them my Kindle Fire works like a champ. Thank you so much you saved me alot of $$ that I do not have on my fixed income. I promise to come back if I have problems with any of my fancy electronic thingies! @-->-- My hats off to all of you at IFIXIT.COM! Oh I have an extra screw... is that a bad thing?? LOL
I have twin grand kids, wanted to give them each Kindles. I bought 2 that had cracked screens but functional. Through trial and error I learned. I watch a couple videos on you-tube. I knew I could do this and I did. My first attempt removing the top glass digitized scree broke the LCD. I had to then order and wait for arrival to finish and during my wait I watched several more videos. It arrived and I successfully put it back together, working like new. The second one I knew to use something at each point where I was carefully separating the top glass. So you know all those credit card applications you get in the mail? They are fake plastic cards and they slide "carefully" just under the glass edge making it so much easier to remove it. Be very careful when replacing the screen not to tear the ribbon thing that is on the screen or you will need another one. If you want you could tape yourself as you tear it down to replay to see where each part goes back to.Once you have done a couple you get better at it
This was absolutely wonderful instruction. Great detail. For separating the glass at the end, just warm the frame around the seam where the glass is glued down with a hair dryer on hot setting and use metal tool to pry around (see you tube videos ) you may have to re-heat if it takes a while. Couldn't have done it without these great instructions. Saved me 200.00. Thanks!
To revise a reply I made quite a few years ago:
Removing the motherboard will not erase the data, but keep in mind that the data is stored on a chip on the motherboard. If you replace the motherboard, your data will still be on the old chip; it will, in effect, be erased.
My Aunt's kindle fire HD has been afflicted with the frozen screen/non-responsive screen bug that seems to be so common amongst this particular model. Amazon suggested a hard reset, but it didn't work. My question is, will replacing the digitizer fix this problem? Or will it return even after if I have replaced said digitizer. Thanks!
Correction, meant "My Aunt's kindle fire 7", 2011 model"
I'll agree that my battery felt like it was glued in with superglue. It took forever to get out and, in the process, I put a hole in the silver bag around the battery. I assume it's not safe anymore. Is it able to be patched up with electrical tape? I'm going to continue replacing the glass to get practice whatever the answer, but there was one thing I was confused about. Some tutorials say you don't need to remove the motherboard and speakers, etc..., just the digitizer. Is that possible? (Some videos gave the impression they were showing the removal of other parts as an "FYI", not necessity.)
How can I tell if I have a first or second generation Kindle fire 7? Screen is broken and I originally received it as a gift without any packaging.
What about the Amazon Kindle Fire Model SG98EG. I know how to separate the front from back. But your instructions to not cover that. Would you direct me to one that covers this Model?
Lance.R.Violator@Gmail.com
My granddaughter dropped her Kindle and the glass was shattered. Successfully removed the glass and all fragments BUT IN THE PROCESS ALL OF THE DOUBLE SIDED 3M TAPE IS GONE.
Where do I purchase new tape strips?
The new glass/screen I purchased seems to have a tiny strip of foam all around that the original glass/screen did not have. I thought this might be the tape strip but apparently it is not.
Help!!
I replaced the cracked screen and it turns on but the touch screen doesn't work now. How do I fix that? TIA
After step 19, How do you remove the screen from the frame?
Where can I buy a battery for my kindle fire
nannyto2 - Antwort
Try EBay or Amazon. make sure you get the right battery for your Kindle , one is for a Kindle HD and the older version........both are 7 ".
vvenona1954 - Antwort
Remember to remove any sd card first!!! Snapped mine in half.
lucy_lady_bug - Antwort
I have the first kindle that came out and it doesn't have the same setup how can I open the back of my kindle?
Kris Sanders - Antwort