Zum Hauptinhalt wechseln

Diese Anleitung enthält neuere Änderungen. Wechsel zur neuesten unüberprüften Version.

Kindle Fire HDX 7" Microphone Replacement

Was du brauchst

  1. Kindle Fire HDX 7" Microphone Replacement, Speaker Bezel: Schritt 1, Bild 1 von 3 Kindle Fire HDX 7" Microphone Replacement, Speaker Bezel: Schritt 1, Bild 2 von 3 Kindle Fire HDX 7" Microphone Replacement, Speaker Bezel: Schritt 1, Bild 3 von 3
    • Insert an opening pick underneath the speaker bezel, and slide it along the perimeter to separate it from the tablet.

    • The adhesive is strong and may require an iOpener, or heat gun, to soften.

  2. Kindle Fire HDX 7" Microphone Replacement: Schritt 2, Bild 1 von 1
    • Remove the speaker bezel.

  3. Kindle Fire HDX 7" Microphone Replacement, Rear Panel: Schritt 3, Bild 1 von 1
    • Remove the six pink 3mm T3 Torx screws from the back case.

  4. Kindle Fire HDX 7" Microphone Replacement: Schritt 4, Bild 1 von 2 Kindle Fire HDX 7" Microphone Replacement: Schritt 4, Bild 2 von 2
    • Wedge opening picks around the perimeter between the display and back case.

    • Work the opening picks around the perimeter until the two halves disengage from each other.

    • Don't completely separate as the display ribbon cable still connects the two.

  5. Kindle Fire HDX 7" Microphone Replacement: Schritt 5, Bild 1 von 1
    • Use the flat end of a spudger to pry up and disconnect the rear panel press-fit connector from the motherboard.

    • There may be a glue strip between the battery and the outside case. Gently pry the case open and use the flat end of a spudger to separate the glue strip.

  6. Kindle Fire HDX 7" Microphone Replacement, Microphone: Schritt 7, Bild 1 von 2 Kindle Fire HDX 7" Microphone Replacement, Microphone: Schritt 7, Bild 2 von 2
    • Pry up the left speaker with the flat end of a spudger and remove.

  7. Kindle Fire HDX 7" Microphone Replacement: Schritt 8, Bild 1 von 2 Kindle Fire HDX 7" Microphone Replacement: Schritt 8, Bild 2 von 2
    • Pry up the right speaker with the flat end of a spudger and remove.

  8. Kindle Fire HDX 7" Microphone Replacement: Schritt 9, Bild 1 von 3 Kindle Fire HDX 7" Microphone Replacement: Schritt 9, Bild 2 von 3 Kindle Fire HDX 7" Microphone Replacement: Schritt 9, Bild 3 von 3
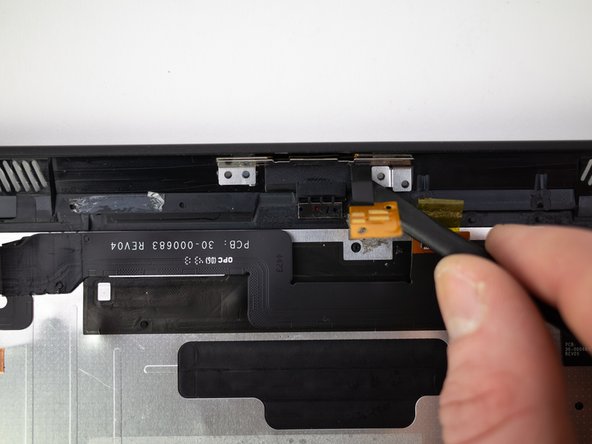
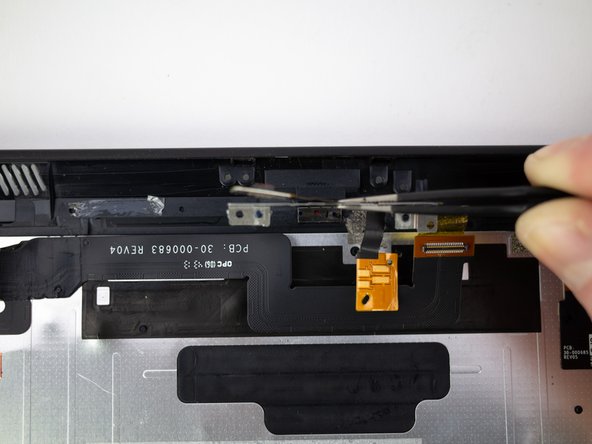
    • Pry up the microphone connector from the rear panel with the flat end of a spudger.

    • Pull up on the microphone with a pair of tweezers to remove.

Abschluss

To reassemble your device, follow these instructions in reverse order.

2 weitere Nutzer:innen haben diese Anleitung absolviert.

Blake Klein

Mitglied seit: 01/29/17

70.510 Reputation

50 Anleitungen geschrieben

0 Kommentare

Kommentar hinzufügen

Seitenaufrufe:

Letzte 24 Stunden: 1

Letzte 7 Tage: 2

Letzte 30 Tage: 2

Insgesamt: 605