Einleitung
Kannst du nicht mehr im Dunkeln lesen? Hier wird dir gezeigt, wie du eine ungleichmäßige oder stellenweise dunkle LED Beleuchtung austauschen kannst.
Was du brauchst
-
-
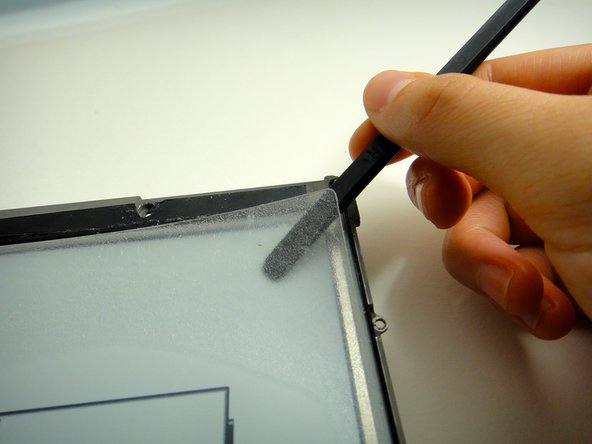
Hebele die Blende mit einem Spudger oder einem Plastiköffnungswerkzeug vorsichtig vom Bildschirm ab. Am einfachsten beginnst du in einer Ecke und lässt das Werkzeug um den Rand herum laufen.
-
-
-
Entferne elf 3,0 mm Kreuzschlitzschrauben um den Mittelrahmen.
Hello, the original battery is 1420m Ah and 3.7VDC, but the buttery you offer to sell is 1600mAh, is it right? there is no problem with different mAh? mi kindle is the amazon kindle 1est generation
-
-
-
Hebe den Mittelrahmen aus dem Gehäuse.
-
-
-
Drehe den Mittelrahmen herum und du siehst den Akku.
-
Entferne drei 3,0 mm Kreuzschlitzschrauben, welche den Akku am Mittelrahmen befestigen.
-
-
-
Hebe den Akku zuerst vorsichtig unten hoch und schiebe ihn dann aus dem Mittelrahmen heraus.
Thanks for providing this guide, I would have been lost without it. My old kindle, however, had very stiff and hard rubber/plastic. There was no way I could have slid the glass to the side or gotten the plastic spud under the edge of the glass or the plastic.
What I did was to remove a piece of the plastic next to the glass , about 1/8” square, then insert a putty knife in between the two sides towards the edges. It all popped apart without breaking anything. Perhaps I could have done this without cutting out the little piece.
Thank you for this very user friendly guide.My kindle is now working as new.The screws are small and fiddly and the correct tools are essential. I took roughly about 45 minutes from start to finish and the most difficult part was taking the casing apart without damaging the screen .. A 5 star service.
The bezel sits on a film meant to protect the screen. When lifting the bezel, it is a good idea to slightly push on the screen with cardboard or something elese, to make sure the screen film stays on the screen as you lift the bezel.
-
-
-
-
Hebe den weißen Kabelbefestiger mit einem Spudger hoch und schiebe das Flachbandkabel heraus.
-
Fahre gegen den Uhrzeigersinn fort und wiederhole für die nächsten Kabel. Die kleinen Kabel ganz haben haben keinen Kabelbefestiger, ziehe sie nur sorgfältig heraus.
The second connector is not exactly a "repeat". The lock to be lifted is on the cable side, whereas the first connector's lock is away from the cable.
-
-
-
Löse das weiße Flachbandkabel, indem du den gelben Plastikstecker vorsichtig hochhebst.
-
-
-
Entferne das gelbe Antistatikband vom Stecker am Flachbandkabel zum Display.
-
Hebe den Kabelbefestiger mit einem Spudger hoch und löse das Kabel.
-
-
-
Drei silberfarbene Schrauben mit silberfarbenen Unterlegscheiben.
-
Zwei silberfarbene Schrauben ohne Unterlegscheiben.
-
Eine schwarze Schraube mit goldfarbener Unterlegscheibe.
-
Eine schwarze Schraube mit einer quadratischen Unterlegscheibe.
-
-
-
Entferne mit einer Pinzette den weißen Klebestreifen über der LED Beleuchtung.
-
-
-
Entferne vorsichtig mit einem Spudger die Plastikschutzfolie über dem Display.
Does anyone know what kind of adhesive is used between the waveguide / dffuser layer, and the display layers under it? It’s definitely not a hard-cured epoxy, but almost a gel — probably silicone — and probably matched to the refractive index of the layers.
Or, did anyone succeed in re-using the original stuff, and if so did you have air pockets or artifacts because of it?
-
-
-
Wenn die äußere Schutzfolie vom Kindle entfernt ist, kannst du die LED Beleuchtung vorsichtig mit den Fingern ablösen.
-


Um dein Gerät wieder zusammenzusetzen, folge den Schritten in umgekehrter Reihenfolge.
Um dein Gerät wieder zusammenzusetzen, folge den Schritten in umgekehrter Reihenfolge.
Rückgängig: Ich habe diese Anleitung nicht absolviert.
5 weitere Nutzer:innen haben diese Anleitung absolviert.
Besonderer Dank geht an diese Übersetzer:innen:
100%
VauWeh hilft uns, die Welt in Ordnung zu bringen! Wie kann ich mithelfen?
Hier starten ›
Team

Cal Poly, Team 3-33, Amido Winter 2013 Mitglied von Cal Poly, Team 3-33, Amido Winter 2013
CPSU-AMIDO-W13S3G33
4 Mitglieder
17 Anleitungen geschrieben
13 Kommentare
Hello to you! Your guide helped me to understand what happened with my kindle. I've got a scratch on the screen but it seems not very deep; the scratch is on a plastic screen, mentioned on the 12-th step. Is it possible to replace this screen with the same one or simple screen protector can do? Thank you.
Can the LEDs simply be removed using this method? I think they are giving me a headache, even on the lowest setting...
Best way is to jailbreak the kindle and use KO reader. In that you can switch off the lights completely. This is a software hack but then you do not need to open the paperweight at all
I removed the plastic screen easily enough but the glue that held it to the display leaves quite a mess on both sides and loses it's tack once removed. I suppose I could clean both sides (with IPA?) and remove the old glue but what's best to reattach the plastic to the screen that will give a nice clear finish?
I actually bought a new screen without the LEDs (all that was available) and it doesn't even have the plastic cover on it yet.
I was wondering, if it is possible to connect the two LED lights to the same power driver?Recently I noticed that my led bulb turns on/off for a split second randomly over the past few days. Does this mean it is starting to die or could it be something..please visit our website: http://lighthut.co.uk
Can someone please confirm that this process is reversible without totally destroying the screen i.e. when you put it back you won't see glue smudges everywhere?
Are you kidding me? You lost me at #3. Does anyone know where I can get this done by a professional?
Hallo,
nach Austausch des Akkus funktioniert das Kindle PW bis auf die Beleuchtung normal.
Wie erkennt man, ob die Beleuchtung defekt ist.
Wo kann man die LED Beleuchtung fürKindle PW erwerben?
Whats the part number for the plastic screen panel itself, my e-ink display is perfectly fine but the plastic is cracked (light leak into crack when lighting is on). I am guessing this is a standard plastic panel with stepped edge to give an interface for light transmission, is it theoretically possible to use a plastic panel with an oversize acetate sheet (or some other clear plastic film) attached to the front to allow landing for the LED to be attached.
Where do I buy the LED replacement?
I found it easier to start this step off with one of the Opening Picks found in the iOpener pack.
NathanF - Antwort
The glue on bezel started to peel the sticky back protective layer off the screen for me - managed to smooth it back down, although now have an unsightly crease. I would try to hold the screen down when you pull the bezel off to stop damaging the screen.
Callum Rogers - Antwort
This step is most time consuming. Take you time and try not to scratch the bezel :)
Oleksii - Antwort
Couldn't get the plastic spudger under the edge of the bezel. A right-angle X-Acto blade was a satisfactory tool here.
dbrick - Antwort
The glue was VERY difficult...I used a trick, from taking apart phones, and used a hair drier to loosen up the glue...worked like a charm.
billkaris - Antwort