Einleitung
Wenn deine Küchenmaschine nicht mehr oder nur sehr geräuschvoll läuft, hilft dir diese Anleitung beim Austausch des Schneckengetriebes.
Was du brauchst
-
-
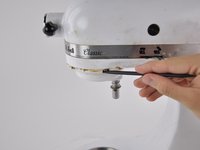
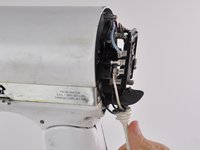
Entferne vorsichtig mit einem Spudger den Abtropfring aus Aluminium.
-
-
-
Treibe mit einem 4 mm Durchschlag und einem Hammer den Splint von der Getriebeabdeckung.
-
-
-
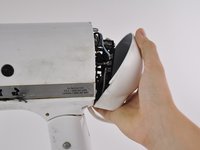
Drehe die fünf 28 mm Flachschrauben mit einem Schraubendreher aus dem vorderen Motorgehäuse.
-
Mit dem gleichen Schraubendreher kannst du auch die beiden 28 mm Sicherungsschrauben herausdrehen.
-
-
-
Drehe die Maschine um. Entferne mit dem gleichen Schraubendreher auch diese beiden 28 mm Sicherungsschrauben.
-
-
-
-
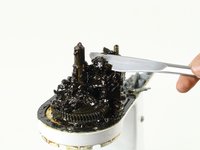
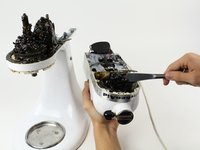
Entferne das Fett mit einem Spachtel oder einem Küchenmesser.
-
Gib das Fett wieder in den Motordeckel zurück.
-
-
-
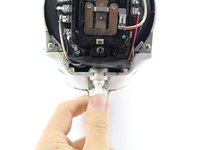
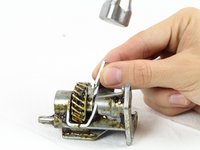
Drehe drei 20 mm Kreuzschlitzschrauben PH2 von der Einheit des Schneckengetriebes heraus.
-


Um dein Gerät wieder zusammen zu setzen folge den Schritten in umgekehrter Reihenfolge.
Um dein Gerät wieder zusammen zu setzen folge den Schritten in umgekehrter Reihenfolge.
Rückgängig: Ich habe diese Anleitung nicht absolviert.
59 weitere Personen haben diese Anleitung absolviert.
Besonderer Dank geht an diese Übersetzer:innen:
100%
VauWeh hilft uns, die Welt in Ordnung zu bringen! Wie kann ich mithelfen?
Hier starten ›
Team

Cal Poly, Team 14-28, Maness Fall 2014 Mitglied von Cal Poly, Team 14-28, Maness Fall 2014
CPSU-MANESS-F14S14G28
4 Mitglieder
22 Anleitungen geschrieben
29 Kommentare
Some corrections:
Step 1 -- Suggest (as the Service Manual does) using a flat-blade screwdriver and tap it with a light hammer to drive the drip ring off.
Step 2 -- the correct size pin punch is 5/32"
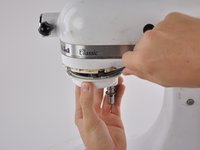
Step 3 -- Using two flat-blade screwdrivers, one on each side, pry off the planetary.
A plastic spudger is likely to break. Two points of leverage opposits each other distributes the load and prevents to the planetary and its shaft.
Step 11 -- The proper punch size is 3/32"
Steps 12 & 13 -- There is a washer on each side of the worm gear. Retain these and place one on each side off the grar when reassembling.
A link to the Service Manual:
Very useful reply.
Step 3: I needed two flat head screwdrivers to pry off the planetary gear.
Step 9: Recommend adding a new seal for the upper housing and new food grade grease. If you have plastic chips from the broken worm gear, you won't want them damaging the new worm gear. Also, if that grease is black its probably time to replace it. Happy Baking!!!
nshourds -
Cheers Finkerbell,
Very helpful info, as was the main part of the guide.
Not sure what model number I was working on, but when I l lifted off the motor housing, there was still wires connected to the base.
Just be careful at this stage in case you have the same...
my model K5SS WH is the same as yours until step 5. It doesnt have the two bolts as shown in the picture for step 5 so i wasnt able to complete the repair. any suggestions.