Zum Hauptinhalt wechseln

Kurio Touch 4S Power Button Replacement

Was du brauchst

  1. Kurio Touch 4S Power Button Replacement, Power Button: Schritt 1, Bild 1 von 1
    • Make sure to open the back cover easily using the plastic opening tool.

  2. Kurio Touch 4S Power Button Replacement: Schritt 2, Bild 1 von 3 Kurio Touch 4S Power Button Replacement: Schritt 2, Bild 2 von 3 Kurio Touch 4S Power Button Replacement: Schritt 2, Bild 3 von 3
    • Remove back cover by prying away from the device.

    • The easiest place to remove the cover is from the bottom and top; try to open it from the right and left sides.

    • Open it gently. Do not open it with too much pressure, so that the plastic back cover do not break.

  3. Kurio Touch 4S Power Button Replacement: Schritt 3, Bild 1 von 2 Kurio Touch 4S Power Button Replacement: Schritt 3, Bild 2 von 2
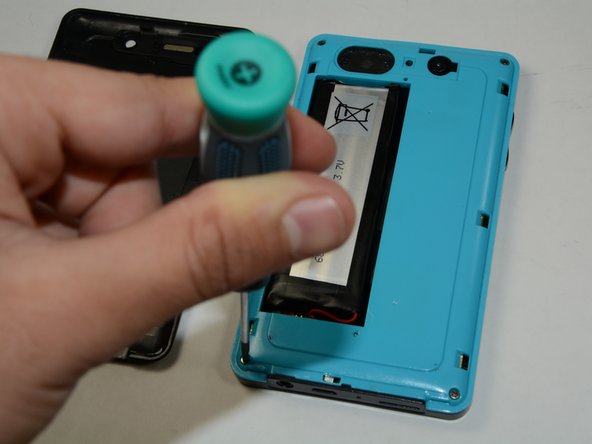
    • To remove the battery, make sure the four 5mm Phillips screws on each side of your device is open using the Phillips #1 Screwdriver

    • After you remove your four 5mm Phillips screws, use your plastic opening tool to help you open the plastic cover of your device.

  4. Kurio Touch 4S Power Button Replacement: Schritt 4, Bild 1 von 1
    • After you remove your four 5mm Philips screws use your plastic opening tool to help you open the plastic cover of your device.

  5. Kurio Touch 4S Power Button Replacement: Schritt 5, Bild 1 von 1
    • Separate the two halves of your Kurio Touch 4S and lay them besides each other.

  6. Kurio Touch 4S Power Button Replacement: Schritt 6, Bild 1 von 1
    • Gently remove the plastic cover that is covering the camera.

  7. Kurio Touch 4S Power Button Replacement: Schritt 7, Bild 1 von 1
    • Use Phillips # 1 screw to open the four 5mm Philips screws on the motherboard.

    • Open the screws gently and do not apply too much force as you could damage the motherboard.

  8. Kurio Touch 4S Power Button Replacement: Schritt 8, Bild 1 von 1
    • Use the plastic opener to remove the battery.

  9. Kurio Touch 4S Power Button Replacement: Schritt 9, Bild 1 von 1
    • Use tweezers to remove the black tape that is attached to the motherboard.

  10. Kurio Touch 4S Power Button Replacement: Schritt 10, Bild 1 von 2 Kurio Touch 4S Power Button Replacement: Schritt 10, Bild 2 von 2
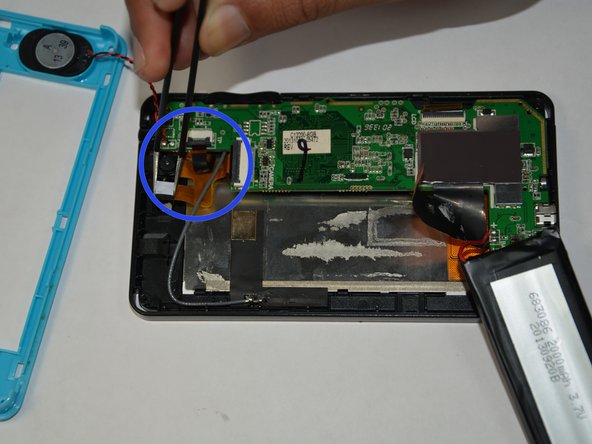
    • Detach all the wire that are connected to the motherboard.

    • Detach the camera module and other components that are attached to the motherboard.

  11. Kurio Touch 4S Power Button Replacement: Schritt 11, Bild 1 von 1
    • Remove the motherboard with the help of plastic opener.

    • Detach the power plug before you remove the motherboard.

  12. Kurio Touch 4S Power Button Replacement: Schritt 12, Bild 1 von 1
    • Use tweezers to hold the power button and gently lift it up.

    • Replace the old power button with the new one.

Abschluss

To reassemble your device, follow these instructions in reverse order.

Ein:e weitere:r Nutzer:in hat diese Anleitung absolviert.

Moin Khan

Mitglied seit: 01/21/15

234 Reputation

2 Anleitungen geschrieben

Team

USF Tampa, Team 6-5, Brown Winter 2015 Mitglied von USF Tampa, Team 6-5, Brown Winter 2015

USFT-BROWN-W15S6G5

3 Mitglieder

10 Anleitungen geschrieben

0 Kommentare

Kommentar hinzufügen

Seitenaufrufe:

Letzte 24 Stunden: 0

Letzte 7 Tage: 1

Letzte 30 Tage: 3

Insgesamt: 464