Zum Hauptinhalt wechseln

Kushlan Cement Mixer 600DDS 2014 Drivetrain Replacement

Was du brauchst

  1. Kushlan Cement Mixer 600DDS 2014 Drivetrain Replacement, Remove the motor cover bolts: Schritt 1, Bild 1 von 1
    • Before you begin, ensure the power cord is unplugged and the power switch is in the OFF position.

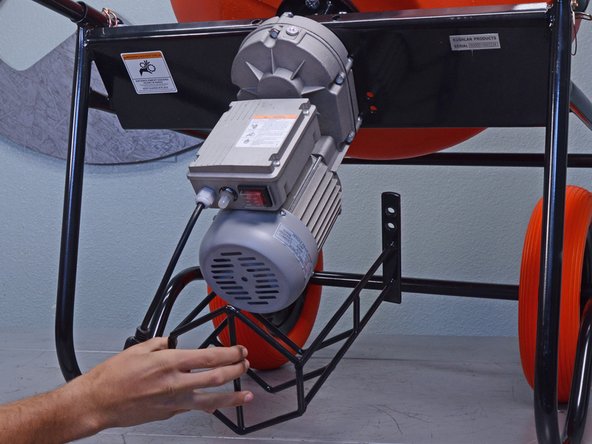
    • Use a 13 mm socket to remove the two bolts securing the motor cover to the frame.

  2. Kushlan Cement Mixer 600DDS 2014 Drivetrain Replacement, Remove the motor cover: Schritt 2, Bild 1 von 1
    • Remove the motor cover.

  3. Kushlan Cement Mixer 600DDS 2014 Drivetrain Replacement, Remove the motor cage bolts: Schritt 3, Bild 1 von 1
    • Use a 13 mm socket to remove the four bolts securing the motor cage to the frame.

  4. Kushlan Cement Mixer 600DDS 2014 Drivetrain Replacement, Remove the motor cage: Schritt 4, Bild 1 von 2 Kushlan Cement Mixer 600DDS 2014 Drivetrain Replacement, Remove the motor cage: Schritt 4, Bild 2 von 2
    • Remove the motor cage.

  5. Kushlan Cement Mixer 600DDS 2014 Drivetrain Replacement, Remove the drum: Schritt 5, Bild 1 von 1
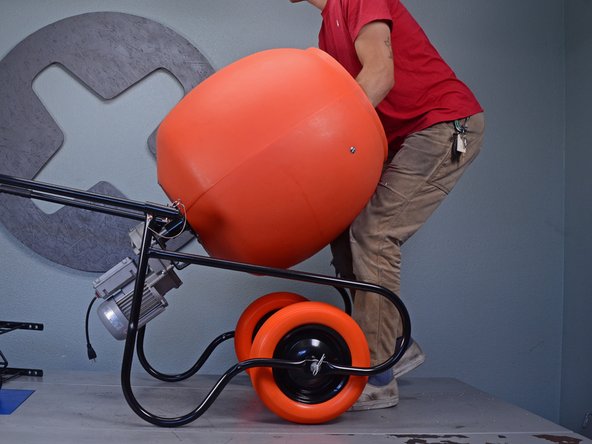
    • Use a 19 mm socket to remove the 70 mm-long bolt securing the drum to the output shaft.

  6. Kushlan Cement Mixer 600DDS 2014 Drivetrain Replacement: Schritt 6, Bild 1 von 3 Kushlan Cement Mixer 600DDS 2014 Drivetrain Replacement: Schritt 6, Bild 2 von 3 Kushlan Cement Mixer 600DDS 2014 Drivetrain Replacement: Schritt 6, Bild 3 von 3
    • Lift the drum straight off of the output shaft and set it aside.

    • Two people may be required depending on the weight of the drum.

  7. Kushlan Cement Mixer 600DDS 2014 Drivetrain Replacement, Remove the gearbox and motor assembly: Schritt 7, Bild 1 von 1
    • Have a second person hold the gearbox and motor assembly while you remove the nuts to prevent it from dropping.

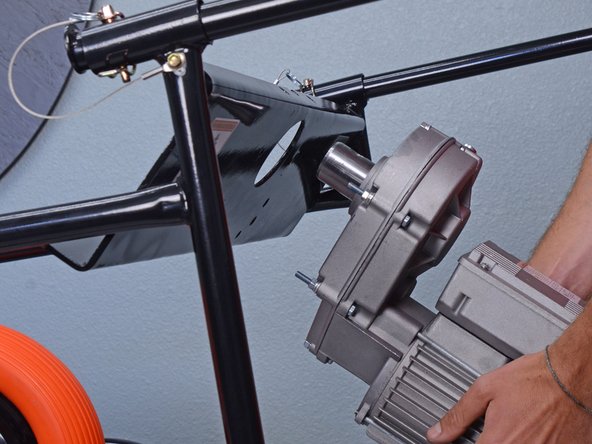
    • Use a 10 mm socket to remove the four nuts securing the gearbox to the frame.

  8. Kushlan Cement Mixer 600DDS 2014 Drivetrain Replacement: Schritt 8, Bild 1 von 2 Kushlan Cement Mixer 600DDS 2014 Drivetrain Replacement: Schritt 8, Bild 2 von 2
    • Remove the gearbox and motor assembly from the frame.

  9. Kushlan Cement Mixer 600DDS 2014 Drivetrain Replacement, Remove the drain plug: Schritt 9, Bild 1 von 1
    • Use a 5 mm hex key to remove the drain plug.

    • Do not tilt the opening down until over a receptacle.

  10. Kushlan Cement Mixer 600DDS 2014 Drivetrain Replacement, Drain the gear oil: Schritt 10, Bild 1 von 1
    • Drain the gear oil into a receptacle.

    • Refill with 8oz of 75W90 gear oil. See the operator's manual.

  11. Kushlan Cement Mixer 600DDS 2014 Drivetrain Replacement, Remove the fan cover: Schritt 11, Bild 1 von 2 Kushlan Cement Mixer 600DDS 2014 Drivetrain Replacement, Remove the fan cover: Schritt 11, Bild 2 von 2
    • Use a Phillips screwdriver to remove the four screws securing the fan cover to the motor.

  12. Kushlan Cement Mixer 600DDS 2014 Drivetrain Replacement: Schritt 12, Bild 1 von 1
    • Remove the fan cover.

  13. Kushlan Cement Mixer 600DDS 2014 Drivetrain Replacement, Separate the gearbox from the motor: Schritt 13, Bild 1 von 1
    • Use a 8 mm socket to remove the four 135 mm-long bolts securing the motor to the gearbox.

  14. Kushlan Cement Mixer 600DDS 2014 Drivetrain Replacement: Schritt 14, Bild 1 von 1
    • Pull the gearbox straight off of the motor.

  15. Kushlan Cement Mixer 600DDS 2014 Drivetrain Replacement: Schritt 15, Bild 1 von 2 Kushlan Cement Mixer 600DDS 2014 Drivetrain Replacement: Schritt 15, Bild 2 von 2
    • Remove the space washer and stop ring from the gearbox case.

  16. Kushlan Cement Mixer 600DDS 2014 Drivetrain Replacement, Open the gearbox: Schritt 16, Bild 1 von 1
    • Use a 10 mm socket to remove the following nuts and bolts from the gearbox case:

    • Five nuts

    • One 40 mm-long bolt

  17. Kushlan Cement Mixer 600DDS 2014 Drivetrain Replacement: Schritt 17, Bild 1 von 1
    • Separate the two halves of the gearbox case.

  18. Kushlan Cement Mixer 600DDS 2014 Drivetrain Replacement: Schritt 18, Bild 1 von 1
    • Remove the gearbox gasket.

    • During reassembly, replace the gasket if it is damaged or worn.

  19. Kushlan Cement Mixer 600DDS 2014 Drivetrain Replacement, Disassemble the drivetrain: Schritt 19, Bild 1 von 2 Kushlan Cement Mixer 600DDS 2014 Drivetrain Replacement, Disassemble the drivetrain: Schritt 19, Bild 2 von 2
    • Use a universal pulley to remove the bearing from the output shaft.

  20. Kushlan Cement Mixer 600DDS 2014 Drivetrain Replacement: Schritt 20, Bild 1 von 2 Kushlan Cement Mixer 600DDS 2014 Drivetrain Replacement: Schritt 20, Bild 2 von 2
    • Use a universal pulley to remove the bearing from the top of the pinion gear.

  21. Kushlan Cement Mixer 600DDS 2014 Drivetrain Replacement: Schritt 21, Bild 1 von 3 Kushlan Cement Mixer 600DDS 2014 Drivetrain Replacement: Schritt 21, Bild 2 von 3 Kushlan Cement Mixer 600DDS 2014 Drivetrain Replacement: Schritt 21, Bild 3 von 3
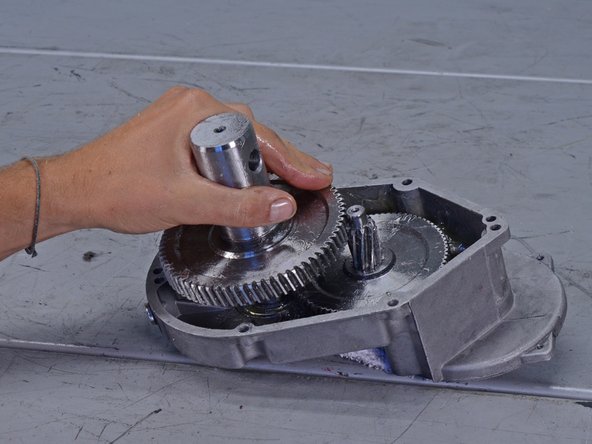
    • Use a pair of pry bars to break the gear and output shaft loose from the gearbox.

    • Once loose, remove the gear and output shaft by hand.

  22. Kushlan Cement Mixer 600DDS 2014 Drivetrain Replacement: Schritt 22, Bild 1 von 3 Kushlan Cement Mixer 600DDS 2014 Drivetrain Replacement: Schritt 22, Bild 2 von 3 Kushlan Cement Mixer 600DDS 2014 Drivetrain Replacement: Schritt 22, Bild 3 von 3
    • Use a pair of pry bars to break the second gear and pinion gear loose from the gearbox case.

    • Once loose, remove the gear and pinion gear by hand.

    • Before reassembly, wipe out as much of the old grease as possible and add plenty of new grease to each new component as you install them.

  23. Kushlan Cement Mixer 600DDS 2014 Drivetrain Replacement, Remove any remaining bearings: Schritt 23, Bild 1 von 3 Kushlan Cement Mixer 600DDS 2014 Drivetrain Replacement, Remove any remaining bearings: Schritt 23, Bild 2 von 3 Kushlan Cement Mixer 600DDS 2014 Drivetrain Replacement, Remove any remaining bearings: Schritt 23, Bild 3 von 3
    • There may be one or both bearings left in the gearbox case. Follow these steps to remove any remaining bearings:

    • A torch is necessary. Wear protective eyewear and heat resistant gloves. Move to a well ventilated area away from anything flammable.

    • Use a torch to heat the outside of the casing near the bearings.

    • The bearings may fall out on their own as the casing expands.

    • Tap the outside of the gearbox case with a hammer to knock the bearings out.

    • If the bearings don't fall out, reheat the casing and try again. If they remain stuck, flip over the gearbox case and use a flathead screwdriver to pry the bearings out.

Abschluss

To reassemble your device, follow these instructions in reverse order.

Apply grease to the new gears and bearings as you install them.

Keep the [[Topic:Kushlan Cement Mixer 600DDS 2014#diagram/19504/hotspot/1657489|gearbox and motor assembly diagram]] accessible during reassembly.

2 weitere Nutzer:innen haben diese Anleitung absolviert.

Sam Omiotek

Mitglied seit: 02/25/19

73.456 Reputation

288 Anleitungen geschrieben

0 Kommentare

Kommentar hinzufügen

Seitenaufrufe:

Letzte 24 Stunden: 1

Letzte 7 Tage: 12

Letzte 30 Tage: 108

Insgesamt: 2,338