Zum Hauptinhalt wechseln

LG 440G Logic Board Replacement

Was du brauchst

  1. LG 440G Logic Board Replacement, Turn off phone.: Schritt 1, Bild 1 von 1
    • Turn the device off.

    • To do so, press and hold the red button.

  2. LG 440G Logic Board Replacement, Flip phone.: Schritt 2, Bild 1 von 1
    • Flip the phone over.

  3. LG 440G Logic Board Replacement, Rear cover removal.: Schritt 3, Bild 1 von 1
    • Slide the rear cover downward

    • Lift it off to access the battery

  4. LG 440G Logic Board Replacement, Removal of battery.: Schritt 4, Bild 1 von 1
    • Locate the small rounded recess to get access to the battery

    • Gently, lift the battery

  5. LG 440G Logic Board Replacement, Unscrew six screws along edges of casing: Schritt 5, Bild 1 von 1
    • Use a Phillips #00 screw driver to remove six screws.

    • Save screws for reassembly.

  6. LG 440G Logic Board Replacement, Lift casing cover: Schritt 6, Bild 1 von 2 LG 440G Logic Board Replacement, Lift casing cover: Schritt 6, Bild 2 von 2
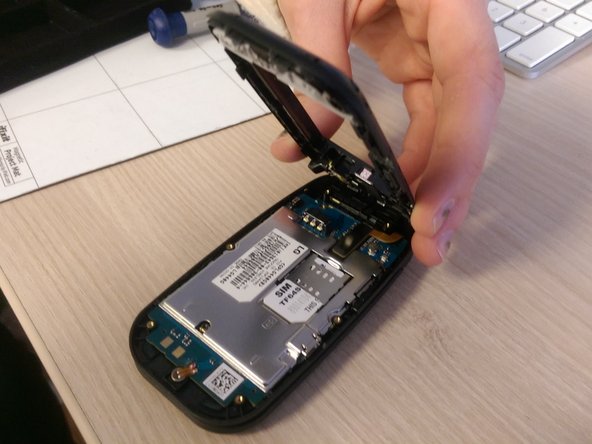
    • Run the plastic opening tool along the edge of the phone to release the casing cover.

    • Lift the casing cover.

  7. LG 440G Logic Board Replacement, Remove rectangular piece (with orange tape attached): Schritt 7, Bild 1 von 2 LG 440G Logic Board Replacement, Remove rectangular piece (with orange tape attached): Schritt 7, Bild 2 von 2
    • Use the plastic opening tool or fingernail to lift the rectangular piece up. The piece can be identified by the orange tape attached to it.

  8. LG 440G Logic Board Replacement, Dislodge logic board: Schritt 8, Bild 1 von 1
    • Dislodge the logic board using a plastic opening tool.

  9. LG 440G Logic Board Replacement, Lift logic board out: Schritt 9, Bild 1 von 1
    • Remove the logic board by lifting up.

Abschluss

To reassemble your device, follow these instructions in reverse order.

2 weitere Nutzer:innen haben diese Anleitung absolviert.

JP Belanger

Mitglied seit: 02/17/15

225 Reputation

2 Anleitungen geschrieben

Team

Ohio State, Team 1-1, Buehl Winter 2015 Mitglied von Ohio State, Team 1-1, Buehl Winter 2015

OSU-BUEHL-W15S1G1

4 Mitglieder

8 Anleitungen geschrieben

Ein Kommentar

Hi, do you know how to take the microphone out without damaging the functionality of the phone? It’s attached to a ribbon that is soldered on. Thanks!

Kobalt000 - Antwort

Kommentar hinzufügen

Seitenaufrufe:

Letzte 24 Stunden: 0

Letzte 7 Tage: 1

Letzte 30 Tage: 5

Insgesamt: 939