Diese Version enthält möglicherweise inkorrekte Änderungen. Wechsle zur letzten geprüften Version.
Was du brauchst
-
Dieser Schritt ist noch nicht übersetzt. Hilf mit, ihn zu übersetzen!
-
Using your thumb, apply pressure to the back cover while sliding it down and off.
-
Lift and remove the back cover.
-
-
Dieser Schritt ist noch nicht übersetzt. Hilf mit, ihn zu übersetzen!
-
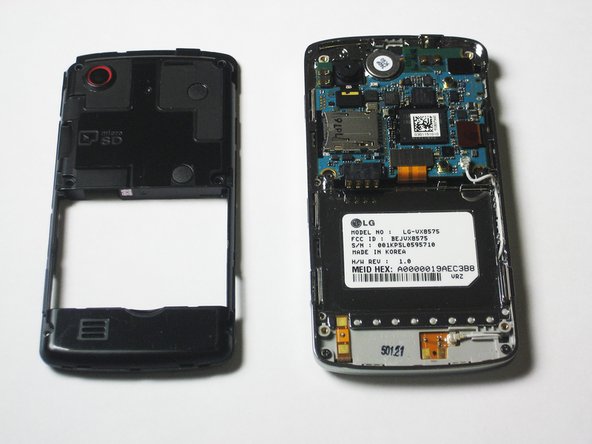
Locate the battery. It is the large black rectangle with the LG logo, a model number, and battery information.
-
Using your thumb or thumbnail, insert a thumb into the crescent indent just below the battery and apply pressure to the battery, pushing up and away from the phone. It will come out easily.
-
-
Dieser Schritt ist noch nicht übersetzt. Hilf mit, ihn zu übersetzen!
-
Leave the phone screen down on a table and locate the six 3.5mm Phillips screws around the edges of the back of the phone. There are four in each corner and two half way up on the sides.
-
Use a Phillips #00 screwdriver to unscrew all six 3.5mm Phillips screws.
-
-
-
Dieser Schritt ist noch nicht übersetzt. Hilf mit, ihn zu übersetzen!
-
Use a plastic opener tool to gently pry off the back case by sliding it in between the back case and the main body of the phone and loosening it around the edges.
-
-
Dieser Schritt ist noch nicht übersetzt. Hilf mit, ihn zu übersetzen!
-
With the phone still face down, locate the speaker button on the right-hand side of the phone and the camera button on the left-hand side of the phone.
-
To remove each button, simply slide it away from the phone, out of its groove.
-
-
Dieser Schritt ist noch nicht übersetzt. Hilf mit, ihn zu übersetzen!
-
Leave the phone face down and locate the two 3.5mm Phillips screws near the bottom corners of the phone. They are indicated by red circles in the first picture provided in this step.
-
Use a Phillips #00 screwdriver to unscrew these two 3.5mm Phillips screws.
-
-
Dieser Schritt ist noch nicht übersetzt. Hilf mit, ihn zu übersetzen!
-
You will see three wires attached to the logic board. Locate the two on the right edge, as well as the one on the bottom edge. They will all have flat rectangular tops.
-
Carefully unclip all three of these wires with your fingernail as pictured.
-
-
Dieser Schritt ist noch nicht übersetzt. Hilf mit, ihn zu übersetzen!
-
Now flip the phone over so that the screen is face-up.
-
Use a plastic opener tool to get in between the front screen and main body of the phone and loosen it around the edges.
-
Once you have loosened the edges, gently pry the front screen away from the phone.
-


Rückgängig: Ich habe diese Anleitung nicht absolviert.
Ein:e weitere:r Nutzer:in hat diese Anleitung absolviert.
Team

Cal Poly, Team 5-1, Forte Spring 2012 Mitglied von Cal Poly, Team 5-1, Forte Spring 2012
CPSU-FORTE-S12S5G1
5 Mitglieder
10 Anleitungen geschrieben
Ein Kommentar
Before taking off the face cover, there are 2 more screws midway up the body. Also, take care that the earpiece does not stick to the face cover when you take it off. If it does, pry it loose from the adhesive and let it dangle from the logic board before attempting to remove the LCD, otherwise you may break the 2 small, very fine wires that attach to it, like I did. Speaker phone only now, unless I can find someone with mad soldering skills.