Diese Version enthält möglicherweise inkorrekte Änderungen. Wechsle zur letzten geprüften Version.
Was du brauchst
-
Dieser Schritt ist noch nicht übersetzt. Hilf mit, ihn zu übersetzen!
-
Insert a thumbnail, or a prying tool like a spudger, into the notch at the bottom left of the back cover.
-
Pry the back cover up to separate its plastic clips.
-
-
Dieser Schritt ist noch nicht übersetzt. Hilf mit, ihn zu übersetzen!
-
Lift the back cover to release the rest of the plastic clips and remove it.
-
-
Dieser Schritt ist noch nicht übersetzt. Hilf mit, ihn zu übersetzen!
-
Lift the battery out of its recess and remove it.
-
-
Dieser Schritt ist noch nicht übersetzt. Hilf mit, ihn zu übersetzen!
-
Remove the four Phillips #00 screws (4 mm length).
-
-
-
Dieser Schritt ist noch nicht übersetzt. Hilf mit, ihn zu übersetzen!
-
Insert a thumbnail, or a prying tool like a spudger, into the notch at the bottom left of the back cover you used earlier to remove the back cover.
-
Pry up the plastic panel, including the loudspeaker, until you can get a good grip.
-
-
Dieser Schritt ist noch nicht übersetzt. Hilf mit, ihn zu übersetzen!
-
Carefully remove the plastic panel including the loudspeaker by gently pulling it away from the phone assembly.
-
-
Dieser Schritt ist noch nicht übersetzt. Hilf mit, ihn zu übersetzen!
-
Remove the eight Phillips #00 screws (4 mm length).
-
-
Dieser Schritt ist noch nicht übersetzt. Hilf mit, ihn zu übersetzen!
-
Insert an opening pick between the bottom right corner of the motherboard cover and the motherboard.
-
Pry up the motherboard cover to open the plastic clips which hold the cover in its place.
-
Work your way along the right edge.
-
-
Dieser Schritt ist noch nicht übersetzt. Hilf mit, ihn zu übersetzen!
-
Carefully lift the right edge of the motherboard cover.
-
Remove the motherboard assembly.
-
-
Dieser Schritt ist noch nicht übersetzt. Hilf mit, ihn zu übersetzen!
-
Check to see that the ribbon cable is connected properly. If it was not, connect it and see if the front-facing camera now functions as intended. Otherwise, proceed
-
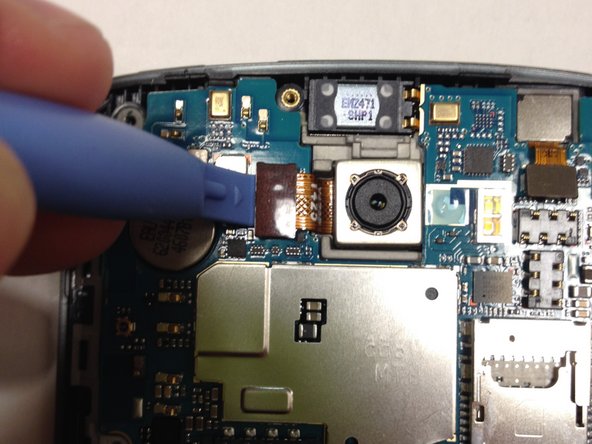
Take the plastic opening tool and gently wedge it under where the ribbon cable is connected
-
Gently lift up to disconnect the ribbon cable
-
-
Dieser Schritt ist noch nicht übersetzt. Hilf mit, ihn zu übersetzen!
-
Repeat the same process for the other 3 ribbon cables connected to the motherboard
-
-
Dieser Schritt ist noch nicht übersetzt. Hilf mit, ihn zu übersetzen!
-
Remove the motherboard by lifting gently
-
-
Dieser Schritt ist noch nicht übersetzt. Hilf mit, ihn zu übersetzen!
-
Take the plastic opening tool and remove the front-facing camera by wedging it into the sides and under the ribbon cable and lifting up
-
-
Dieser Schritt ist noch nicht übersetzt. Hilf mit, ihn zu übersetzen!
-
Remove the old front-facing camera
-


Rückgängig: Ich habe diese Anleitung nicht absolviert.
12 weitere Nutzer:innen haben diese Anleitung absolviert.
Team

UMass Dartmouth, Team 1-3, Duarte Fall 2014 Mitglied von UMass Dartmouth, Team 1-3, Duarte Fall 2014
UMASSD-DUARTE-F14S1G3
4 Mitglieder
10 Anleitungen geschrieben
3 Kommentare
Naoto,
Thank you for the detailed guide it was very satisfying to repair this on my own.
please note: Image # 10 through me off for a few moments, until I realized it it was posted in mirror image mode.
For any one wanting to try this fix, I say “Go For It”
Also good to note: on my LG G3 . Once the back cover was removed, the inside back plate, comes apart in two sections the bottom 1/3 ( starting at the USB Charging port) is the first section that came apart.
Then the top section (starting beside the mid section of the battery housing) comes off easily.
Once completely removed, it was very easy to spot that the front facing camera ribbon connector just needed to be reset.
My phone feels brand new again :)
Again thank you
The Fix it Dude ,Fabian
Yes since I have had my LG G3 it's been through alot considering it's now 2018 and it still has the performance needed and still more then alot of phones out there while being like 5 years old.
The biggest issue I have noticed and read about was overheating, in my mind caused by placing the CPU & GPU processors back to back. Luckily many people have come up with simple ways to help this. One in which I used was creating a more robust Heatsink, with just the use of alluminum from a tin can. Which worked great for me. Ya amazingly before I had done this I was seeing temps of up to 90°C which is liysuper high. It surprised me with such a great phone that they missed such an easy design flaw or possibly never had the time to figure out a better way before the release date