Diese Übersetzung enthält möglicherweise noch nicht die neuesten Änderungen der Original-Anleitung. Hilf mit, die Übersetzung zu aktualisieren oder sieh dir die Original-Anleitung an.
Einleitung
Hier wird der Austausch der Rückkamera gezeigt.
Was du brauchst
-
-
Halte die Akkuauswurftaste gedrückt und ziehe das untere Ende des Telefons aus dem Gehäuse heraus.
-
-
-
Stecke das SIM-Karten-Auswurfwerkzeug (0,8-mm-SIM-Karten-Auswurfstift) in das kleine Loch im SIM-Kartenfach.
-
Drücke mit etwas Kraft nach innen, um das Fach auszuwerfen.
-
Ziehe das SIM-Kartenfach aus dem Telefon heraus.
-
-
-
Entferne die beiden 5,5 mm Kreuzschlitz # 00 Schrauben am unteren Ende des Telefons.
-
-
-
-
Setze das Kunststofföffnungswerkzeug in die Naht zwischen der Glasscheibe und dem Metallkörper.
-
Heble das Glas nur ein kleines bisschen hoch.
It is, i can’t seem to do it too easily either. Maybe i need to heat it up? I don’t want to damage it as it will still be used as a camera.
-
-
-
Stecke den Spudger in den nun offenen Raum zwischen Gehäuse und Bildschirm.
-
Drücke nach innen, um den Bildschirm noch weiter zu trennen.
-
Schiebe den Nylonspudger langsam über die Kante des Telefons, bis der Bildschirm aus dem Gehäuse herausspringt.
My LCD started to let loose using this way to saparate the top and bottom of the phone.
I used a guitar pick and slided it from the bottom to the top like the dude in this video: https://www.youtube.com/watch?v=XV10zyw8...
Didn’t had to use a lot of force this way, and my screen almost didn’t bend !
Yep! I did it also with this method. Wayy better and easier ;)
I found it easier to run the tool or a pick along the sides, and then sort of hinge the thing open at the top rather than running completely around the screen. It gets a little dicey where the glass starts to curve.
-
-
-
Ziehe den Bildschirm aus dem Gehäuse. Die beiden Teile sollten vollständig getrennt sein.
-
-
-
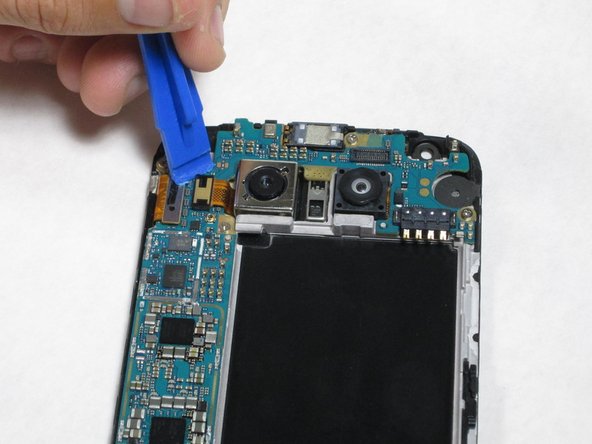
Setze das Plastiköffnungswerkzeug zwischen den Stecker am Flachbandkabel zum Display und der Hauptplatine ein und ziehe nach oben. Der Stecker sollte leicht herausspringen.
-
-
-
Wenn das Flachbandkabel weg ist, kannst du die Kamera mit einer Pinzette entfernen.
The camera is attached to the frame with adhesive- use a nylon screen opening tool or a spludger to help lift the camera off of the body. Tilt it out at a 45 degree angle to clear the PCB and you're ready for replacement!
I found it easier to use some guitar picks to separate the screen from the body. I lifted the screen away from the body using a prying tool, then insert the guitar pick in the gap. I worked it along the seam until I got to the top of the phone, then worked on the other side.
-


Um dein Gerät wieder zusammenzusetzen, folge den Schritten in umgekehrter Reihenfolge.
Um dein Gerät wieder zusammenzusetzen, folge den Schritten in umgekehrter Reihenfolge.
Rückgängig: Ich habe diese Anleitung nicht absolviert.
34 weitere Nutzer:innen haben diese Anleitung absolviert.
Besonderer Dank geht an diese Übersetzer:innen:
83%
VauWeh hilft uns, die Welt in Ordnung zu bringen! Wie kann ich mithelfen?
Hier starten ›

Team

Cal Poly, Team 18-2, Forte Fall 2016 Mitglied von Cal Poly, Team 18-2, Forte Fall 2016
CPSU-FORTE-F16S18G2
4 Mitglieder
15 Anleitungen geschrieben
6 Kommentare
Great instructions. This was my first time taking apart any phone. Everything went smoothly and my camera now works! thank you
This worked great for me. I was a little nervous prying on my phone, especially when I heard the first POP. But after that, it was not hard at all. The new camera focuses great for me now and I can get back to taking great pictures with my G5!
Thanks for the detailed instructions, tools and affordable part!
I can’t pry the screen off with the plastic tools I purchased with ifixit. what now?