Zum Hauptinhalt wechseln

Diese Version enthält möglicherweise inkorrekte Änderungen. Wechsle zur letzten geprüften Version.

Was du brauchst

  1. Dieser Schritt ist noch nicht übersetzt. Hilf mit, ihn zu übersetzen!

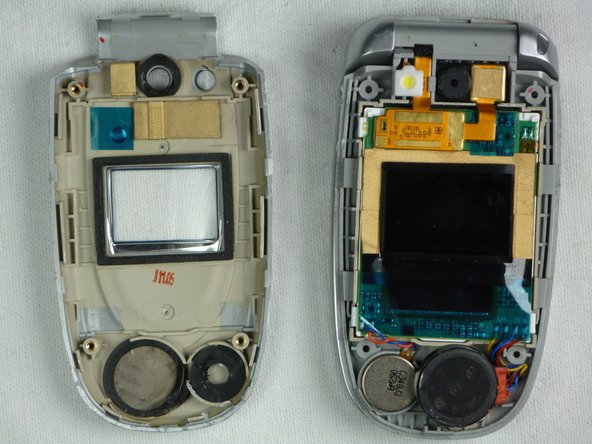
    : Schritt 1, Bild 1 von 3 : Schritt 1, Bild 2 von 3 : Schritt 1, Bild 3 von 3
    • Pry the grey pieces of plastic off the corners of the screen with a spudger.

  2. Dieser Schritt ist noch nicht übersetzt. Hilf mit, ihn zu übersetzen!

    : Schritt 2, Bild 1 von 2 : Schritt 2, Bild 2 von 2
    • Unscrew each of the four screws with a Phillips #00 Screwdriver.

    • These screws are the same size as the ones from the back casing, but are not the same size as the screw from the antenna.

    • These screws are the same size as the ones from the back casing, but are not the same size as the screw from the antenna.

  3. Dieser Schritt ist noch nicht übersetzt. Hilf mit, ihn zu übersetzen!

    : Schritt 3, Bild 1 von 2 : Schritt 3, Bild 2 von 2
    • Close the phone after removing the screws.

    • Slide a spudger into the cracks in the top half of the phone's casing.

    • Wedge and lever the spudger to remove the casing.

    • Apply constant pressure to avoid cracking the plastic casing. This step can take a few minutes.

  4. Dieser Schritt ist noch nicht übersetzt. Hilf mit, ihn zu übersetzen!

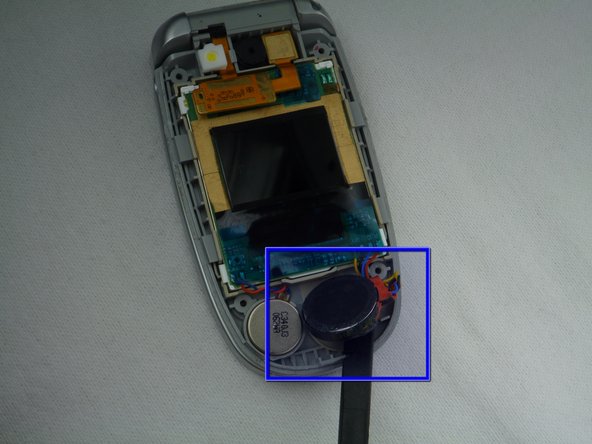
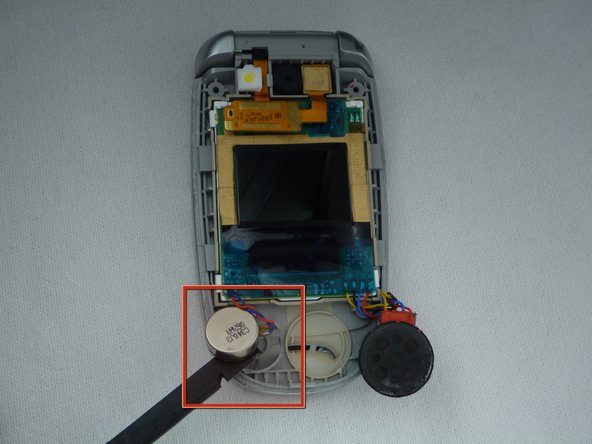
    : Schritt 4, Bild 1 von 3 : Schritt 4, Bild 2 von 3 : Schritt 4, Bild 3 von 3
    • Remove the chipboard from the screen by sliding a plastic spudger under the screen and lifting.

    • Use a plastic spudger to avoid short-circuiting the phone's electronics.

    • Gently lift the speaker out of the plastic casing using a plastic spudger.

    • Remove the small battery adjacent to the speaker with a plastic spudger.

  5. Dieser Schritt ist noch nicht übersetzt. Hilf mit, ihn zu übersetzen!

    : Schritt 5, Bild 1 von 3 : Schritt 5, Bild 2 von 3 : Schritt 5, Bild 3 von 3
    • Slide and lever a plastic spudger between the screen and it's housing.

    • Avoid tearing the wires connecting the screen, the small battery and the speaker.

    • Remove the chip connecting the screen to the camera using your fingers.

Ziellinie

jmarcum

Mitglied seit: 10/28/09

16 Reputation

1 Anleitung geschrieben

Team

Cal Poly, Team 9-18, Regan Fall 2009 Mitglied von Cal Poly, Team 9-18, Regan Fall 2009

CPSU-REGAN-F09S9G18

5 Mitglieder

2 Anleitungen geschrieben

Ein Kommentar

The “battery” beside the speaker isn’t the battery, it’s the phone vibrator. Still a good guide, however

Kaleb White - Antwort

Kommentar hinzufügen

Seitenaufrufe:

Letzte 24 Stunden: 0

Letzte 7 Tage: 1

Letzte 30 Tage: 1

Insgesamt: 3,392