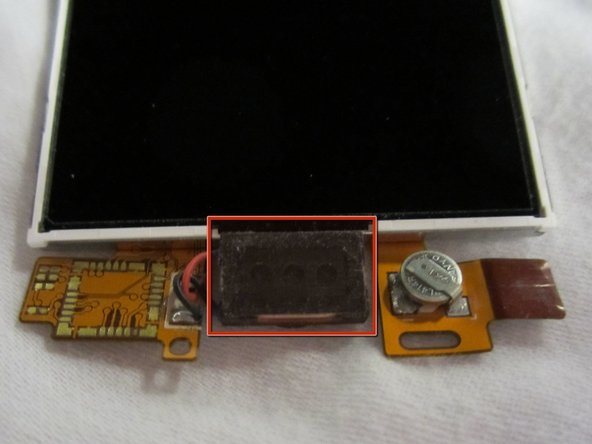
Zum Hauptinhalt wechseln

LG Xenon Speaker Replacement

Was du brauchst

  1. LG Xenon Speaker Replacement, Back Case: Schritt 1, Bild 1 von 1
    • Turn the phone over so the back side is facing you.

  2. LG Xenon Speaker Replacement: Schritt 2, Bild 1 von 2 LG Xenon Speaker Replacement: Schritt 2, Bild 2 von 2
    • Placing your thumb on the bottom of the phone, apply pressure to the small ridge in the middle of the phone and push upward towards the camera.

    • The back casing should slide off.

  3. LG Xenon Speaker Replacement, Battery: Schritt 3, Bild 1 von 2 LG Xenon Speaker Replacement, Battery: Schritt 3, Bild 2 von 2
    • Using your index finger, pull the top of the battery out first. Place your finger at the top center of the battery in the gap that is provided. Then pull the battery towards yourself.

    • The battery should easily fall out after the top of the battery has been pulled out.

  4. LG Xenon Speaker Replacement, Motherboard: Schritt 4, Bild 1 von 2 LG Xenon Speaker Replacement, Motherboard: Schritt 4, Bild 2 von 2
    • Unscrew the six 2.4mm Phillips #00 screws (three on the left and three on the right of the phone) to remove the inner back case.

  5. LG Xenon Speaker Replacement: Schritt 5, Bild 1 von 1
    • Once all six screws are removed, use the plastic opening tool to carefully pry apart the inner back case. Push the plastic tool underneath the case. Carefully push upward, with the tool, while moving it around the case.

  6. LG Xenon Speaker Replacement: Schritt 6, Bild 1 von 2 LG Xenon Speaker Replacement: Schritt 6, Bild 2 von 2
    • Remove the camera, lock, and volume buttons from the side of the phone.

  7. LG Xenon Speaker Replacement: Schritt 7, Bild 1 von 2 LG Xenon Speaker Replacement: Schritt 7, Bild 2 von 2
    • Carefully remove the two 3mm Phillips #00 screws (one on the top and one on the bottom) that are attaching the motherboard to the phone.

  8. LG Xenon Speaker Replacement: Schritt 8, Bild 1 von 2 LG Xenon Speaker Replacement: Schritt 8, Bild 2 von 2
    • For this next step, carefully lift and remove the motherboard.

    • A connector cable will still be connected to the motherboard upon removing it.

    • Damage to the connector cable will permanently disable phone.

  9. LG Xenon Speaker Replacement: Schritt 9, Bild 1 von 2 LG Xenon Speaker Replacement: Schritt 9, Bild 2 von 2
    • Carefully unclip the silver metallic tab from the motherboard.

  10. LG Xenon Speaker Replacement: Schritt 10, Bild 1 von 2 LG Xenon Speaker Replacement: Schritt 10, Bild 2 von 2
    • Once the cable is removed, you have successfully disassembled the motherboard of your phone.

  11. LG Xenon Speaker Replacement, Keyboard: Schritt 11, Bild 1 von 1
    • Turn the motherboard over and carefully remove the keypad from the motherboard.

    • The keyboard may be sitting loosely in the case (not attached to the motherboard). Carefully remove keyboard from case.

  12. LG Xenon Speaker Replacement, LCD: Schritt 12, Bild 1 von 1
    • After removing the motherboard and keyboard, unscrew eight 1.6mm Phillips #00 screws in the middle of the phone.

  13. LG Xenon Speaker Replacement: Schritt 13, Bild 1 von 1
    • Remove slider piece.

    • Pay close attention that you don’t lose the spring.

    • Carefully remove the spring.

  14. LG Xenon Speaker Replacement: Schritt 14, Bild 1 von 2 LG Xenon Speaker Replacement: Schritt 14, Bild 2 von 2
    • Remove six 2.25mm Phillips #00 screws along the outside of the case.

  15. LG Xenon Speaker Replacement: Schritt 15, Bild 1 von 2 LG Xenon Speaker Replacement: Schritt 15, Bild 2 von 2
    • Using the plastic opening tool, carefully open and remove the case. Slide the tool along the edge and pry upwards to open.

  16. LG Xenon Speaker Replacement: Schritt 16, Bild 1 von 1
    • Remove the black electrical tape holding the LCD to the screen.

  17. LG Xenon Speaker Replacement: Schritt 17, Bild 1 von 1
    • Un-clasp the small tab in the top right corner.

  18. LG Xenon Speaker Replacement: Schritt 18, Bild 1 von 3 LG Xenon Speaker Replacement: Schritt 18, Bild 2 von 3 LG Xenon Speaker Replacement: Schritt 18, Bild 3 von 3
    • Unhook the LCD from tabs on the bottom using the plastic opening tool.

    • Remove the LCD. Be careful, the LCD screen is fragile.

  19. LG Xenon Speaker Replacement, Speaker: Schritt 19, Bild 1 von 2 LG Xenon Speaker Replacement, Speaker: Schritt 19, Bild 2 von 2
    • The speaker is attached to the top of the LCD.

Abschluss

To reassemble your device, follow these instructions in reverse order.

Ein:e weitere:r Nutzer:in hat diese Anleitung absolviert.

Micaela Saqui

Mitglied seit: 04/19/12

39 Reputation

7 Anleitungen geschrieben

Team

Cal Poly, Team 9-41, Regan Spring 2012 Mitglied von Cal Poly, Team 9-41, Regan Spring 2012

CPSU-REGAN-S12S9G41

5 Mitglieder

16 Anleitungen geschrieben

0 Kommentare

Kommentar hinzufügen

Seitenaufrufe:

Letzte 24 Stunden: 0

Letzte 7 Tage: 0

Letzte 30 Tage: 2

Insgesamt: 833