Einleitung
If the laptop begins to overheat, check to hear that there is a whirring noise when the laptop is turned on. If there is no noise, the laptop may go into a thermal cool down signifying a faulty cooling fan. This guide will walk you through how to change the cooling fan.
Was du brauchst
-
-
Flip the IdeaPad bottom side up.
-
Using a Phillips #1 screwdriver, remove the two 6.0mm screws on the back panel, that hold the keyboard.
-
Flip the computer back to top facing.
-
-
-
Open the lid.
-
Use the plastic opening tool to pry the keyboard up and away from the bottom assembly.
-
-
-
Next disconnect the keyboard cable by using the tip of the spudger or your finger to lightly push out the ribbon from the contact port.
-
Completely remove the keyboard from the bottom assembly.
-
-
-
-
Using a Phillips #1 screwdriver, unscrew the one 5.0mm screw on the back panel.
-
-
-
Flip the laptop to its back and the optical drive is located at the top left corner.
-
Remove the optical CD DVD drive by lightly pulling it out of the assembly.
-
-
-
Place the laptop bottom facing up.
-
Using a Phillips #1 screwdriver, remove the remaining eight 6.0mm screws on the back panel.
-
Flip the computer back to top facing.
-
-
-
Separate the top case from the bottom using a plastic opening tool.
-
Continue prying the top and bottom case from each other all around the perimeter of the laptop.
-
-
-
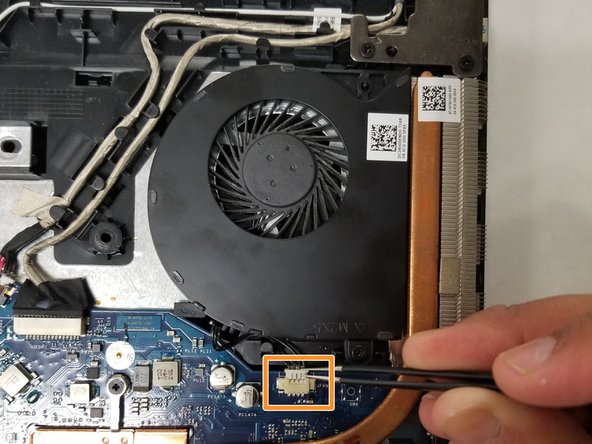
On the back panel, the cooling fan is located at the top right.
-
Unscrew the 6.0mm screw using the Phillips #1 screwdriver.
-
Push the plastic piece towards the direction the wires are in with the tweezers to completely disconnect it from the back panel.
-


To reassemble your device, follow these instructions in reverse order.
To reassemble your device, follow these instructions in reverse order.
Rückgängig: Ich habe diese Anleitung nicht absolviert.
Eine weitere Person hat diese Anleitung absolviert.

Team

UW Tacoma, Team S1-G5, Rose Fall 2018 Mitglied von UW Tacoma, Team S1-G5, Rose Fall 2018
UWT-ROSE-F18S1G5
4 Mitglieder
39 Anleitungen geschrieben