Einleitung
Wenn das Gerät nicht über den Startbildschirm herauskommt, das Rad sich endlos dreht oder einen Bluescreen mit einer Meldung ähnlich wie "Your PC ran into a problem and needs to restart" zeigt, könnte deine Festplatte beschädigt sein. Diese Anleitung zeigt, wie du sie austauschen kannst.
Was du brauchst
-
-
Drehe das IdeaPad auf die Oberseite.
-
Entferne auf der Rückseite die beiden 6 mm #1 Kreuzschlitzschrauben, die die Tastatur fixieren.
-
Drehe den Computer wieder um.
-
-
-
Öffne den Computer.
-
Heble die Tastatur mit einem Opening Tool nach oben und weg von der unteren Baugruppe.
-
-
-
Entferne das Tastaturkabel, indem du es mit der Spitze eines Spudgers oder deinem Finger vorsichtig aus dem Anschluss drückst.
-
Entferne die Tastatur vom Gerät.
-
-
-
-
Entferne die 5 mm #1 Kreuzschlitzschraube am Gehäuseunterteil.
-
-
-
Drehe das Laptop um, sodass das optische Laufwerk in der oberen linke Ecke liegt.
-
Ziehe das optische Laufwerk behutsam aus dem Laptop und entferne es.
-
-
-
Drehe das Laptop um, sodass die Unterseite nach oben zeigt.
-
Entferne die restlichen acht 6 mm Kreuzschlitzschrauben #1 an der Gehäuseunterseite.
-
Drehe den Rechner wieder um, sodass die Vorderseite nach oben zeigt.
-
-
-
Trenne die Gehäuseoberseite mit einem Opening Tool von der Unterseite.
-
Heble die Oberseite von der Gehäuseunterseite ab, indem du dich einmal um das Notebook herum arbeitest.
-
-
-
Drehe den Laptop um und löse die Gehäuseoberseite vorsichtig von der Gehäuseunterseite ab.
-
-
-
Der Akku ist an der Gehäuseunterseite befestigt.
-
Entferne die beiden 4 mm Schrauben.
-
Drücke den Akku aus dem Gehäuse, um ihn zu entfernen.
-
-
-
Entferne die vier 4,0 mm Kreuzschlitzschrauben #1, mit denen die Festplatte in den Ecken im Gerät befestigt ist.
-
Schiebe die Festplatte nach links, bis sie vom Gerät abgetrennt ist.
-
Hebe die Festplatte aus dem Computer heraus.
-
-
-
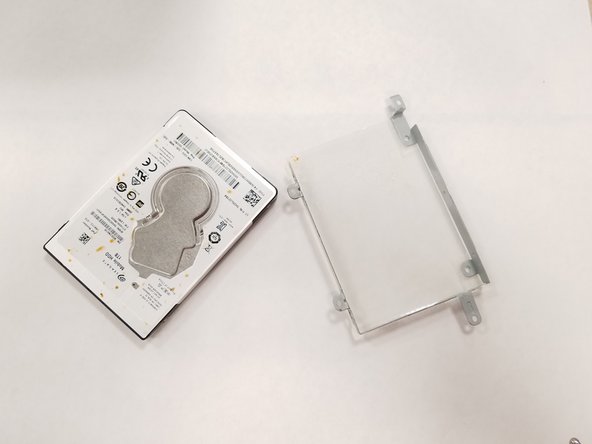
Entferne die vier 3,0 mm langen Kreuzschlitzschrauben #1, mit denen die Festplatte im Befestigungsrahmen gehalten wird.
-
Entferne den Kunststoffrahmen von der Festplatte.
-


Um dein Gerät wieder zusammenzubauen, folge den Schritten in umgekehrter Reihenfolge.
Um dein Gerät wieder zusammenzubauen, folge den Schritten in umgekehrter Reihenfolge.
Rückgängig: Ich habe diese Anleitung nicht absolviert.
6 weitere Personen haben diese Anleitung absolviert.
Besonderer Dank geht an diese Übersetzer:innen:
100%
VauWeh hilft uns, die Welt in Ordnung zu bringen! Wie kann ich mithelfen?
Hier starten ›

Team

UW Tacoma, Team S1-G5, Rose Fall 2018 Mitglied von UW Tacoma, Team S1-G5, Rose Fall 2018
UWT-ROSE-F18S1G5
4 Mitglieder
39 Anleitungen geschrieben
4 Kommentare
I found that two of the screws on the bottom hold down the keyboard, so they need to be unscrewed before the keyboard will come up. Also, there are two “shallow” screws (that become visible after the DVD drive is removed) which need to be removed, and the battery doesn’t really need to be removed to replace the hard drive.
I’ve posted these comments on their associated steps, but it doesn’t hurt to repeat them here: There are 3 screws on the bottom of the laptop holding certain parts in place (keyboard & optical drive). These will need to be removed before doing anything else in this guide, so it’s best to just remove all 11 screws (yes, there are 11, not 10 as stated) from the bottom of the laptop. After removing the optical drive, there will be 2 more screws to remove. The screw underneath the keyboard holds the fan assembly in place, not the optical drive, as they are on opposite sides of the laptop.
Cannot remove optical hard drive following instructions. Does not appear to be removable on my Lenovo Ideapad 110.