Zum Hauptinhalt wechseln

Lenovo IdeaPad 130-15AST Motherboard Replacement

Was du brauchst

  1. Lenovo IdeaPad 130-15AST Motherboard  Replacement, DVD/CD Optical Drive: Schritt 1, Bild 1 von 1
    • Verify that the DVD/CD Tray is free of DVD's and CD's.

    • Using a Phillips #00 screwdriver, remove one of the 6.0mm screws.

  2. Lenovo IdeaPad 130-15AST Motherboard  Replacement: Schritt 2, Bild 1 von 2 Lenovo IdeaPad 130-15AST Motherboard  Replacement: Schritt 2, Bild 2 von 2
    • Using the Jimmy Tool, gently pry the DVD/CD Drive away from the case of the laptop.

  3. Lenovo IdeaPad 130-15AST Motherboard  Replacement: Schritt 3, Bild 1 von 1
    • Gently slide the DVD/CD Drive out of the laptop.

  4. Lenovo IdeaPad 130-15AST Motherboard  Replacement, Battery: Schritt 4, Bild 1 von 1
    • Before proceeding, make sure the computer is turned off and it is not connected to any power source.

    • Using a Phillips #00 screwdriver, remove twelve of the 6.0mm screws.

  5. Lenovo IdeaPad 130-15AST Motherboard  Replacement: Schritt 5, Bild 1 von 3 Lenovo IdeaPad 130-15AST Motherboard  Replacement: Schritt 5, Bild 2 von 3 Lenovo IdeaPad 130-15AST Motherboard  Replacement: Schritt 5, Bild 3 von 3
    • Do not try to completely remove this case without ensuring the entire case is free of connection points as this could crack or damage the case.

    • Use a thin, flat edge to gently break the seal of the case.

  6. Lenovo IdeaPad 130-15AST Motherboard  Replacement: Schritt 6, Bild 1 von 2 Lenovo IdeaPad 130-15AST Motherboard  Replacement: Schritt 6, Bild 2 von 2
    • Make sure that the back panel is completely free from the laptop.

    • Grab the sides of the back panel of the laptop with two hands. Then separate the panel from the laptop by lifting up.

  7. Lenovo IdeaPad 130-15AST Motherboard  Replacement: Schritt 7, Bild 1 von 1
    • Using a Phillips #0 screwdriver, remove three 6.0mm screws.

  8. Lenovo IdeaPad 130-15AST Motherboard  Replacement: Schritt 8, Bild 1 von 3 Lenovo IdeaPad 130-15AST Motherboard  Replacement: Schritt 8, Bild 2 von 3 Lenovo IdeaPad 130-15AST Motherboard  Replacement: Schritt 8, Bild 3 von 3
    • Using a pair of tweezers, remove the black plug which includes 8 wires.

  9. Lenovo IdeaPad 130-15AST Motherboard  Replacement: Schritt 9, Bild 1 von 2 Lenovo IdeaPad 130-15AST Motherboard  Replacement: Schritt 9, Bild 2 von 2
    • Grabbing the sides of the battery with one hand, remove the battery from the laptop.

    I worked. Thanks you so much for the informative and thorough explanation.

    Guy Kaminitz - Antwort

  10. Lenovo IdeaPad 130-15AST Motherboard  Replacement, Speaker: Schritt 10, Bild 1 von 1
    • Using a prying tool, remove the white plug (which includes 4 different colored wires) from the motherboard. Repeat the same step for the other plug.

    • This plug is small and fragile. You should not use a lot of force to separate the plastic connection from the motherboard.

  11. Lenovo IdeaPad 130-15AST Motherboard  Replacement: Schritt 11, Bild 1 von 1
    • Disconnect the speaker wires from their connection tabs along the front of the computer.

    • These wires are not connected to anything internally. They connect the speakers from the power supply to each other.

  12. Lenovo IdeaPad 130-15AST Motherboard  Replacement: Schritt 12, Bild 1 von 2 Lenovo IdeaPad 130-15AST Motherboard  Replacement: Schritt 12, Bild 2 von 2
    • To remove the speakers, pinch the inside edge and lift upwards.

    • These speakers are help in by O-rings. Be sure not to lose these, as new speakers do not come with new O-rings.

  13. Lenovo IdeaPad 130-15AST Motherboard  Replacement, Motherboard: Schritt 13, Bild 1 von 2 Lenovo IdeaPad 130-15AST Motherboard  Replacement, Motherboard: Schritt 13, Bild 2 von 2
    • Gently move the wires wrapped around the fan that run along the left side of the cooling fan.

    • These wires are not connected directly to the fan and should not be removed but simply displaced from their original location.

  14. Lenovo IdeaPad 130-15AST Motherboard  Replacement: Schritt 14, Bild 1 von 1
    • Using the Phillips #0 screwdriver, remove two 4.0mm screws.

  15. Lenovo IdeaPad 130-15AST Motherboard  Replacement: Schritt 15, Bild 1 von 3 Lenovo IdeaPad 130-15AST Motherboard  Replacement: Schritt 15, Bild 2 von 3 Lenovo IdeaPad 130-15AST Motherboard  Replacement: Schritt 15, Bild 3 von 3
    • Gently use a prying tool to disconnect the cooling fan from the motherboard.

    • The fan is connected to the motherboard via a clip. To remove this, push on the white clips and pull upwards.

  16. Lenovo IdeaPad 130-15AST Motherboard  Replacement: Schritt 16, Bild 1 von 2 Lenovo IdeaPad 130-15AST Motherboard  Replacement: Schritt 16, Bild 2 von 2
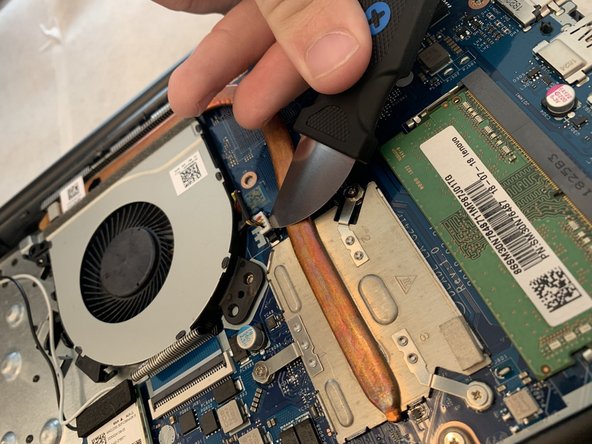
    • Remove the yellow tape from the motherboard to ensure freedom of movement upon removal.

  17. Lenovo IdeaPad 130-15AST Motherboard  Replacement: Schritt 17, Bild 1 von 2 Lenovo IdeaPad 130-15AST Motherboard  Replacement: Schritt 17, Bild 2 von 2
    • Using a spudger, lift the black tab to remove the blue tab from the Motherboard.

    • Although the image shows the metal spudger, you should use the nylon spudger or the plastic opening tools for this step. The metal spudger may cause irreparable damage to the user and/or the device if used improperly.

  18. Lenovo IdeaPad 130-15AST Motherboard  Replacement: Schritt 18, Bild 1 von 2 Lenovo IdeaPad 130-15AST Motherboard  Replacement: Schritt 18, Bild 2 von 2
    • Using a plastic opening tool, lift the black tab to remove the blue tab from the Motherboard.

    • Although the image shows the metal spudger, you should use the nylon spudger or the plastic opening tools for this step. The metal spudger may cause irreparable damage to the user and/or the device if used improperly.

  19. Lenovo IdeaPad 130-15AST Motherboard  Replacement: Schritt 19, Bild 1 von 2 Lenovo IdeaPad 130-15AST Motherboard  Replacement: Schritt 19, Bild 2 von 2
    • Using a plastic opening tool, lift the black tab to remove the blue tab from the Motherboard.

    • Although the image shows the metal spudger, you should use the nylon spudger or the plastic opening tools for this step. The metal spudger may cause irreparable damage to the user and/or the device if used improperly.

  20. Lenovo IdeaPad 130-15AST Motherboard  Replacement: Schritt 20, Bild 1 von 3 Lenovo IdeaPad 130-15AST Motherboard  Replacement: Schritt 20, Bild 2 von 3 Lenovo IdeaPad 130-15AST Motherboard  Replacement: Schritt 20, Bild 3 von 3
    • Using a Phillips #0 screwdriver, remove a single 6.0mm screw.

    • After removing the screw, remove the card from the motherboard.

  21. Lenovo IdeaPad 130-15AST Motherboard  Replacement: Schritt 21, Bild 1 von 2 Lenovo IdeaPad 130-15AST Motherboard  Replacement: Schritt 21, Bild 2 von 2
    • Using a plastic opening tool, lift the black tab to remove the blue tab from the Motherboard.

    • Although the image shows the metal spudger, you should use the nylon spudger or the plastic opening tools for this step. The metal spudger may cause irreparable damage to the user and/or the device if used improperly.

  22. Lenovo IdeaPad 130-15AST Motherboard  Replacement: Schritt 22, Bild 1 von 3 Lenovo IdeaPad 130-15AST Motherboard  Replacement: Schritt 22, Bild 2 von 3 Lenovo IdeaPad 130-15AST Motherboard  Replacement: Schritt 22, Bild 3 von 3
    • Using a Phillips #0 screwdriver, remove three 6.0mm screws.

    • After removing the screws, remove the copper from the laptop.

  23. Lenovo IdeaPad 130-15AST Motherboard  Replacement: Schritt 23, Bild 1 von 2 Lenovo IdeaPad 130-15AST Motherboard  Replacement: Schritt 23, Bild 2 von 2
    • Using a pair of tweezers, remove the plug from the motherboard.

  24. Lenovo IdeaPad 130-15AST Motherboard  Replacement: Schritt 24, Bild 1 von 1
    • Using a Phillips #0 screwdriver, remove six 6.0mm screws.

  25. Lenovo IdeaPad 130-15AST Motherboard  Replacement: Schritt 25, Bild 1 von 1
    • Lift up and remove the motherboard from the device.

Abschluss

To reassemble your device, follow these instructions in reverse order.

3 weitere Nutzer:innen haben diese Anleitung absolviert.

Ein Kommentar

Where can I find an Intel replacement motherboard instead of the stupid AMD a6 one?

connoratteberry - Antwort

Kommentar hinzufügen

Seitenaufrufe:

Letzte 24 Stunden: 1

Letzte 7 Tage: 7

Letzte 30 Tage: 23

Insgesamt: 3,379