Einleitung
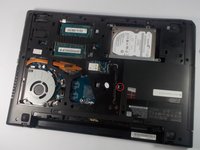
This guide will help you replace your DVD Drive on your Lenovo Ideapad G50-45. You might need this repair if your DVD Drive has failed. Please reference the troubleshooting page, or your product manual, to determine if this has occurred.
Before starting this repair, you should remove your battery. Please follow this battery removal guide.
You should also have
- A flathead screwdriver
- A Phillips #2 screwdriver
- A replacement DVD Drive
- A small container to hold screws
Keep in mind to be gentle when removing and replacing any screws. They could strip easily.
Good luck and happy fixing!
Was du brauchst
-
-
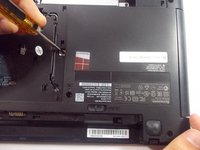
First, remove the three screws located on the bottom panel of the laptop using a Philips #2 screwdriver.
-
To avoid losing the small screws, put them in a container.
-
-
-
To remove the panel on the laptop, gently slide the panel away from the battery.
-
Lift up the panel and place it to the side.
-
-
-
-
Remove the indicated screw holding the DVD Drive.
-
To avoid losing the screw, place it in the same container used to hold the other three screws.
-


To reassemble your device, follow these instructions in reverse order.
To reassemble your device, follow these instructions in reverse order.
Rückgängig: Ich habe diese Anleitung nicht absolviert.
6 weitere Personen haben diese Anleitung absolviert.
Team

UMass Dartmouth, Team 2-6, Shastany Fall 2015 Mitglied von UMass Dartmouth, Team 2-6, Shastany Fall 2015
UMASSD-SHASTANY-F15S2G6
3 Mitglieder
5 Anleitungen geschrieben