Zum Hauptinhalt wechseln

Lenovo IdeaPad N586 Motherboard Replacement

Was du brauchst

  1. Lenovo IdeaPad N586 Motherboard Replacement, Battery: Schritt 1, Bild 1 von 2 Lenovo IdeaPad N586 Motherboard Replacement, Battery: Schritt 1, Bild 2 von 2
    • To unlock the battery, flip the laptop over so that the bottom is facing upward. Then unlock the left clip by pushing the clip to the left.

  2. Lenovo IdeaPad N586 Motherboard Replacement: Schritt 2, Bild 1 von 2 Lenovo IdeaPad N586 Motherboard Replacement: Schritt 2, Bild 2 von 2
    • Now push the right clip to the right and hold it while using your other hand to pull the battery out.

  3. Lenovo IdeaPad N586 Motherboard Replacement, Back Panel: Schritt 3, Bild 1 von 1
    • Remove the two screws highlighted.

  4. Lenovo IdeaPad N586 Motherboard Replacement: Schritt 4, Bild 1 von 1
    • This is the back of the laptop with the cover removed.

  5. Lenovo IdeaPad N586 Motherboard Replacement, Optical Drive: Schritt 5, Bild 1 von 1
    • Locate and remove the single screw right of the optical drive

  6. Lenovo IdeaPad N586 Motherboard Replacement: Schritt 6, Bild 1 von 1
    • Optical Drive should slide out easily with one thumb's effort.

  7. Lenovo IdeaPad N586 Motherboard Replacement, Hard Drive: Schritt 7, Bild 1 von 1
    • Now remove the last two screws highlighted

  8. Lenovo IdeaPad N586 Motherboard Replacement: Schritt 8, Bild 1 von 2 Lenovo IdeaPad N586 Motherboard Replacement: Schritt 8, Bild 2 von 2
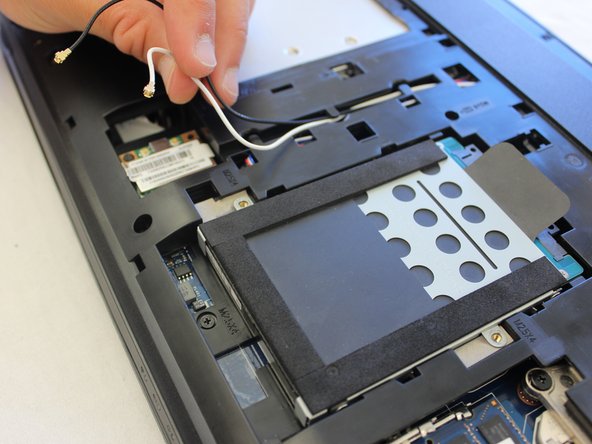
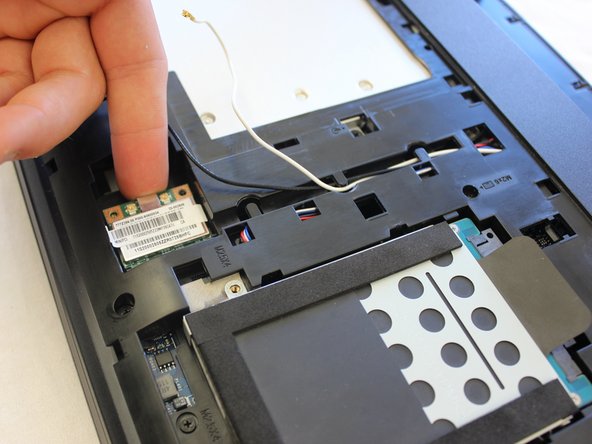
    • Push hard drive away from the center of the chassis.

    • Lift the hard drive out of the chassis using the tab located on the drive.

  9. Lenovo IdeaPad N586 Motherboard Replacement, Wifi card: Schritt 9, Bild 1 von 2 Lenovo IdeaPad N586 Motherboard Replacement, Wifi card: Schritt 9, Bild 2 von 2
    • Remove the white and black wires.

  10. Lenovo IdeaPad N586 Motherboard Replacement: Schritt 10, Bild 1 von 2 Lenovo IdeaPad N586 Motherboard Replacement: Schritt 10, Bild 2 von 2
    • Next, unscrew the wifi card

  11. Lenovo IdeaPad N586 Motherboard Replacement: Schritt 11, Bild 1 von 1
    • Pull out the wifi card.

  12. Lenovo IdeaPad N586 Motherboard Replacement, Memory: Schritt 12, Bild 1 von 2 Lenovo IdeaPad N586 Motherboard Replacement, Memory: Schritt 12, Bild 2 von 2
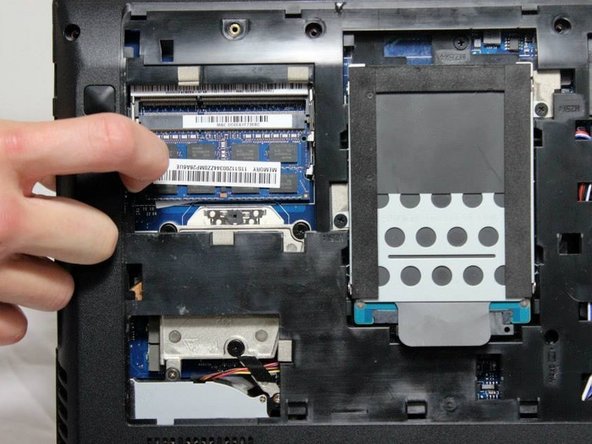
    • Now push the little clips out away from the memory to unlock the memory.

  13. Lenovo IdeaPad N586 Motherboard Replacement: Schritt 13, Bild 1 von 1
    • After unlocking the memory from it's position, pull the memory out.

  14. Lenovo IdeaPad N586 Motherboard Replacement, Keyboard: Schritt 14, Bild 1 von 1
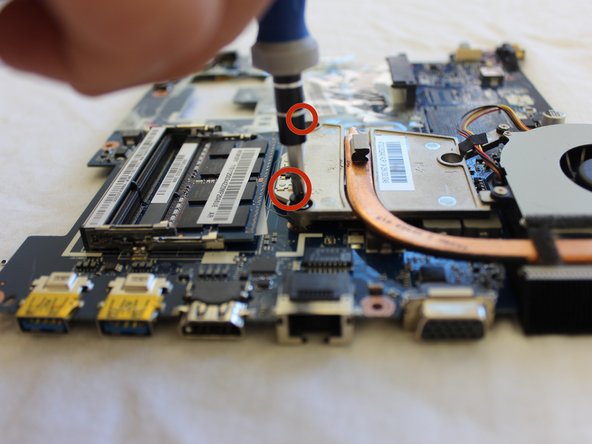
    • Remove three screws on bottom of case. They have a little keyboard image next to them. If you don't do this first, the keyboard will not come off. Place the plastic spudger right under the edge of the keyboard and lift up the keyboard.

  15. Lenovo IdeaPad N586 Motherboard Replacement: Schritt 15, Bild 1 von 1
    • Slowly and gently lift the keyboard up to separate from the chassis.

  16. Lenovo IdeaPad N586 Motherboard Replacement: Schritt 16, Bild 1 von 1
    • Gently lift the keyboard off the chassis.

    • Carefully disconnect the keyboard from the laptop by unhooking the keyboard ribbon.

  17. Lenovo IdeaPad N586 Motherboard Replacement: Schritt 17, Bild 1 von 1
    • Now remove the keyboard from the computer.

  18. Lenovo IdeaPad N586 Motherboard Replacement, Fan: Schritt 18, Bild 1 von 2 Lenovo IdeaPad N586 Motherboard Replacement, Fan: Schritt 18, Bild 2 von 2
    • Pull the plug shown.

  19. Lenovo IdeaPad N586 Motherboard Replacement: Schritt 19, Bild 1 von 2 Lenovo IdeaPad N586 Motherboard Replacement: Schritt 19, Bild 2 von 2
    • Lift up fan.

    • Remove two highlighted screws.

  20. Lenovo IdeaPad N586 Motherboard Replacement: Schritt 20, Bild 1 von 1
    • This is the fan separated from the motherboard.

  21. Lenovo IdeaPad N586 Motherboard Replacement, Motherboard: Schritt 21, Bild 1 von 1
    • Remove all screws shown.

  22. Lenovo IdeaPad N586 Motherboard Replacement: Schritt 22, Bild 1 von 1
    • Flip laptop over.

  23. Lenovo IdeaPad N586 Motherboard Replacement: Schritt 23, Bild 1 von 1
    • Remove one more screw hidden under white paper oval sticker (lenovo)

  24. Lenovo IdeaPad N586 Motherboard Replacement: Schritt 24, Bild 1 von 1
    • Remove keyboard bezel.

  25. Lenovo IdeaPad N586 Motherboard Replacement: Schritt 25, Bild 1 von 2 Lenovo IdeaPad N586 Motherboard Replacement: Schritt 25, Bild 2 von 2
    • Unplug highlighted tabs.

  26. Lenovo IdeaPad N586 Motherboard Replacement: Schritt 26, Bild 1 von 2 Lenovo IdeaPad N586 Motherboard Replacement: Schritt 26, Bild 2 von 2
    • More tabs need to be removed.

  27. Lenovo IdeaPad N586 Motherboard Replacement: Schritt 27, Bild 1 von 2 Lenovo IdeaPad N586 Motherboard Replacement: Schritt 27, Bild 2 von 2
    • Remove final plug connecting motherboard to base of laptop.

  28. Lenovo IdeaPad N586 Motherboard Replacement: Schritt 28, Bild 1 von 1
    • This is what the motherboard looks when taken out of the laptop.

Abschluss

To reassemble your device, follow these instructions in reverse order.

3 weitere Nutzer:innen haben diese Anleitung absolviert.

Patrick

Mitglied seit: 04/08/14

453 Reputation

3 Anleitungen geschrieben

Team

Cal Poly, Team 8-7, Regan Spring 2014 Mitglied von Cal Poly, Team 8-7, Regan Spring 2014

CPSU-REGAN-S14S8G7

5 Mitglieder

10 Anleitungen geschrieben

2 Kommentare

You cannot must pull up on the keyboard. There are three screws on the bottom of the case that have to be removed first!!

Clint Hatchett - Antwort

My laptop open hoi no please tell me why open hoi na please vaia

Mdimranh203@gmail.com - Antwort

Kommentar hinzufügen

Seitenaufrufe:

Letzte 24 Stunden: 0

Letzte 7 Tage: 0

Letzte 30 Tage: 2

Insgesamt: 2,128