Zum Hauptinhalt wechseln

Lenovo IdeaPad Y500 Keyboard Replacement

Was du brauchst

  1. Lenovo IdeaPad Y500 Keyboard Replacement, Battery: Schritt 1, Bild 1 von 3 Lenovo IdeaPad Y500 Keyboard Replacement, Battery: Schritt 1, Bild 2 von 3 Lenovo IdeaPad Y500 Keyboard Replacement, Battery: Schritt 1, Bild 3 von 3
    • Slide the lock on the right side until you hear a click. Once you hear a click , you should see the color red.

  2. Lenovo IdeaPad Y500 Keyboard Replacement: Schritt 2, Bild 1 von 1
    • Unlike the first lock, this lock is spring loaded and must be held in place when used.

    • Slide the lock to the left (in the direction of the arrow below the lock) and hold in place.

  3. Lenovo IdeaPad Y500 Keyboard Replacement: Schritt 3, Bild 1 von 1
    • Gently pull battery away from the computer while holding open the lock.

  4. Lenovo IdeaPad Y500 Keyboard Replacement, Keyboard: Schritt 4, Bild 1 von 3 Lenovo IdeaPad Y500 Keyboard Replacement, Keyboard: Schritt 4, Bild 2 von 3 Lenovo IdeaPad Y500 Keyboard Replacement, Keyboard: Schritt 4, Bild 3 von 3
    • Unlock the battery latch by pulling it up.

    • It should reveal red underneath when it's unlocked.

  5. Lenovo IdeaPad Y500 Keyboard Replacement: Schritt 5, Bild 1 von 3 Lenovo IdeaPad Y500 Keyboard Replacement: Schritt 5, Bild 2 von 3 Lenovo IdeaPad Y500 Keyboard Replacement: Schritt 5, Bild 3 von 3
    • Push the latch down and then hold in position.

    • Pull the optical drive out.

  6. Lenovo IdeaPad Y500 Keyboard Replacement: Schritt 6, Bild 1 von 3 Lenovo IdeaPad Y500 Keyboard Replacement: Schritt 6, Bild 2 von 3 Lenovo IdeaPad Y500 Keyboard Replacement: Schritt 6, Bild 3 von 3
    • Remove nine screws with a Phillips #1 screwdriver.

  7. Lenovo IdeaPad Y500 Keyboard Replacement: Schritt 7, Bild 1 von 3 Lenovo IdeaPad Y500 Keyboard Replacement: Schritt 7, Bild 2 von 3 Lenovo IdeaPad Y500 Keyboard Replacement: Schritt 7, Bild 3 von 3
    • Pull up on the loosened cover to remove.

    • Remove two screws with a Phillips #1 screwdriver.

  8. Lenovo IdeaPad Y500 Keyboard Replacement: Schritt 8, Bild 1 von 3 Lenovo IdeaPad Y500 Keyboard Replacement: Schritt 8, Bild 2 von 3 Lenovo IdeaPad Y500 Keyboard Replacement: Schritt 8, Bild 3 von 3
    • Pull the tab straight to the left until part releases.

    • Lift up the part to remove completely.

  9. Lenovo IdeaPad Y500 Keyboard Replacement: Schritt 9, Bild 1 von 3 Lenovo IdeaPad Y500 Keyboard Replacement: Schritt 9, Bild 2 von 3 Lenovo IdeaPad Y500 Keyboard Replacement: Schritt 9, Bild 3 von 3
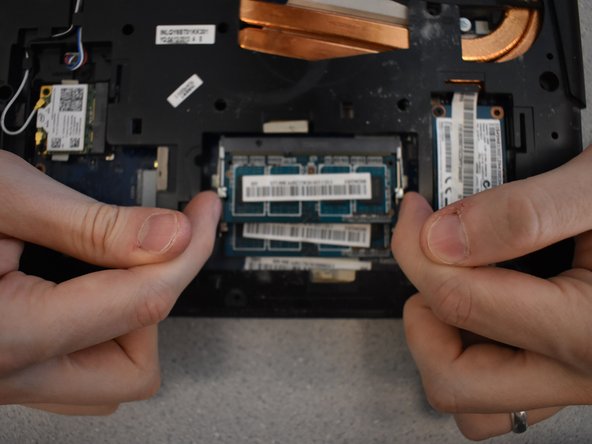
    • To release the DIMM, pull the tabs on either side away from each other simultaneously.

    • The DIMM will pop out on its own.

  10. Lenovo IdeaPad Y500 Keyboard Replacement: Schritt 10, Bild 1 von 3 Lenovo IdeaPad Y500 Keyboard Replacement: Schritt 10, Bild 2 von 3 Lenovo IdeaPad Y500 Keyboard Replacement: Schritt 10, Bild 3 von 3
    • To disconnect the Wi-Fi cables, use a spudger to gently push up under them.

    • Wi-Fi cables are delicate.

  11. Lenovo IdeaPad Y500 Keyboard Replacement: Schritt 11, Bild 1 von 3 Lenovo IdeaPad Y500 Keyboard Replacement: Schritt 11, Bild 2 von 3 Lenovo IdeaPad Y500 Keyboard Replacement: Schritt 11, Bild 3 von 3
    • Using a Phillips #1 screwdriver, remove the two screws.

    • Once screws are out, the card will just pop out.

  12. Lenovo IdeaPad Y500 Keyboard Replacement: Schritt 12, Bild 1 von 1
    • Remove three screws using a Phillips #1 screwdriver.

  13. Lenovo IdeaPad Y500 Keyboard Replacement: Schritt 13, Bild 1 von 3 Lenovo IdeaPad Y500 Keyboard Replacement: Schritt 13, Bild 2 von 3 Lenovo IdeaPad Y500 Keyboard Replacement: Schritt 13, Bild 3 von 3
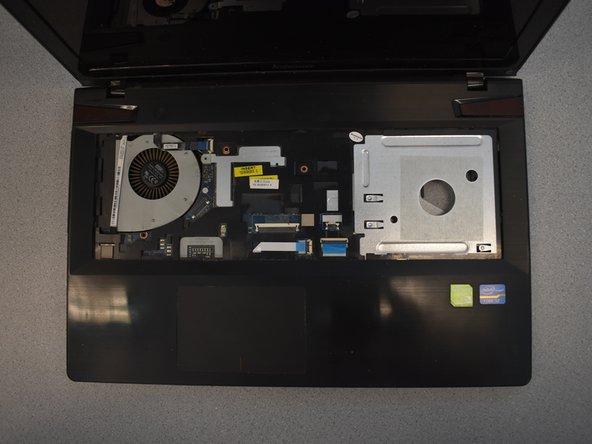
    • With the laptop upside down, open slightly.

    • To remove the keyboard, push the back of the keyboard forward with your thumb while pulling away from the laptop on the other side.

    • You will not be able to pull the keyboard completely away. The cables are still connected to the laptop.

  14. Lenovo IdeaPad Y500 Keyboard Replacement: Schritt 14, Bild 1 von 3 Lenovo IdeaPad Y500 Keyboard Replacement: Schritt 14, Bild 2 von 3 Lenovo IdeaPad Y500 Keyboard Replacement: Schritt 14, Bild 3 von 3
    • To release the cables, use the spudger to push both ends on the side of the cable.

    • Gently pull the cables up to disconnect.

  15. Lenovo IdeaPad Y500 Keyboard Replacement: Schritt 15, Bild 1 von 2 Lenovo IdeaPad Y500 Keyboard Replacement: Schritt 15, Bild 2 von 2
    • Pull the keyboard up and away from the laptop to remove it.

Abschluss

To reassemble your device, follow these instructions in reverse order.

3 weitere Nutzer:innen haben diese Anleitung absolviert.

Team

UW Tacoma, Team S1-G2, Cardinal Spring 2019 Mitglied von UW Tacoma, Team S1-G2, Cardinal Spring 2019

UWT-CARDINAL-S19S1G2

4 Mitglieder

5 Anleitungen geschrieben

Ein Kommentar

Not sure if removing all components was really necessary just to replace the keyboard but I still did it and succeeded in replacing the keyboard. Thank you for great and detailed instructions.

Grzegorz Krugły - Antwort

Kommentar hinzufügen

Seitenaufrufe:

Letzte 24 Stunden: 0

Letzte 7 Tage: 0

Letzte 30 Tage: 8

Insgesamt: 1,970