Zum Hauptinhalt wechseln
Gemeinsam reparieren - Jetzt registrieren

Lenovo Ideapad 320-17IKB Heat Sink Replacement

Was du brauchst

  1. Lenovo Ideapad 320-17IKB Heat Sink Replacement, Back Panel: Schritt 1, Bild 1 von 1
    • Turn off and unplug the computer.

    • Flip the laptop over so that the back panel is facing upwards.

    Frag FixBot
  2. Lenovo Ideapad 320-17IKB Heat Sink Replacement: Schritt 2, Bild 1 von 2 Lenovo Ideapad 320-17IKB Heat Sink Replacement: Schritt 2, Bild 2 von 2
    • Remove fourteen 7mm Phillips #00 screws from the back panel.

    Frag FixBot
  3. Lenovo Ideapad 320-17IKB Heat Sink Replacement: Schritt 3, Bild 1 von 1
    • Carefully remove the optical drive by pulling the bezel away from the laptop.

    Frag FixBot
  4. Lenovo Ideapad 320-17IKB Heat Sink Replacement: Schritt 4, Bild 1 von 2 Lenovo Ideapad 320-17IKB Heat Sink Replacement: Schritt 4, Bild 2 von 2
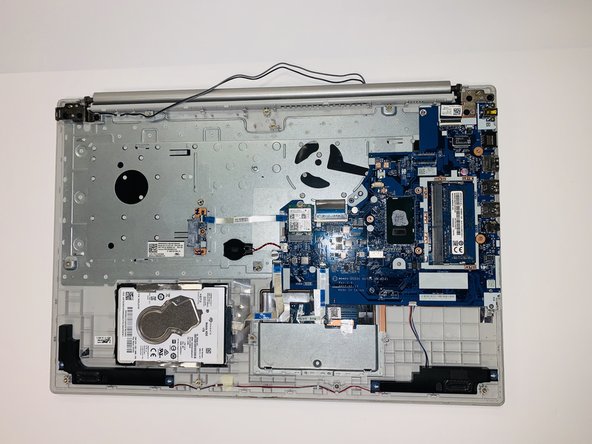
    • Use your fingers or an opening tool to gently remove the back panel from the bottom of the laptop.

    • Lay both sides of the laptop next to each other.

    Frag FixBot
  5. Lenovo Ideapad 320-17IKB Heat Sink Replacement, Battery: Schritt 5, Bild 1 von 2 Lenovo Ideapad 320-17IKB Heat Sink Replacement, Battery: Schritt 5, Bild 2 von 2
    • Remove five 7mm Phillips #0 screws from the battery holder.

    Frag FixBot
  6. Lenovo Ideapad 320-17IKB Heat Sink Replacement: Schritt 6, Bild 1 von 2 Lenovo Ideapad 320-17IKB Heat Sink Replacement: Schritt 6, Bild 2 von 2
    • Pinch the connecting cord with one hand and pry the battery connector with the other hand, while gently pulling the connector straight out and towards the bottom edge of the base.

    • When removing the battery, use care to keep it flat and do not open the battery because it can result in fire or explosion.

    Frag FixBot
  7. Lenovo Ideapad 320-17IKB Heat Sink Replacement, Fan: Schritt 7, Bild 1 von 2 Lenovo Ideapad 320-17IKB Heat Sink Replacement, Fan: Schritt 7, Bild 2 von 2
    • Remove five 7mm Phillips #00 screws from the cooling fan.

    Frag FixBot
  8. Lenovo Ideapad 320-17IKB Heat Sink Replacement: Schritt 8, Bild 1 von 3 Lenovo Ideapad 320-17IKB Heat Sink Replacement: Schritt 8, Bild 2 von 3 Lenovo Ideapad 320-17IKB Heat Sink Replacement: Schritt 8, Bild 3 von 3
    • Gently lift the fan assembly out of the laptop.

    • Gently remove the connecting wires from the exterior of the fan by slowly "weaving" the cord between the ridges of the fan.

    Frag FixBot
  9. Lenovo Ideapad 320-17IKB Heat Sink Replacement, Heat Sink: Schritt 9, Bild 1 von 3 Lenovo Ideapad 320-17IKB Heat Sink Replacement, Heat Sink: Schritt 9, Bild 2 von 3 Lenovo Ideapad 320-17IKB Heat Sink Replacement, Heat Sink: Schritt 9, Bild 3 von 3
    • Gently lift and remove the heat sink and set it aside.

    Frag FixBot
Abschluss

To reassemble your device, follow these instructions in reverse order.

Eine weitere Person hat diese Anleitung absolviert.

Team

iFixit Mitglied von iFixit

Staff

122 Mitglieder

25.805 Anleitungen geschrieben

1 Kommentar zur Anleitung

Guys, did you notice the hole in the heat sink just above the processor? Doesn't it make the heatsink less effective?

Neeraj - Antwort Teilen

Kommentar hinzufügen

Seitenaufrufe:

Letzte 24 Stunden: 1

Letzte 7 Tage: 6

Letzte 30 Tage: 49

Insgesamt: 787