Einleitung
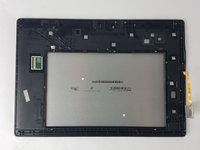
In order to remove the tablet screen, removal of the battery and motherboard is necessary.
Was du brauchst
-
-
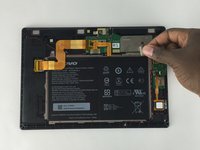
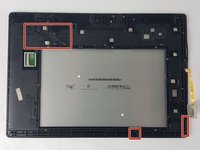
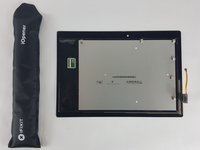
Use a plastic opening tool to pry open the back cover of the tablet.
-
The second picture shows the tablet with the back removed.
-
-
In diesem Schritt verwendetes Werkzeug:Tweezers$4.99
-
Remove the tape that secures the ribbon cable.
-
Use precision tweezers if the tape cannot be removed by hand.
C’est inutile !
Ne pas faire !!
FWIW, my lenovo looks a bit different. I purchased it in the spring of 2019. The battery specs reveal differences too. No biggie…
The unit shown in this fixit session has a 26.6 wh battery while my April 2019 tablet claims only 18.7 wh. My unit’s battery is nearly square and is not held down by the screwed, metal ring shown in your photos.
-
-
-
Carefully remove the ribbon cable from the power button connector.
-
To remove the cable, push the clamp on the connector up and pull gently.
The clamp is on the opposite side of where the cable inserts. It is hinged to pull up vertically to the right toward the cable.
Surtout pas !
The discussed cable doesn’t even exist on my April 2019 Lenovo. Good thing b/c a later comment indicated problems replacing the left side of that cable.
-
-
-
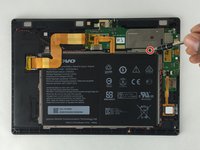
Remove the following screws securing the metal frame holding the battery.
-
Five 2 mm Philips screws.
-
-
-
Remove the grey tape.
-
Unscrew the hidden 2mm screw using the Phillips #000 drill bit.
-
-
-
Remove the second piece of tape from the other ribbon cable connected to the battery.
-
-
-
-
Remove the screws securing the battery connector cover.
-
Two 2mm Phillips screws.
-
-
-
Gently remove the following:
-
Disconnect the battery ribbon cable.
It pulls up vertically and not horizontally.
On my April 2019 model (TB-x104F), there’s no screwed, metal ring. The battery is, instead lightly glued to the plastic base. There are 2 ‘ramps’ in the plastic on what would be the right side of your photo. I moved the unit to my outdoor barbeque in case mangling the lithium battery started a fire. I pushed my largest, flat blade screwdriver down each ramp, taking turns. Gradually I lifted the battery out. It looks curved and probably broken. I took the tablet inside and left the battery in the bbq.
-
-
-
Remove the following screws using the Phillips 000 drill bit.
-
Eleven 4 mm screws
-
-
-
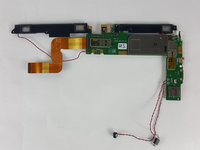
Carefully disconnect the ribbon cable on the motherboard.
-
To remove the cable, push the connector on the clamp up and gently pull.
-
-
-
Disconnect the other end of the motherboard ribbon cable.
-
The other end is attached to the frame of the tablet with adhesive. Gently pry it up to remove it.
-
-
-
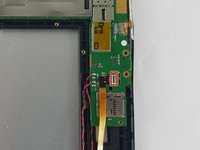
The wire connected to the motherboard can be removed by lifting them from their shown slots.
-
-
-
Remove the pieces of tape attaching the frame of the tablet to the screen
-
Ten pieces of grey tape.
-
-
-
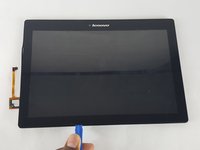
Remove the screen from the frame of the tablet
-
Heat up the adhesive and gently pry the screen away with the plastic opening tool.
-
-
-
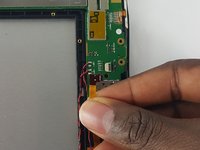
Separate the screen from the digitizer.
-
Heat up the adhesive securing the screen and pry it away using the plastic opening tool.
-


To reassemble your device, follow these instructions in reverse order.
To reassemble your device, follow these instructions in reverse order.
Rückgängig: Ich habe diese Anleitung nicht absolviert.
17 weitere Personen haben diese Anleitung absolviert.
Team

USF Tampa, Team 12-6, Eyestone Spring 2016 Mitglied von USF Tampa, Team 12-6, Eyestone Spring 2016
USFT-EYESTONE-S16S12G6
4 Mitglieder
10 Anleitungen geschrieben
6 Kommentare
how did you keep the digitizer intact?my problem is the lcd screen and I bought only that.too scared to start without knowing how to keep the digitizer intact as it would take weeks before I could replace it.also wondering how to replace the lcd and only that.could you help me please?
Hans Sorensen ,Norway
In my personal opinion, this guide have a bunch of steps that aren't necessary. I just replaced a cracked one. And I just removed the battery for security purposes since I was going to use heat. But you don't have to remove the mother board or anything else, just disconnect the digitizer flex and then start prying on front. That's it.
https://youtu.be/etxKSTK3Gno?t=8m19s
Is that black tape important? I wasn't lucky and it was torn.
How do you calibrate the digitizer afterwards?
Step 11 talks about using a Phillips 000 drill bit, rather than screwdriver, to remove the screws.
If your TB2 is more that three years old, the adhesive securing the digitizer to the plastic body is probably dry and hard. The best tool was the large blade of my Swiss army knife. I had to apply a lot of heat for at least 40 minutes. It was not easy. The blade of the knife also gummed up with the adhesive and I had to clean it regularly with acetone. (Do it outside away from any heath source since acetone is very flammable)
In this situation and looking back at some of the other comments, I think the advice to remove the mother board and all its inputs is the correct way to do it. Applying so much heat to delicate electronic components is for sure not the correct way to do it.
Finally, in my case the screen was very fractured. For safety and hopping to avoid small glass going everywhere, I covered the screen with clear packing tape. That helped to finish the job without injury.
Removing the cover was a struggle (for me, a newbie). Took 10 minutes+. I don’t have a plastic tool and the small screwdriver left marks. But a non-functioning tablet has zero value so …
Frank Harvey - Antwort