Einleitung
This guide will provide step by step instructions on how to replace the battery in your Lenovo Tab 2 A7-20F.
Note: Before removing the battery, make sure that the device is shut down completely and that the charger is disconnected. Make sure that your hands are dry and that you have discharged any built up static charge by touching a good ground source. This will help to avoid damaging any electric components.
Was du brauchst
-
-
Starting at any point along the seam of the case carefully pry it open with the metal spudger, slowly working your way around the outside until the case can come apart.
-
-
-
-
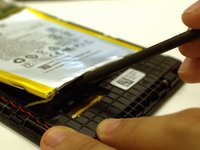
Use the spudger tool to loosen the bond of the adhesive from the double sided tape.
-
Separate the battery from the case.
-


To reassemble your device, follow these instructions in reverse order.
To reassemble your device, follow these instructions in reverse order.
Rückgängig: Ich habe diese Anleitung nicht absolviert.
2 weitere Personen haben diese Anleitung absolviert.
Team

Washington State, Team S5-G111, Phelps-Hillen Fall 2017 Mitglied von Washington State, Team S5-G111, Phelps-Hillen Fall 2017
WSU-PHELPS-HILLEN-F17S5G111
4 Mitglieder
6 Anleitungen geschrieben