Zum Hauptinhalt wechseln

Lenovo ThinkPad X1 Carbon 7th Gen Motherboard Replacement

Was du brauchst

  1. Lenovo ThinkPad X1 Carbon 7th Gen Motherboard Replacement, Back cover removal: Schritt 1, Bild 1 von 2 Lenovo ThinkPad X1 Carbon 7th Gen Motherboard Replacement, Back cover removal: Schritt 1, Bild 2 von 2
    • Use a Phillips #1 screwdriver to loosen the five captive screws securing the back cover.

  2. Lenovo ThinkPad X1 Carbon 7th Gen Motherboard Replacement, Insert an opening pick: Schritt 2, Bild 1 von 3 Lenovo ThinkPad X1 Carbon 7th Gen Motherboard Replacement, Insert an opening pick: Schritt 2, Bild 2 von 3 Lenovo ThinkPad X1 Carbon 7th Gen Motherboard Replacement, Insert an opening pick: Schritt 2, Bild 3 von 3
    • Insert an opening pick at a 45˚ angle between the back cover and frame near the rear middle screw.

    • Pry up on the pick to release the clips securing the back cover to the frame.

    • You will hear several clicks while prying up.

  3. Lenovo ThinkPad X1 Carbon 7th Gen Motherboard Replacement, Remove the back cover: Schritt 3, Bild 1 von 3 Lenovo ThinkPad X1 Carbon 7th Gen Motherboard Replacement, Remove the back cover: Schritt 3, Bild 2 von 3 Lenovo ThinkPad X1 Carbon 7th Gen Motherboard Replacement, Remove the back cover: Schritt 3, Bild 3 von 3
    • Lift the back cover up and remove it from the chassis.

    • You will hear several clicks while lifting up.

    • During reassembly, this is a good point to power on your laptop and test all functions before sealing it up. Be sure to power your laptop back down before you continue working.

  4. Lenovo ThinkPad X1 Carbon 7th Gen Motherboard Replacement, Unfasten the battery: Schritt 4, Bild 1 von 2 Lenovo ThinkPad X1 Carbon 7th Gen Motherboard Replacement, Unfasten the battery: Schritt 4, Bild 2 von 2
    • Use a Phillips #0 screwdriver to remove the six 4.9 mm-long screws securing the battery.

  5. Lenovo ThinkPad X1 Carbon 7th Gen Motherboard Replacement, Remove the battery: Schritt 5, Bild 1 von 3 Lenovo ThinkPad X1 Carbon 7th Gen Motherboard Replacement, Remove the battery: Schritt 5, Bild 2 von 3 Lenovo ThinkPad X1 Carbon 7th Gen Motherboard Replacement, Remove the battery: Schritt 5, Bild 3 von 3
    • Lift the battery straight out of its recess and remove it.

  6. Lenovo ThinkPad X1 Carbon 7th Gen Motherboard Replacement, Motherboard: Schritt 6, Bild 1 von 2 Lenovo ThinkPad X1 Carbon 7th Gen Motherboard Replacement, Motherboard: Schritt 6, Bild 2 von 2
    • Remove the connectors with bar latches by lifting up on the small bar behind the port and pulling the circuit ribbon away from the port.

  7. Lenovo ThinkPad X1 Carbon 7th Gen Motherboard Replacement: Schritt 7, Bild 1 von 3 Lenovo ThinkPad X1 Carbon 7th Gen Motherboard Replacement: Schritt 7, Bild 2 von 3 Lenovo ThinkPad X1 Carbon 7th Gen Motherboard Replacement: Schritt 7, Bild 3 von 3
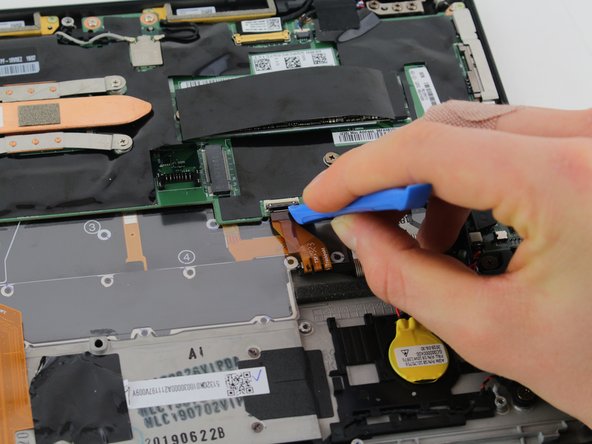
    • Remove the snap connectors by lifting straight up until the connection pops out.

    • Use an opening tool to pry them off if a finger cannot get underneath the connection.

  8. Lenovo ThinkPad X1 Carbon 7th Gen Motherboard Replacement: Schritt 8, Bild 1 von 3 Lenovo ThinkPad X1 Carbon 7th Gen Motherboard Replacement: Schritt 8, Bild 2 von 3 Lenovo ThinkPad X1 Carbon 7th Gen Motherboard Replacement: Schritt 8, Bild 3 von 3
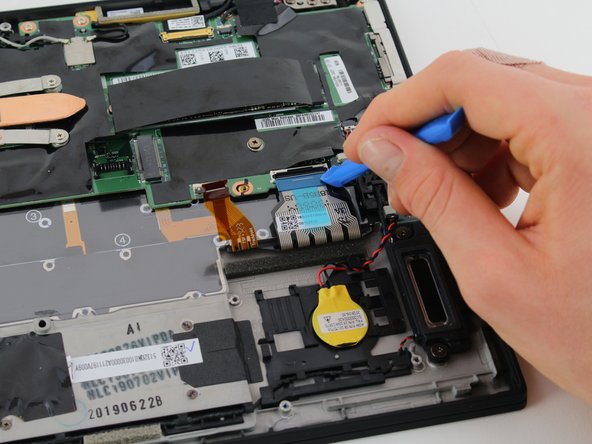
    • Remove the latch connections by lifting the latch up, releasing the circuit ribbon.

    • Use an opening tool to get underneath the latch if a finger cannot.

  9. Lenovo ThinkPad X1 Carbon 7th Gen Motherboard Replacement: Schritt 9, Bild 1 von 1
    • Remove the insert connections by pulling the connector away from the port.

  10. Lenovo ThinkPad X1 Carbon 7th Gen Motherboard Replacement: Schritt 10, Bild 1 von 1
    • Remove the seven 4 mm Phillips #0 screws that hold the motherboard in place

    • Remove the 3 mm Phillips #0 screw located near the fan.

  11. Lenovo ThinkPad X1 Carbon 7th Gen Motherboard Replacement: Schritt 11, Bild 1 von 1
    • Lift the motherboard with the fan still connected straight up and out of the device.

Abschluss

To reassemble your device, follow these instructions in reverse order.

2 weitere Nutzer:innen haben diese Anleitung absolviert.

Hayden Jeanor

Mitglied seit: 01/23/20

511 Reputation

3 Anleitungen geschrieben

Team

Cal Poly, Team S19-G2, White Winter 2020 Mitglied von Cal Poly, Team S19-G2, White Winter 2020

CPSU-WHITE-W20S19G2

4 Mitglieder

20 Anleitungen geschrieben

Ein Kommentar

Do you have this motherboard? I bought this laptop a year ago and It does not power on. If you have any idea on it mail me at biplavraut@gmail.com or any link would be helpful. Thank you in advance.

biplavrautfb - Antwort

Kommentar hinzufügen

Seitenaufrufe:

Letzte 24 Stunden: 3

Letzte 7 Tage: 22

Letzte 30 Tage: 113

Insgesamt: 4,425