Zum Hauptinhalt wechseln

Lenovo ThinkPad X1 Yoga 2nd Generation Pen Charging Port Replacement

Was du brauchst

  1. Lenovo ThinkPad X1 Yoga 2nd Generation Pen Charging Port Replacement, Back Cover: Schritt 1, Bild 1 von 1
    • Ensure the laptop is powered off and the charging cable is disconnected before opening the back cover.

    • Flip over the laptop to access the back cover.

  2. Lenovo ThinkPad X1 Yoga 2nd Generation Pen Charging Port Replacement: Schritt 2, Bild 1 von 2 Lenovo ThinkPad X1 Yoga 2nd Generation Pen Charging Port Replacement: Schritt 2, Bild 2 von 2
    • Use a Phillips #0 screwdriver to remove the eight 8 mm screws.

  3. Lenovo ThinkPad X1 Yoga 2nd Generation Pen Charging Port Replacement: Schritt 3, Bild 1 von 1
    • Remove the back cover.

    • A popping sound may occur when the back cover is removed.

  4. Lenovo ThinkPad X1 Yoga 2nd Generation Pen Charging Port Replacement, Pen Charging Port: Schritt 4, Bild 1 von 1
    • Remove the pen from its slot on the side of the laptop before removing the pen charging port.

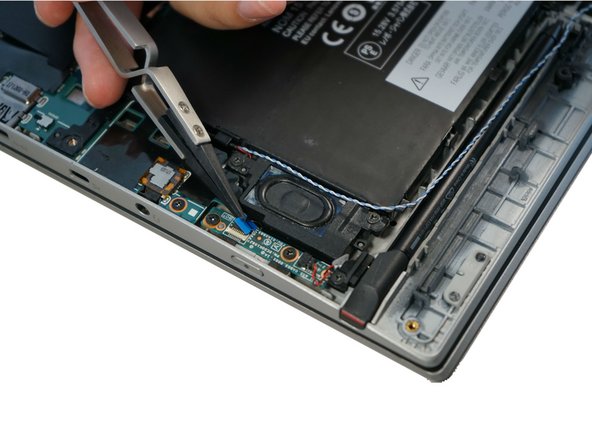
  5. Lenovo ThinkPad X1 Yoga 2nd Generation Pen Charging Port Replacement: Schritt 5, Bild 1 von 2 Lenovo ThinkPad X1 Yoga 2nd Generation Pen Charging Port Replacement: Schritt 5, Bild 2 von 2
    • Lift the tab with a spudger to expose the ribbon cable.

    • Do not use the metal spudger unless if it's for serious prying power. The metal spudger may damage or puncture the internal components in your device, so please use a plastic opening tool or nylon spudger instead.

    • Carefully pull out the ribbon cable using Pro/ESD/Angled tweezers.

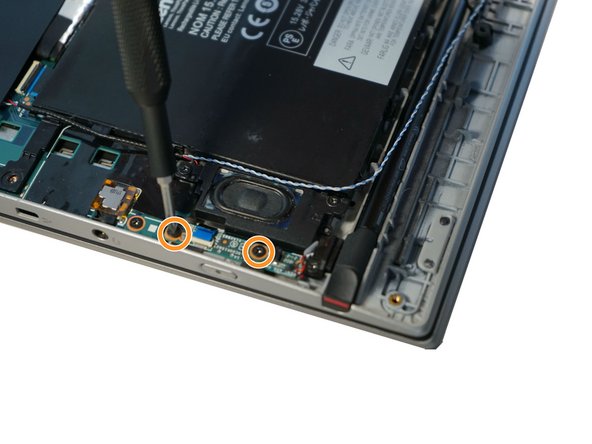
  6. Lenovo ThinkPad X1 Yoga 2nd Generation Pen Charging Port Replacement: Schritt 6, Bild 1 von 2 Lenovo ThinkPad X1 Yoga 2nd Generation Pen Charging Port Replacement: Schritt 6, Bild 2 von 2
    • Disconnect the red and black charger wire from the port on the circuit board.

    • Remove two 4 mm screws using the Phillips #0 screwdriver.

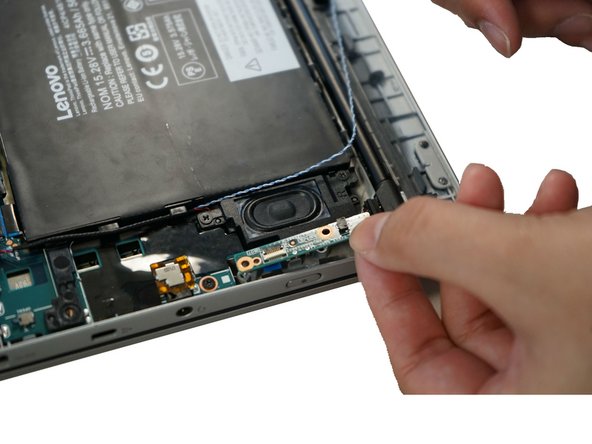
  7. Lenovo ThinkPad X1 Yoga 2nd Generation Pen Charging Port Replacement: Schritt 7, Bild 1 von 1
    • Remove the circuit board by hand.

  8. Lenovo ThinkPad X1 Yoga 2nd Generation Pen Charging Port Replacement: Schritt 8, Bild 1 von 2 Lenovo ThinkPad X1 Yoga 2nd Generation Pen Charging Port Replacement: Schritt 8, Bild 2 von 2
    • Remove a single 6 mm screw from the charging port using the Phillips #0 screwdriver.

    • Remove the black charging port using your fingers.

Abschluss

To reassemble your device, follow these instructions in reverse order.

Katrina Lee

Mitglied seit: 02/10/20

154 Reputation

1 Anleitung geschrieben

Team

Cal Poly, Team S22-G3, Regan Winter 2020 Mitglied von Cal Poly, Team S22-G3, Regan Winter 2020

CPSU-REGAN-W20S22G3

5 Mitglieder

7 Anleitungen geschrieben

0 Kommentare

Kommentar hinzufügen

Seitenaufrufe:

Letzte 24 Stunden: 0

Letzte 7 Tage: 4

Letzte 30 Tage: 20

Insgesamt: 2,101