Zum Hauptinhalt wechseln

Lenovo Vibe Z2 Pro Battery Replacement

Was du brauchst

  1. Lenovo Vibe Z2 Pro Battery Replacement, Lenovo Vibe Z2 Pro Backplate Disassembly: Schritt 1, Bild 1 von 2 Lenovo Vibe Z2 Pro Battery Replacement, Lenovo Vibe Z2 Pro Backplate Disassembly: Schritt 1, Bild 2 von 2
    • Remove the 4.9 mm torx head screws located on the camera plate on the back of the phone

  2. Lenovo Vibe Z2 Pro Battery Replacement: Schritt 2, Bild 1 von 1
    • Remove the 3.65 mm Torx head screws at the bottom of the phone.

  3. Lenovo Vibe Z2 Pro Battery Replacement: Schritt 3, Bild 1 von 2 Lenovo Vibe Z2 Pro Battery Replacement: Schritt 3, Bild 2 von 2
    • Remove the SIM card tray by pushing a pin into the hole on the side of the phone.

  4. Lenovo Vibe Z2 Pro Battery Replacement: Schritt 4, Bild 1 von 2 Lenovo Vibe Z2 Pro Battery Replacement: Schritt 4, Bild 2 von 2
    • Push the Spudger along the gap between the phone and the backplate to separate them.

  5. Lenovo Vibe Z2 Pro Battery Replacement: Schritt 5, Bild 1 von 1
    • Carefully pull the backplate away from the phone.

  6. Lenovo Vibe Z2 Pro Battery Replacement, Battery: Schritt 6, Bild 1 von 2 Lenovo Vibe Z2 Pro Battery Replacement, Battery: Schritt 6, Bild 2 von 2
    • Peel away protective the film using your hands.

  7. Lenovo Vibe Z2 Pro Battery Replacement: Schritt 7, Bild 1 von 2 Lenovo Vibe Z2 Pro Battery Replacement: Schritt 7, Bild 2 von 2
    • Remove any adhesive strips holding the battery in place gently using a fingernail or spudger.

    • The regular black nylon spudger should be used whenever possible, especially around batteries.

  8. Lenovo Vibe Z2 Pro Battery Replacement: Schritt 8, Bild 1 von 1
    • Disconnect the orange battery ribbon cable by gently lifting with a spudger.

  9. Lenovo Vibe Z2 Pro Battery Replacement: Schritt 9, Bild 1 von 3 Lenovo Vibe Z2 Pro Battery Replacement: Schritt 9, Bild 2 von 3 Lenovo Vibe Z2 Pro Battery Replacement: Schritt 9, Bild 3 von 3
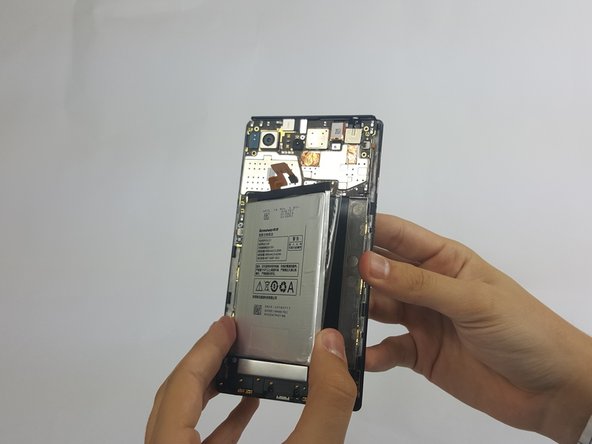
    • Insert a fingernail or spudger into either side of the battery and lift upward.

    • Remove the battery from phone.

Abschluss

To reassemble your device, follow these instructions in reverse order.

4 weitere Nutzer:innen haben diese Anleitung absolviert.

Team

USF Tampa, Team 18-3, Blackwell Fall 2016 Mitglied von USF Tampa, Team 18-3, Blackwell Fall 2016

USFT-BLACKWELL-F16S18G3

4 Mitglieder

12 Anleitungen geschrieben

2 Kommentare

Where to buy such battery?

Damir Dominko - Antwort

wala pa po ba dito s pinas ng bl230?

eduardo santos - Antwort

Kommentar hinzufügen

Seitenaufrufe:

Letzte 24 Stunden: 0

Letzte 7 Tage: 3

Letzte 30 Tage: 9

Insgesamt: 3,352