Einleitung
Follow this guide to replace or remove the right fan in your Lenovo YOGA 730-15IKB. The fans in a laptop draw air over the components which allows them to stay cool and last longer.
If your fans are noisy or create a high-pitched whining noise, they may need to be replaced. You can also try blowing compressed air into the fan to remove any built-up dust that may be slowing it down.
Was du brauchst
-
-
Flip the laptop over so you can see the underside.
-
Remove the ten 7mm T5 Torx screws.
-
-
-
Pry up the bottom cover with an opening tool.
-
Start at the front edge of the cover and make your way along the sides.
-
-
-
-
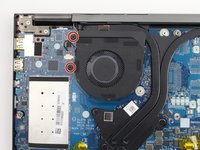
Disconnect the fan cable. Pull the wire toward the back of the laptop while wiggling to loosen the connection.
-
You can also use the white tabs on the connector to push the cable free.
-


To reassemble your device, follow these instructions in reverse order.
To reassemble your device, follow these instructions in reverse order.
Rückgängig: Ich habe diese Anleitung nicht absolviert.
Eine weitere Person hat diese Anleitung absolviert.
Team

Cal Poly, Team S1-G6, White Winter 2020 Mitglied von Cal Poly, Team S1-G6, White Winter 2020
CPSU-WHITE-W20S1G6
3 Mitglieder
27 Anleitungen geschrieben