Zum Hauptinhalt wechseln

Lenovo Yoga 720 Wireless Adapter Replacement

Was du brauchst

  1. Lenovo Yoga 720 Wireless Adapter Replacement, Bottom Cover: Schritt 1, Bild 1 von 3 Lenovo Yoga 720 Wireless Adapter Replacement, Bottom Cover: Schritt 1, Bild 2 von 3 Lenovo Yoga 720 Wireless Adapter Replacement, Bottom Cover: Schritt 1, Bild 3 von 3
    In diesem Schritt verwendetes Werkzeug:
    T5 Torx Screwdriver
    $5.49
    Kaufen
    • Before you begin, be sure to turn off your laptop and discharge the battery down to 25%.

    • Start by flipping the device over so that you see the screws.

    • Remove seven Torx T5 short screws.

    • Remove three Torx T5 long screws.

  2. Lenovo Yoga 720 Wireless Adapter Replacement: Schritt 2, Bild 1 von 3 Lenovo Yoga 720 Wireless Adapter Replacement: Schritt 2, Bild 2 von 3 Lenovo Yoga 720 Wireless Adapter Replacement: Schritt 2, Bild 3 von 3
    In diesem Schritt verwendetes Werkzeug:
    iFixit Opening Tool
    $1.99
    Kaufen
    • Starting from the USB port, use your opening tool to gently pry up the case.

    • Make sure you are prying on the cover itself, not the metal shield around the USB port.

    • Pry along the laptop in the order shown by the arrows.

    • Do NOT pry along the top side, or you risk damaging the casing. Stay with the arrows.

  3. Lenovo Yoga 720 Wireless Adapter Replacement: Schritt 3, Bild 1 von 3 Lenovo Yoga 720 Wireless Adapter Replacement: Schritt 3, Bild 2 von 3 Lenovo Yoga 720 Wireless Adapter Replacement: Schritt 3, Bild 3 von 3
    • Lift the case from the bottom side. NOT the side with the hinges.

    • When you feel resistance, do NOT keep lifting or you will damage the housing.

    • Once you feel resistance, gently pull the case towards you. (away from the hinges.)

    • Remove the case.

  4. Lenovo Yoga 720 Wireless Adapter Replacement, Battery: Schritt 4, Bild 1 von 3 Lenovo Yoga 720 Wireless Adapter Replacement, Battery: Schritt 4, Bild 2 von 3 Lenovo Yoga 720 Wireless Adapter Replacement, Battery: Schritt 4, Bild 3 von 3
    In diesem Schritt verwendetes Werkzeug:
    JIS Driver Set
    $19.99
    Kaufen
    • This is the battery. For guides that are for other parts, the battery is removed for the reason of it being a pain to connect or disconnect while screwed in.

    • Be careful not to short anything on the motherboard, as the battery cannot be disconnected before removal.

    • Remove four J1 Philips screws.

    • Remove one J1 philips screw.

    • Do not mix these screws up. If you put the longer screw where the shorter screw belongs, you will damage the shield around the keyboard.

    • Lift the battery slightly using your plastic opening tool.

    • Do not lift the battery out all the way, as it is still connected to the motherboard.

    • Do NOT puncture or deform the battery or it may catch fire or even explode.

  5. Lenovo Yoga 720 Wireless Adapter Replacement: Schritt 5, Bild 1 von 3 Lenovo Yoga 720 Wireless Adapter Replacement: Schritt 5, Bild 2 von 3 Lenovo Yoga 720 Wireless Adapter Replacement: Schritt 5, Bild 3 von 3
    • Pull the battery towards you until the wire is accessible.

    • gently tug and wiggle on the wire until it pops out.

    • Remove the battery.

  6. Lenovo Yoga 720 Wireless Adapter Replacement, Wireless Adapter: Schritt 6, Bild 1 von 2 Lenovo Yoga 720 Wireless Adapter Replacement, Wireless Adapter: Schritt 6, Bild 2 von 2
    In diesem Schritt verwendetes Werkzeug:
    Tweezers
    $3.99
    Kaufen
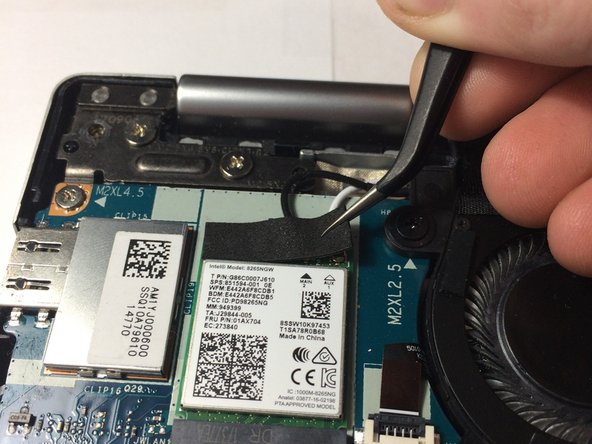
    • This is the wireless adapter.

    • Using tweezers, remove the fuzzy tape.

  7. Lenovo Yoga 720 Wireless Adapter Replacement: Schritt 7, Bild 1 von 3 Lenovo Yoga 720 Wireless Adapter Replacement: Schritt 7, Bild 2 von 3 Lenovo Yoga 720 Wireless Adapter Replacement: Schritt 7, Bild 3 von 3
    In diesem Schritt verwendetes Werkzeug:
    JIS Driver Set
    $19.99
    Kaufen
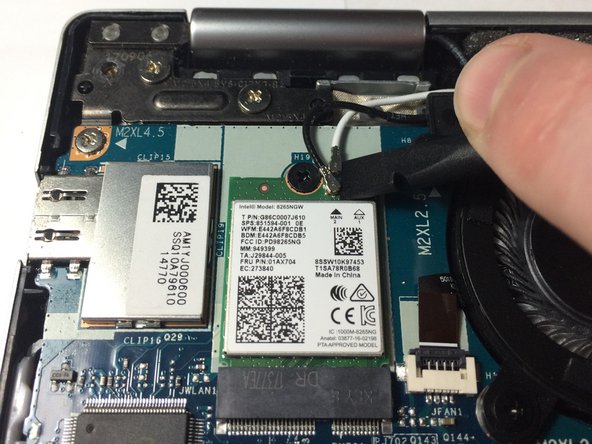
    • Remove the white and black antenna cables using a spudger.

    • Move any cables in the way out of the way.

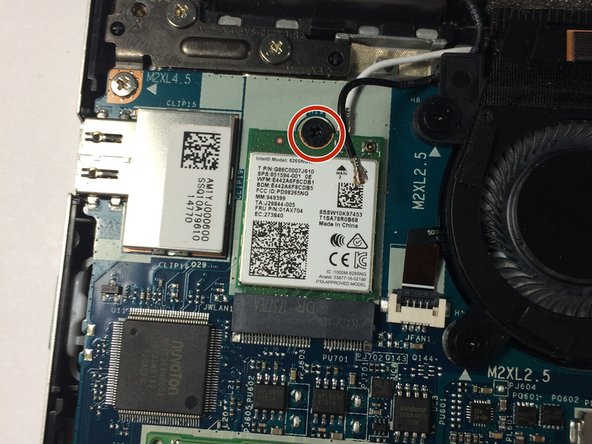
    • Remove one JIS1 screw holding the wireless card in place.

  8. Lenovo Yoga 720 Wireless Adapter Replacement: Schritt 8, Bild 1 von 1
    • Gently pull out the wireless card.

Abschluss

To reassemble your device, follow these instructions in reverse order.

5 weitere Nutzer:innen haben diese Anleitung absolviert.

Aiden

Mitglied seit: 09/19/15

17.369 Reputation

21 Anleitungen geschrieben

2 Kommentare

Just for the record: a 1730Mbps Wireless 9260NGW Wifi Network Card For Intel 9260 Dual Band NGFF 2x2 802.11ac Wifi Bluetooth 5.0 will work for a Yoga 720 13IKB and will add Bluetooth 5.1 to your device :)

Jeho - Antwort

Just wanted to add I just swapped my 720-13IKB’s wifi module for a Intel AX200 (Only version i could buy was in a “desktop kit”)

and it worked out of the box! AX201 / AX210 or newer are a different kind of m.2 wifi and wont work with the 720 13IKB according to reddit.

Now I’m easily getting 350 down on my 5Ghz 40HT (Wifi6 WPA3) network!, Old card didn’t support my new WPA3 wifi and could only get 100ish down.

Sven - Antwort

Kommentar hinzufügen

Seitenaufrufe:

Letzte 24 Stunden: 0

Letzte 7 Tage: 1

Letzte 30 Tage: 21

Insgesamt: 5,793