Zum Hauptinhalt wechseln

Lenovo Yoga 720-15IKB Speaker Replacement

Archivierte Anleitung
Diese Anleitung wurde ausschließlich für historische Zwecke erhalten. Verwende die aktualisierte Version dieser Anleitung, um deine Reparatur durchzuführen.

Was du brauchst

  1. Lenovo Yoga 720-15IKB Speaker Replacement, Bottom Cover: Schritt 1, Bild 1 von 2 Lenovo Yoga 720-15IKB Speaker Replacement, Bottom Cover: Schritt 1, Bild 2 von 2
    • Start by flipping the device over so that you see the screws.

    • Remove the 7 T5 short screws.

    • Remove the 3 long T5 screws.

  2. Lenovo Yoga 720-15IKB Speaker Replacement: Schritt 2, Bild 1 von 2 Lenovo Yoga 720-15IKB Speaker Replacement: Schritt 2, Bild 2 von 2
    • Starting at the left USB port use you opening tool to gently pry up the bottom case.

    • Make sure you are prying on the cover itself, not the metal shield around the USB port.

    • Pry along the laptop's edge as shown by the arrows.

    • Do NOT pry along the top side, or you will damage the casing. Stay with the arrows.

  3. Lenovo Yoga 720-15IKB Speaker Replacement: Schritt 3, Bild 1 von 1
    • Lift the case from the bottom side. NOT the side with the hinges.

    • When you feel resistance, do NOT keep lifting or you will damage the housing.

    • Once you feel resistance, gently pull the case towards you. (away from the hinges.)

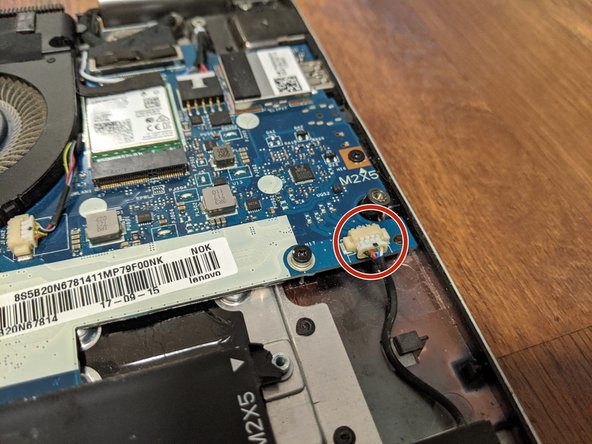
    • Remove the bottom case.

    • Unplug the battery connector

  4. Lenovo Yoga 720-15IKB Speaker Replacement, Unplug Speaker cable: Schritt 5, Bild 1 von 2 Lenovo Yoga 720-15IKB Speaker Replacement, Unplug Speaker cable: Schritt 5, Bild 2 von 2
    • Unplug the speaker cable.

Abschluss

To reassemble your device, follow these instructions in reverse order.

dkay

Mitglied seit: 01/05/20

226 Reputation

2 Anleitungen geschrieben

0 Kommentare

Kommentar hinzufügen

Seitenaufrufe:

Letzte 24 Stunden: 0

Letzte 7 Tage: 1

Letzte 30 Tage: 1

Insgesamt: 67